Engagement and Networking
Breakdown of the features and opportunities to facilitate engagement and networking before, during and after your event.
- Session Options
- Session Chat
- Session Q&A
- Live Polling
- Event Game / Challenges
- Attendee Networking
- 1-2-1 Video Calls
- Activity Feed
- Alerts and Notifications
- Smart Sessions
- Browser Requirements
- Setting up a Networking Room in the CMS
- Linking your room to an Agenda session & Joining a room
- Live Streams & Videos
- Joining a room
- Clearing Users and Chats in a Room Through CMS
- Inactivity
- Media Permissions
- Smart Session Features Table
- Zoom breakouts user experience
- NEW CrowdComms Video Breakouts
- Wordclouds
Session Options
Depending on your content requirements you may opt for different methods of delivering a specific session. Below we have outlined the most common types of sessions and options to manage these.
Live streamed session
This is the most common approach to delivering sessions on the CrowdComms platform. The session is broadcast live with the speaker delivering content in real time with production applied to ensure the output is of a high quality.
In order to get to this output, CrowdComms production team will work with you pre event to agree on the branded templates and speaker positioning on the live stream output. In addition we work collaboratively with you on the running order to ensure everything is agreed in advance and the allocated streaming technician shows content or engagement results at the appropriate time.
Please note: External production company can mange these type of sessions and stream seamlessly into the CrowdComms platform if this is the preference.
Key points:
- Production manager works with you in advance to agree on how to display all aspects of the session including branding, where speakers appear, how content and engagement results are displayed.
- Streaming technician required who is responsible for manage the transitions of your session providing experienced technical management of the session. This can be managed by CrowdComms or external production company.
- High quality output for remote users to watch and engage in real time.
- Session engagement from live chat, Q&A, live polling.
- Additional user features include providing feedback and making notes.
- Gamification challenges can be linked to the content to ensure users have to watch, pay attention and be awarded points for answering content related questions.
- Live streamed sessions can be made on demand for post event viewing. These will be available for watching again in the format they were streamed live unless you opt to edit the recording before making on demand. Please note if you prefer not to make these on demand this is also an option.
Output for remote users:

Pre recorded also known as an on demand session
In essence this is the same as a live stream session except for one key difference, rather than the content being streamed in real time, it will be recorded in advance and made available to watch at any given time by users on the platform.
Key points:
- Requires you to manage the pre records or opt for our technicians or external production company to mange the pre records.
- Provides the opportunity to perfect the content with multiple takes ensuring the recorded content you share on the platform is of the highest standard possible.
- Session chat can be used for engagement with the speaker responding in the chat thread. Feedback and notes also available for user engagement with the on demand session.
- Live polling and Q&A are not suited for on demand sessions as the speaker needs to be live streamed in order to respond and engage with these features.
- Gamification challenges can be linked to the content to ensure users have to watch, pay attention and be awarded points for answering content related questions.

Simu-live: Combination of pre recorded and live content
Giving you the best of both worlds; pre record your content to ensure its perfect and live stream your speaker(s) at the appropriate time to engage with the remote audience through live polling and Q&A. When you stream your speaker for the live engagement, ensure they sit in the same location and wear the same clothes as they did on the pre recorded section to ensure the session flows seamlessly between the pre recorded sections and live sections.
Key points:
- Requires you to manage the pre records or opt for our technicians or external production company to mange the pre records.
- In addition to the pre recording, we can manage the live component including one of our production managers working with you in the lead up to your event agreeing on how to display all aspects of the live streamed content including branding, where speakers appear, how content and engagement results are displayed.
- Streaming technician required who is responsible for manage the transitions of your live streamed content providing experienced technical management of the session. This can be managed by CrowdComms or external production company.
- Provides the opportunity to perfect the content by recording in advance with multiple takes where needed. Combined with still benefiting from live engagement with your remote audience
- Session engagement from live chat, Q&A, live polling.
- Additional user features include providing feedback and making notes.
- Gamification challenges can be linked to the content to ensure users have to watch, pay attention and be awarded points for answering content related questions.
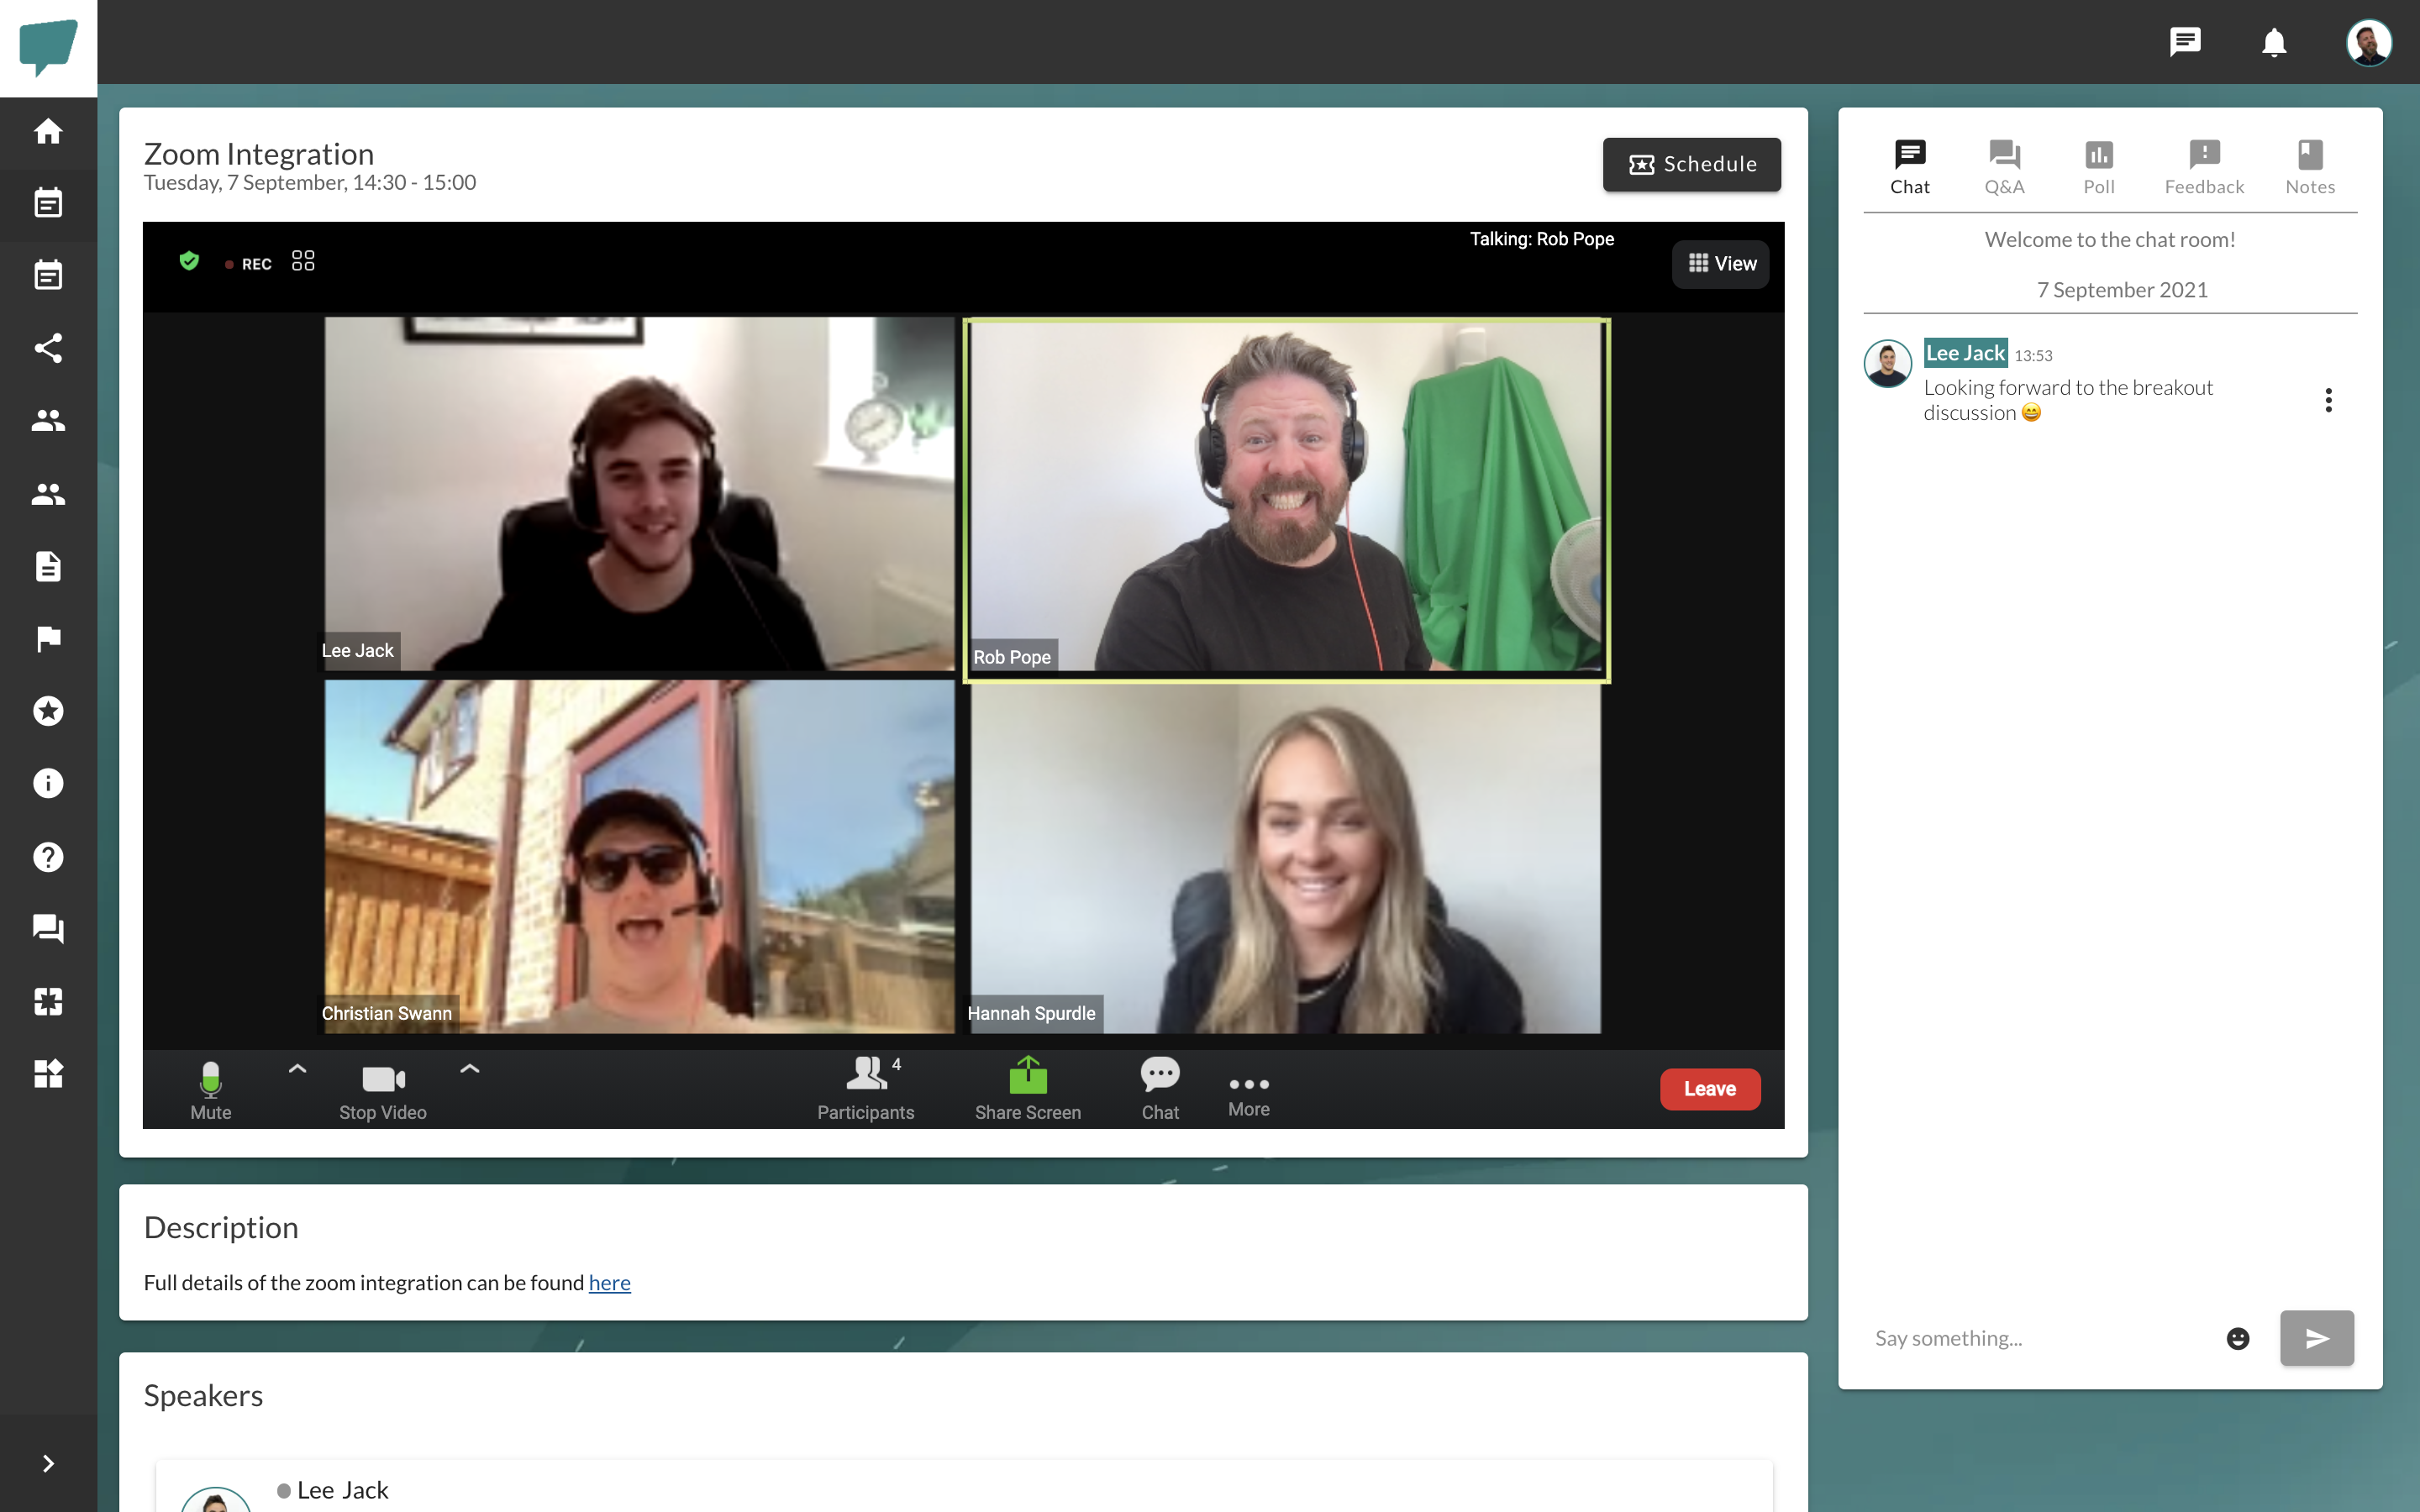
Zoom Integration
Integrate your zoom account to include zoom meetings within the CrowdComms platform. Zoom functionality works seamlessly within the platform and users are not required to download zoom.
Key points:
- Requires you to have your own Zoom account which is integrated with the CrowdComms platform - Read more
- Zoom functionality is available within the framework of the CrowdComms platform
- No need for users to download Zoom
- Limited reporting, only the data that is available from Zoom
- Self managed rooms, CrowdComms are not involved with the delivery of these type of sessions as the session itself is ran through Zoom
- Typically used for breakouts and discussion sessions however Zoom webinars can also be integrated in the same way.

CrowdComms round table feature
Open conversation / discussion rooms that allow all users to have equal rights to discuss a topic and share screen. Limited functionality, where allocated hosts are required along with other features such as chat, we recommend using the Zoom integration.
- Branded discussion rooms that are part of the CrowdComms platform
- All users invited have equal permissions to share screen
- Full details listed here
- Typically used for open conversation / round table style breakouts with small user numbers
- These type of sessions are self managed and CrowdComms resource(s) do not join the session.

Link out to external video conferencing solution
If you prefer to use another video conferencing solution such as Teams to run your breakouts, you can include a branded 'Join meeting' or similar button in the session description. When clicked by users, this will open your video conference solution of choice in a new tab.

Session Chat
Overview
- Live chat feed linked to sessions in the agenda.
- Users can add their message within the chat section before, during and after the session finishes.
- Interface includes when chat messages were sent by date and time.
- Works great for live feedback and to gauge how the audience is feeling and what their thoughts are around the session.
- Speakers or admins can engage with the chat feed however we recommend using the live Q&A feature or live polling for direct engagement with the remote audience.
- Chat section is enabled or disabled with simple toggle on / off option in the CrowdComms dashboard (CMS)
- CrowdComms Staff can remove unwanted messages from the chat feed and, if necessary, remove a user from th app.


Session Q&A
Overview
- Allow the audience to ask questions in the lead up and during your session(s).
- Moderation to control what questions are sent to speaker(s) and / or control the questions that appear on the live stream.
- Ability to edit questions before they are sent to speakers.
- Users have the option to vote up their favourite questions once they've been approved by moderation.
- Most popular questions will appear at the top of speaker view and the main live stream view. This allows your speakers to focus their attention on the most popular questions at the allocated time.
- You retain record of all questions asked, giving you the opportunity to distribute answers post event if desired.
- Option to keep questions anonymous or show users name and company next to the question(s) they have asked.
Platform interface, user experience:


Moderation for admins:
Moderation is accessible via URL for remote control. Simple toggle on / off to approve or hide questions once answered.

Speaker view:
Speaker view is accessible via URL. Typically loaded on second comfort screen or iPad to allow speakers to quickly see the approved questions at appropriate time.

Reporting
The Questions report includes breakdown of all questions submitted and number of likes / vote ups each question received. Shows which session the question is related too and who asked the question. Option to create this report with anonymous responses.
*This data is available in real time and can be exported from the CMS at any time up to six months post event.

Live Polling
Overview
- Live polling allows real time engagement between your speaker(s) presenting and the audience.
- Create slides into the speaker presentation deck with the polling question and possible answers.
- These polls are replicated on the CrowdComms platform and at the relevant time are made live for users to vote.
- Live poll results can be captured and displayed when the speaker is ready to review or shown on the live stream with the results updating as votes are submitted.
- Common use cases are knowledge check to ensure the audience are paying attention or to get the audiences opinion on an upcoming discussion piece.
- Live polls includes a multiple choice question where you determine whether users can vote once, can change their vote after submitting a vote or give the ability to vote multiple times.
- Live polling results are customisable to replicate your event branding and include sponsor logo's where appropriate.
- Link live polling to an event game by awarding points for each time a user takes part in a live poll or if they get a live poll correct.
- You can include as many polls as you wish however we recommend limiting the number per session to no more than three (3) live polls. The reason is the speaker has to introduce the poll and take time to expand on the results, value is added through this engagement with the speaker addressing the poll as much as the data captured. You therefore need to allow at least 1 minute for each live poll question.


Live Display
Present the real time results to the main screen. You can customise these in advance, showcasing your event brand or any event sponsors. Change the live display branding from session to session if required. The live display is simply a live web link and can be shown to screen by your AV team or our onsite team using a switch unit to seamlessly transition between the powerpoint slides and live polling results as and when needed.

Simple admin controls
Our live polling is designed to empower you or your AV team to self manage with ease. If you prefer for us to be onsite and take care of session engagement, chat to your Account Manger and we'll be happy to help.

Reporting
Option to review the branded results for all live polling questions on the CrowdComms dashboard (CMS) up to six months post event. Screenshots can be taken by admins from the CMS of these branded results.
A live polling report avaialble for download includes breakdown of all polling responses including which session the live poll is related too, who responded to each live poll and how they responded. Option to create this report with anonymous responses.
Please note: This data is available in real time and can be downloaded from the CMS at any time up to six months post event.

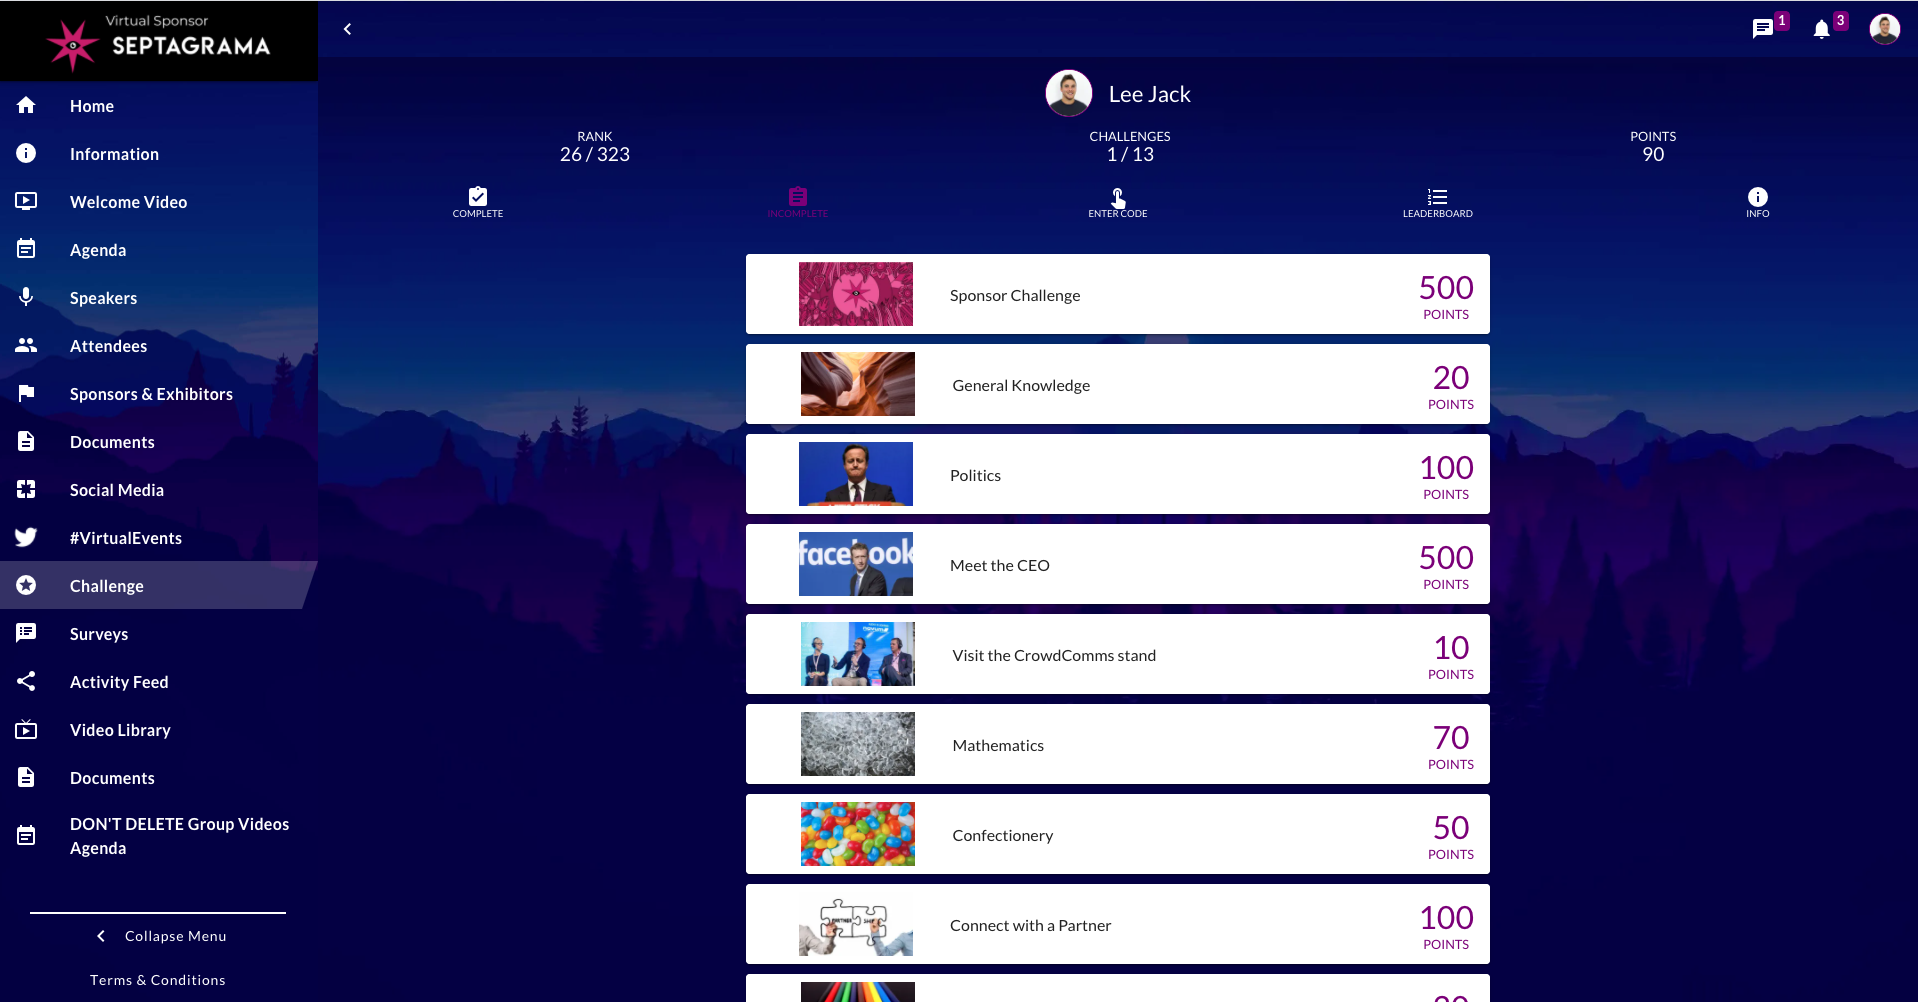
Event Game / Challenges
Overview
- Create an event game where you create challenges and award points to incentivise desirable user actions.
- Include pre, during and post event challenges to continually drive engagement.
- Include prize(s) for the winner or top 3 participants to further incentivise uptake and engagement.
- Live leaderboard shows who's winning and adds extra motivation with real time updates resulting in users position on the leaderboard changing throughout the event.
- Manually award or remove points from users for engagement in workshops and breakouts or for other good / bad behaviour!
- Two challenge types, automated and custom which are outlined in more detail below.
Game Interface
Automated Challenges
- Automatically award points for specific actions in the platform. These automated triggers are setup on the CrowdComms dashboard (CMS).
- Pre event challenges:
- Update profile picture and receive X points
- Complete multiple choice survey or quiz with X points for each question completed or answered correctly
- Session engagement challenges:
- Take part in live poll question and receive X points
- Answer a live poll question correctly and receive X points
- Complete session feedback and receive X points
- Enter code included on powerpoint slide and receive X points
Points awarded upon completing the automated challenges and live leaderboard updates

Custom Challenges
- Create custom challenges requiring users to type the correct answer or passcode to receive allocated number of points.
- Limit number of attempts to increase difficulty.
- Creativity is required to tie this into your specific event requirements. Examples below will give an idea of how this can work.
- Sponsor challenge: Go to Sponsor page and find out what their new product is called. X points for entering name of new product.
- Session challenge: Watch session starting at 9am and confirm what the primary aim for 2021 is. X points for entering the primary aim for 2021.
- Networking challenge: Each attendee has provided a unique piece of information as part of their registration. Use the 1-2-1 chat or start a 1-2-1 video call with other attendees and find out their unique answer. Enter this into the 'Enter code' section to win X points per unique answer submitted.

Attendee Networking
Overview
In this section, we'll outline the various options to facilitate and encourage networking.
We recommend promoting the platform at least one (1) week before your first event show day to allow attendees to begin networking with each up during the lead up to the event. The networking continues throughout the event and post event.
Login and opt-in options
- On first login, users will be required to accept the terms of service and opt in or out of appearing in the attendee section, being contactable through 1-2-1 chat messaging or 1-2-1 video calls.
- View security settings and login options

Update Profile Picture
- Attendee details can be transferred from registration however it's often preferable to include the minimum detail to begin with; First name, Last Name and Email address.
- Email address is only used for the purposes of identifying the attendee and is not visible to other attendee unless the user specifically chooses to share their email address.
- Attendees have the chance to update their profile including adding profile picture, bio, social media links and updating any custom fields you choose to add to the people section as part of platform setup.
- Integrate the profile update into the event game by awarding points for this action. Encourage attendees to update their profile to be awarded X points as part of the promotion. Read more about event game options

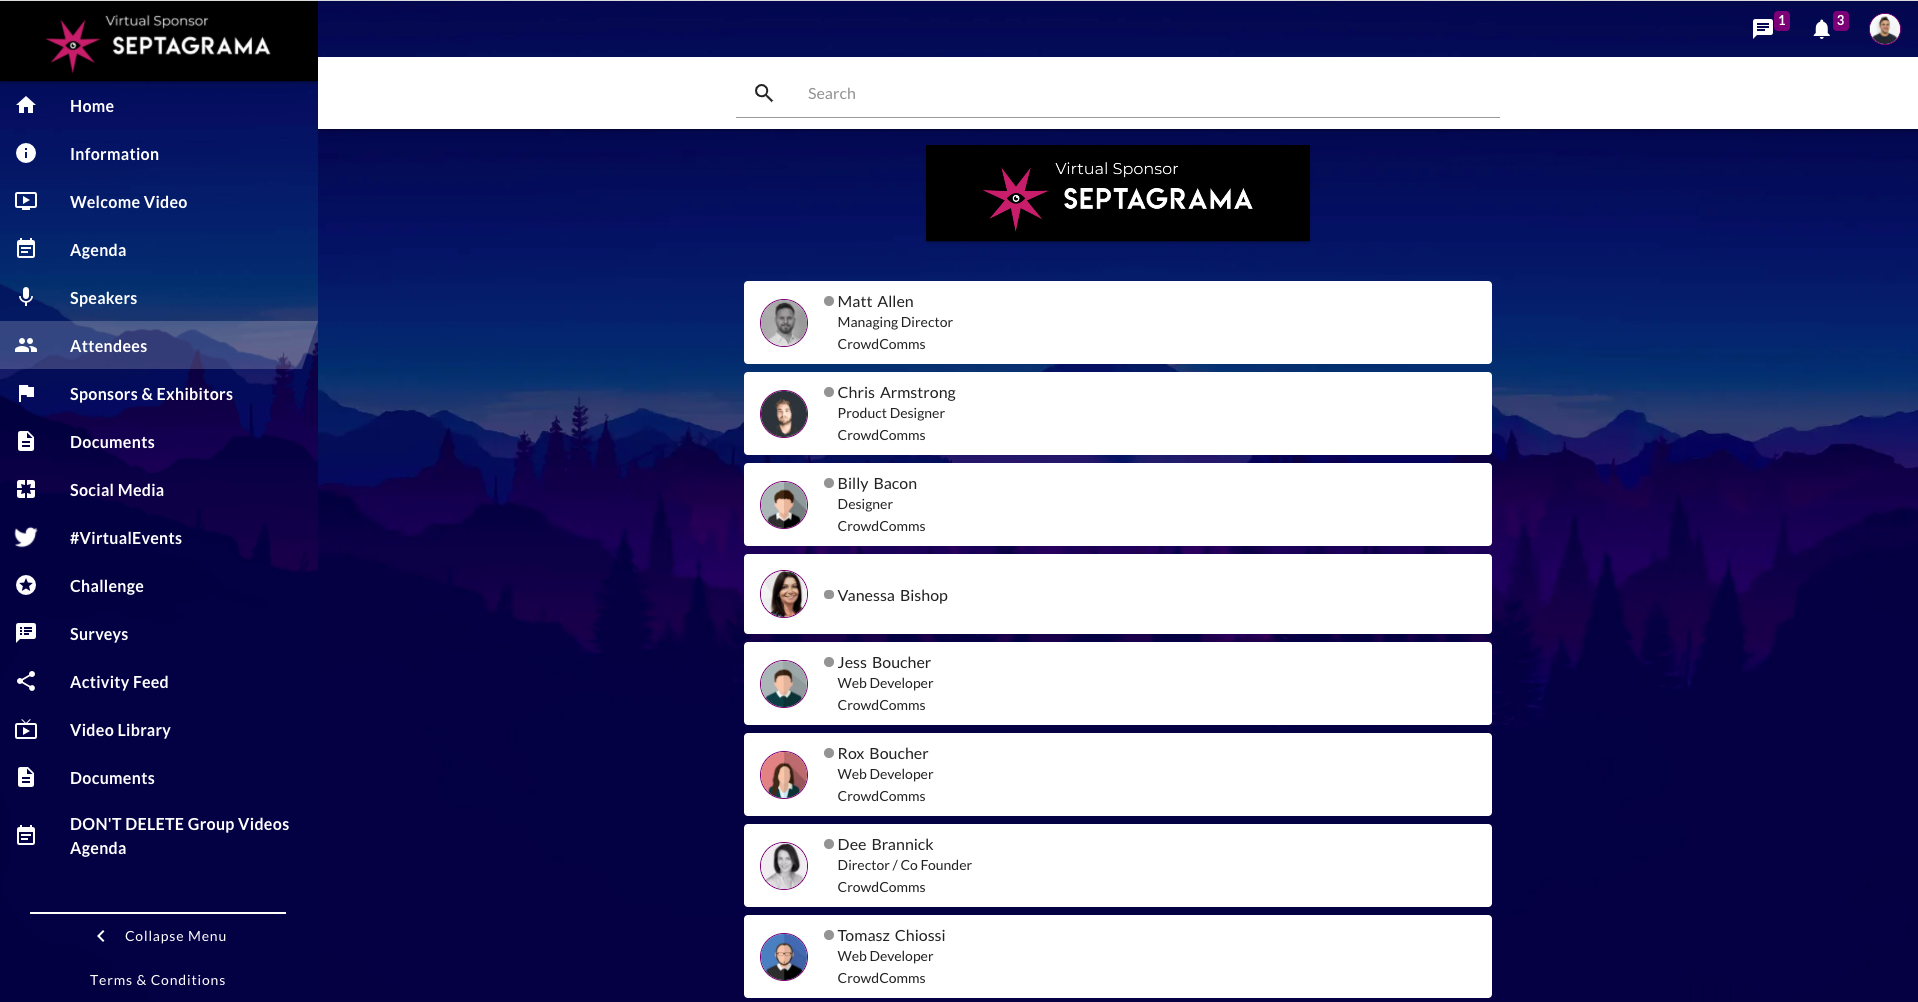
Attendee List
- Attendee list will include all users that you have added to the attendee group and who chose to opt-in to be visible in the platform.
- Search functionality allows users to search by name or key word including any of the information on other attendee profiles i.e. job title, company. This enables users to quickly find like minded people to network with.
List view with search functionality:
User profile once selected from list:

Private 1-2-1 Chat
- Once a user selects an attendee they are interested in, they will be able to connect via social media and / or send private chat messages.
- This level of networking is dependant on the other user having chosen to opt-in to chat messaging and updating their profile with social media links.
- Upon receiving a chat message, users receive a notification to the chat icon to the top right of the platform.
- If a users is not currently logged in, they will receive an email referencing that they've received a message in the platform and option to click through to see contents of the message.
Privat 1-2-1 chat view:

User view of their current 1-2-1 chat threads:

Encrypted 1-2-1 Video Call
- Starting a video call is the same process as sending a chat message. Users have option to search the attendee list and select the attendee you wish to network with providing the chosen to opt-in to the relevant feature.
- In the attendee list view includes online / offline indicators showing who is available to be contacted via video call.
- Upon sending a video call request, the other attendee will receive a pop up which they can accept, decline or block user from contacting them again.
- If an attendee accepts the video call, a new window will open pulling through the platform branding and both users will appear on screen similar to other video conference solutions.
- Screen share options allow both users to present where appropriate.
- Please note: 1-2-1 video calls are not included in standard package.
Incoming video call:

Upon accepted video call request:

Click join call to move into the 1-2-1 encrypted video call:


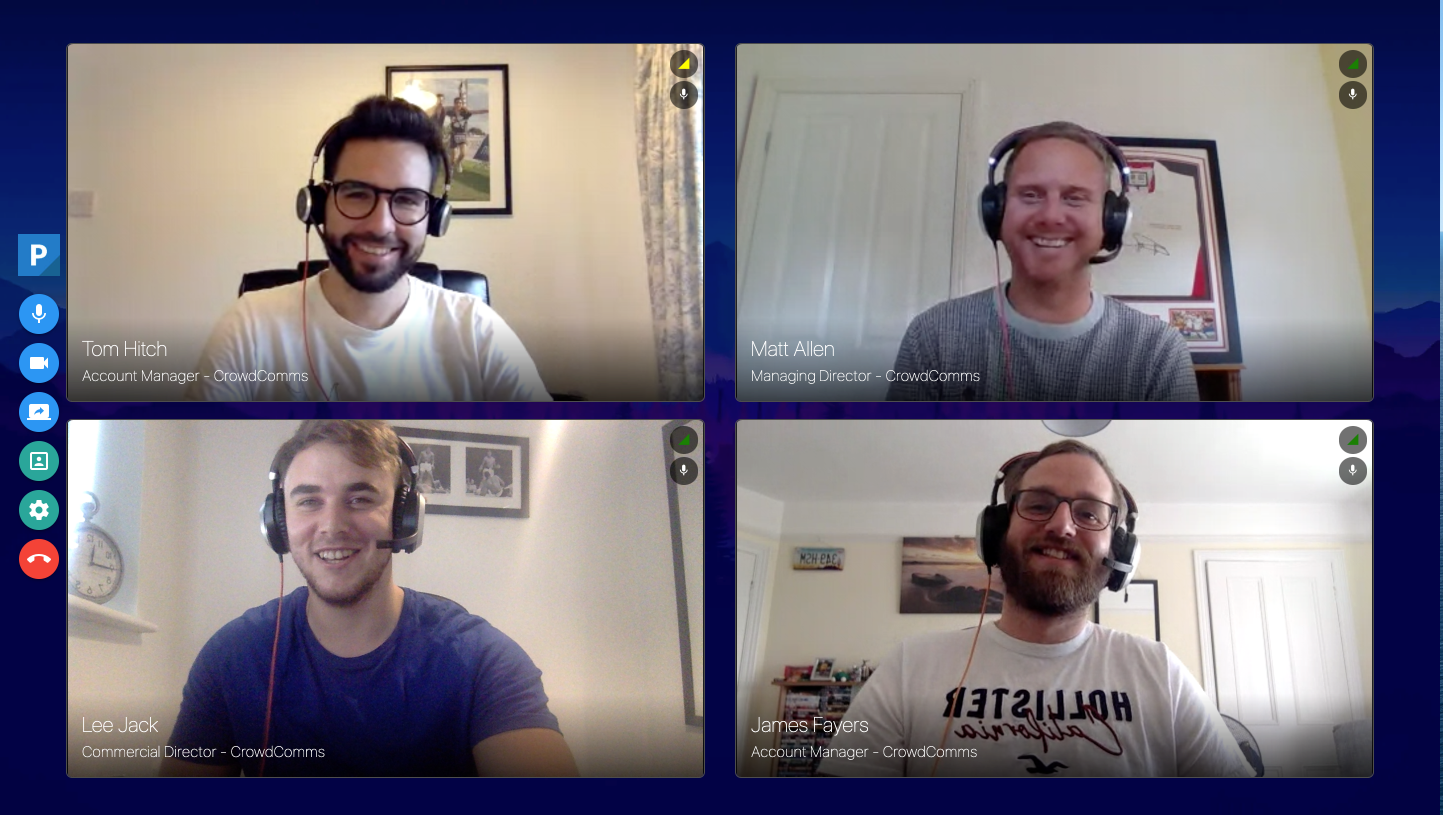
Round Table Discussion / Group Videos
- Create sessions in an agenda module with a 'Join Video Meeting' button.
- Users will be able to join up to 10 minutes before the session begins.
- When clicked the 'Join Video Meeting' button will take users through to new window onto a branded group video call.
- We recommend to create personalised schedule to ensure only invited users join and number of participants is managed.
- We recommend restricting to maximum of 12 users per round table discussion / group video session. This is an open discussion video and if you have more than 12 users, it is very difficult for the conversation to flow.
- All participants will have the option to share screen and present.
- There is no specific host feature as this is specifically an open discussion feature.
- Absolute max users is 50 however having these numbers joining an open discussion video call isn't a great experience. Users will be required to scroll to see all participants. 16 users are visible on screen without scrolling.
- 10 x breakout videos are included in standard package. Additional units of 10 breakout videos can be purchased.
Session view with video meeting linked:

Breakout video view with multiple participants:
1-2-1 Video Calls
Overview
- Starting a video call is the same process as sending a chat message. Users have option to search the attendee list and select the attendee you wish to network with providing the chosen to opt-in to the relevant feature.
- In the attendee list view includes online / offline indicators showing who is available to be contacted via video call.
- Users also have the option to search sponsors and exhibitors and request a video call with online representatives - View further detail on sponsor and exhibitor exposure
- Upon sending a video call request, the other attendee will receive a pop up which they can accept, decline or block user from contacting them again.
- If an attendee accepts the video call, this will open in a pop up and can be expanded as a new window whilst pulling through the platform branding and both users will appear on screen similar to other video conference solutions.
- Screen share options allow both users to present where appropriate.
- Please note: 1-2-1 video calls are not included in standard package.
User requirements
-
Users will need to be using up to date version of their browser
-
Latest versions of Chrome, FireFox, Edge (Chromium) and Safari 14+ are supported
-
On IOS devices, Safari is the only supported browser
- Older browsers including Internet Explorer are not supported
Incoming video call:

Upon accepted video call request:

Click join call to move into the 1-2-1 encrypted video call. Option for pop up to appear over platform or go to full screen:


Activity Feed
Overview
- The activity feed is an internal social wall where users can post photos, videos and comments
- Users then have the option to scroll through, like and comment on existing posts
- Widely used for internal events where allowing posts to social media is not an option
- Moderation is available to admins
- Create multiple activity feeds for different topics
- Control which groups can see specific activity feeds from the left hand navigation menu
Example activity feed:

Info page to link through to various activity feeds setup for topics:

Moderation available on the CrowdComms dashboard (CMS)

Alerts and Notifications
Overview
Alerts allow you to send out notifications to your audience before, during and after an event. It is a great way to keep your attendees up to date with your event and drive engagement for live sessions, capturing feedback or promoting sponsors and networking opportunities.

Example alerts:
- Update your profile to gain 50 points!
- Session starts in 5 minutes
- Networking hour begins now
- Thank you to our sponsor
- Please provide feedback here
This feature has now been re-designed to be even more flexible. There are now three different types of in-app alerts, all with native push notification support, so delegates will never miss another message. You can opt for large pop-ups with or without embedded surveys, flash notifications or a persistent notification with a call-to-action.
This re-design includes the ability to embed surveys from the survey library into the large pop-up alert notification, enabling event surveys to be collected more swiftly and effectively.
To avoid bombarding your delegates with 'in-your-face' alerts, the more subtle flash notifications can be used, which will appear on the top right-hand corner of the Event App screen for five seconds. Alternatively, the persistent notification can be used, which is a similar design but continues to be displayed until the user dismisses it or performs the call-to-action.
Preparing alerts
- Firstly, you will need to log into your CrowdComms Content Management System (CMS) Dashboard and input your details.
- Upon successful login, select the Event App in which you would like to use the alerts.
- Then click on the ‘Alerts’ tab from the left-hand menu, and you will then see the Alerts page.
- To add an alert, click on the ‘+’ icon at the top of the page.
- On this page, you will see three different types of alerts to choose from. To pick the type of alert notification you wish to use, click on one of the top options. The options are:
a. Full-Screen Modal Notification – Rich media format alerts that must be acknowledged by the user
b. Fading Notification – Small, text-only notifications that disappear after five seconds without user interaction
c. Persistent Notification – Small, text-only notifications that remain until the user takes an action

Full-Screen Modal Notifications
- For this type of alert notification, you can also embed a survey within the notification for your delegates to complete. You can also make the completion mandatory if you wish.
- To set up your alert notification, there are several fields that you will need to populate.
- You first need to add the title for your alert in the Content section. You are allowed 128 characters in this field.
- Next, you can add the message or content for your alert in the rich-text editor’s field. This field will enable you to style your alert notification message including adding bold, italic, bullet points etc.
- In this field, you can also embed a video which you have uploaded to the CMS Dashboard Video Library.
- Next, is the Embed section where you can embed a survey which you have already created in your Survey Library. Click here to find out how to create a survey.
- You can also make this survey compulsory, just check on the ‘Mandatory completion’ checkbox to enable this function. Please note that if you check this box, this means your delegates will not be able to navigate away from the alert notification pop-up until they have completed the survey. Therefore, it may be a good idea to inform your delegates about this in the alert’s text.
- In the next section, Time, you can decide when you would like the alert notification to appear on your Event App for your delegate to see.
- If you would like the alert notification to be sent immediately, check on the ‘Send now’ check box.
- If you want to send it in the future, select the date and time when you would like the alert notification to be sent out.
- This next section is the Recipients to whom you want the alert notification to go to. If it’s a targeted alert that you are sending, use the relevant group(s) you wish to target. Select the 'Everyone' group if you want everyone on your Event App to see the alert notification.
- The final section is other Delivery methods which you can include on top of the in-app notification that you’re sending.
- Check on the ‘Send email notification’ check box if you want the email version of the alert to be sent to your delegate’s inbox.
- Check on the ‘Send native notification’ check box if you want your delegate to receive a Push Notification on their mobile device.
- If you opt for the native notification option, you will see the Push Notification section where you can add a notification message and embed a deep link to direct your delegates to a specific part of your Event App.
- Once you’re happy with your alert notification set up, either click ‘Send’ if you have checked ‘Send now’ or click ‘Save’ to schedule it to go out on the date and time set.

Fading & Persistent Alert Notifications
- The Fading and Persistent alert notifications are very similar in design. Both are small, text-only notifications which will appear on the top right-hand corner of your screen.
- The two differences are that for Persistent alert notifications, you can add a Call-to-Action button to direct the user to a specific page within your Event App. The message will also remain until the user takes an action. When Fading alert notifications are used, the message will disappear after 5 seconds.
- To set up both types of notifications, you will need to add the Alert title and message. You have up to 128 characters in both fields.
- For the Persistent alert notification Call-to-Action button, you can personalise your text with up to 30 characters in this field.
- You can then add a deep link to your Call-to-Action button by selecting an action from the dropdown option. For example, if you select ‘Session’ you will then be prompted by another dropdown where you can select the specific Session you want to guide your delegates to. Please note that if you choose not to add a deep link, the Call-to-Action button will take your delegate to the Alerts page of the App.
- In the next section, you can decide when you would like the alert notification to appear on your Event App for your delegate to see.
- If you would like the alert notification to be sent immediately, click on the ‘Send now’ check box.
- If you want to send it in the future, select the date and time when you would like the alert notification to be sent out.
- This next section is the Recipients to whom you want the alert notification to go to.
- If it’s a targeted alert that you are sending, use the relevant group(s) you wish to target. Select the' Everyone' group if you want everyone on your Event App to see the alert notification.
- The final section is other Delivery methods which you can include on top of the in-app notification that you’re sending.
- Check on the ‘Send email notification’ check box if you want the email version of the alert to be sent to your delegate’s inbox.
- Check on the ‘Send native notification’ check box if you want your delegates to receive Push Notifications on their mobile device.
- If you opt for the native notification option, you will see the Push Notification section where you can add a notification message and embed a deep link to direct your delegates to a specific part of your Event App.
- Please note, that when creating a persistent alert notification, the Push Notification deep link will be bound to the same action as the alert Call-to-Action button.
- Once you’re happy with your alert notification set up, either click ‘Send’ if you have checked ‘Send now’ or click ‘Save’ to schedule it to go out on the date and time set.

Smart Sessions
Smart Sessions is revolutionising the way we network at virtual and hybrid events. Offered as part of the CrowdComms’ industry-leading event platform, it recreates the serendipity of in-person networking, online. Dedicated networking rooms give attendees intuitive and engaging spaces to effortlessly join video conversations with other delegates and watch event live streams together once again. Networking rooms can be organised by topic, industry, attendee type, or any other way that helps your attendees connect with the right people – transforming the experience of attending a virtual or hybrid conference, exhibition, company get-together, member meeting or awards show. Smart Sessions also unlocks a range of sponsorship opportunities, from branding to announcements and advertising content. We’ve set out a user guide below to get you quickly up and running. If at any time you require further support or assistance, please get in touch with your CrowdComms’ Account Manager or Support Specialist, who will be happy to guide you through the process.
Browser Requirements
Browser Requirements
Browsers must support WebGL. Browsers supported by the WebGLRenderer are:
- Firefox 15+
- Chrome 11+ (Recommended)
- Edge 99+
- Opera 19+
If you find that you still have trouble after checking the above, then please check here to see if your browser settings are also compatible.
Note: Safari is not currently supported.
Setting up a Networking Room in the CMS
Setting up a Networking Room in the CMS
To get started, you’ll need to set up a virtual networking room in the CMS. Once all the elements for this are in place, your attendees will use this space to watch live streamed content and interact with each other.
- Log into the CMS with your credentials.
- In the Dashboard, select the Event App that you would like to add virtual networking to.
- Click on ‘Libraries’ in the left-hand sidebar.
- A secondary menu will appear to the right. Click on ‘Virtual Networking’.

- To add a virtual networking room to your Event App, click on the ‘+’ button on the top right-hand side of the screen.
- A pop-up window will appear, inviting you to create a title for your room
- Once you have filled in the title field, click ‘Create’ and you will be taken to your room’s main edit page.

- TOGGLE ON the ‘Show in Virtual Networking module’ to make the room visible in the Event App.
- You can also fill in the description field to provide more information for your delegates. Please note: This field has a limit of 240 characters.

10. Below the description field, you can set the ‘Room Capacity’ to admit a certain number of participants. The room limit is set to 300 users. If this capacity is reached, a message will appear advising users that the room is full.
11. Head on over to the ‘Times’ TAB at the top, to edit the room opening times to fit your requirements. By default, networking rooms are open for the duration of your event. If users attempt to enter rooms outside of your selected times, they will see a message informing them that the room is closed.

12. If you go to the ‘Groups’ TAB at the top, you can select which groups have access to your networking room. Please note: Groups must be set up through the ‘People Library’ in the CMS. Please click here for instructions on how to set up your groups.

13. To customise the look of your room, you’ll want to go to the ‘Branding’ TAB at the top. Here, you can upload a background, logo, poster image and change your room’s colour scheme.
Note: Background images should be 4000 x 4000 pixels in size. Your logo can be any size and the poster image should be 1920 x 1080 pixels with an aspect ratio of 16:9.
Note:
Changing the primary colour will affect:
- The ‘OFF’ state of the microphone and video
- The ‘OPEN’ state of any modal, for example: Settings and People Search, the colour of a user’s bubble, the colour of the bubble that users are in, users shown on the mini map in the room and TAB titles, e.g., chat.
Changing the secondary colour will affect:
- The ‘ON’ state of the microphone and video
- The ‘CLOSED’ state of any modals

- Click ‘Save’, which will automatically take you back to the main menu displaying the virtual networking rooms.
Note: The ‘Administrators’ TAB currently offers no functionality to users. This feature will be developed in a future version.
Linking your room to an Agenda session & Joining a room
Linking your room to an Agenda session in the CMS
If you do not already have an Agenda module set up, check out our Agenda guide to get you started.
- In your Agenda module click on ‘Add Session’ or choose one from the list below if your agenda session already exists.
- A pop-up will appear inviting you to populate your session title, subtitle, and times as appropriate.

3. Click Save, which takes you to a new agenda session edit page/panel.
4. Fill in all the agenda TABS as appropriate. Please note: Only the ‘Embed’ TAB will have a direct impact on your networking room.
5. Click on the ‘Embed’ TAB, which brings up the function options for your session.
6. In the virtual networking rooms section, on the same page, select the room that you have created.

7. Click ‘Save’ – your room is now linked to your agenda session.
Live Streams & Videos
Live Streams
To add a live stream into your room:
- Go to Libraries > Videos
- Upload the video you want to play in the room
- Go to Libraries > Virtual Networking
- Select your room and click on the edit icon
- Click on the Embed TAB
- Choose your live stream from the drop down menu under "CrowdComms Live Streams"

7. Click Save
NOTE: You can stream the same live stream into multiple rooms
Videos (Simulive)
To add a video into your room:
- Go to Libraries > Videos
- Upload the video you want to play in the room
- Go to Libraries > Virtual Networking
- Select your room and click on the edit icon
- Click on the Embed TAB
- Choose your video from the drop down menu under "Simulive video from library"

7. Click Save
The video you have selected will now play in your room.
NOTE: You will need to interact within the room once for the video to start
Joining a room
Joining the room via an Agenda Session
- Click on the ‘Agenda Session’ you have created (you will then see an option to watch the live stream in your networking room).
- By clicking on the option of ‘Join now’ in the bottom left of the screen this will open a separate window for your room.

Screen Sharing
The user who is screen sharing will be noticeable by a highlighted border around their video screen.
NOTE: Sharing a screen will overtake any LIVE stream in the room.

Location Map
Click on the ‘location’ icon to view a map to pinpoint your current location.
Teleporting
Click on the online users list before clicking on the ‘Teleport’ button next to the user you wish to travel to. You will then see your avatar teleport across the room arriving near to the person you selected.
Please note: You are not able to teleport while on a call or while in a bubble with other attendees.

Bubble Locking
You can now ‘lock’ your bubbles to prevent other users from joining your conversation. Simply click on the padlock in the middle of your bubble and this will change the padlock icon to ‘closed’.
The closed padlock is visible to everyone else in the room.
To unlock the bubble, click on the padlock again and the icon will change to an open padlock.
You can lock your bubble with 2, 3, 4, 5, 6, 7 or 8 users inside of it. If you are in a locked bubble, you can, however, still leave at any time.

Clearing Users and Chats in a Room Through CMS
Clearing users and chats in a room through CMS
Users can clear users and chats in a room through CMS.
Select the “reset” icon in the Virtual Networking Rooms list for the room you wish to reset. You will then be presented with a pop up where you can select clearing the room and or the chat within the room.

Inactivity
Inactivity
A user will be marked as inactive if:
- If the user hasn’t interacted with the app in an hour and they're not in a call, and there isn't an ongoing live stream
- If the user hasn’t interacted with the app recently and the browser decides to suspend it as a background task – the browser may do this to free up available resources on the device
NOTE: You will be presented with an inactivity page which will have a link to “re-join” the room

Media Permissions
Media Permissions
Users will be prompted to accept media permissions when first joining the room, if these permissions are rejected then the user will not be able to join the room.

Smart Session Features Table
Smart Session Features Table (Updated 03.05.2022)
|
Existing Features |
In Development |
Future Development |
|
One-to-one and up to group of 8 video chat within |
Linking Q&A feature to the room |
Enhanced emoji feature in chat |
|
Ability to link live stream to a room |
Waiting room feature |
Room size options |
|
Ability to screenshare with members of the |
User availability status |
:inking poll feature to the room |
|
Chat feature with delegates within the room |
Ability to conduct scheduled meetings within Smart Sessions |
Ability for a user to join a Smart Session on mobile and tablet |
|
Blurred background on video call |
Ability to tag other delegates in chat |
Ability to invite external users into the room |
|
Profanity filters in chat |
|
Facilitator tool |
|
Teleport to another user within a room |
|
|
|
Options to turn camera on/off during video call |
|
|
|
Volume adjustment on either video call or live |
|
|
|
Customisable/bespoke background and logo |
|
|
|
Audible emojis in chat |
|
|
|
Cruising around the room |
|
|
|
Room locking for private chat |
|
|
|
Analytics |
|
|
|
Onboarding instruction |
|
|
|
Ability to link video-on-simulive to the room |
|
|
|
Ability to link video-on-demand to the room |
|
|
|
|
|
|
|
|
|
|
|
|
|
|
|
|
|
Zoom breakouts user experience
About the integration
The Zoom integration uses the Zoom SDK functionality which is for the most part comparable to the standard experience using Zoom. You can see comparison of the functionality supported in our Zoom SDK integration and standard Zoom experience here
In order to use the Zoom integration, you will need your own Zoom account and setup guide can be found here
User experience
Users of the CrowdComms platform will not require their own Zoom account and will not be required to login to Zoom or leave the CrowdComms platform in order to join the Zoom breakout.
This allows users to have a seamless experience joining Zoom breakouts whilst enjoying the CrowdComms platform feature set and remain on your branded platform.
Zoom SDK functionality including allowing the host to allow users into the breakout, mute users and share screen are supported. Refer to the above comparison document linked for further details on functionality supported.
Joining experience

Speaker / Host experience
The person running the session will need to launch the meeting from Zoom in order for users on the CrowdComms platform. If the Zoom meeting has not been started, users will receive a pop up explaining that the session has yet to start.
The speaker / host will have all the normal Zoom controls including ability to admin users into the breakout if setting is enabled, to mute users and remove users from the breakout if required.
Zoom integration output and user options
- Users will have the option to enable preferred audio and camera on first access
- Admins will be able to allow users into the session, kick users out and mute users depending on the Zoom meeting settings applied in Zoom
- Users will be able to share their screen providing this permission has been given on the setup of the relevant meeting in Zoom
- Uses will be able to toggle between speaker and gallery view
- Users will be able to go full screen to focus on the content
- Zoom chat and other Zoom SDK supported functionality is available
- The right hand CrowdComms engagement tab can be hidden if not needed for the breakout

NEW CrowdComms Video Breakouts
CrowdComms Video Breakout
Introduction
Our Video Breakout feature has undergone another transformative update, showcasing enhanced functionality. It still maintains its capacity to accommodate up to fifty users per session, facilitating the seamless hosting of large meetings.
We've refined the setup process to seamlessly integrate with other engagement features through the Dashboard Library route. This improvement allows you to effortlessly add multiple Video Breakout Rooms and easily link them to their respective sessions.
While the traditional setup, which enables you to activate the Video Breakout feature by toggling within the session, will continue to coexist with the new setup, it's crucial to note that we will gradually phase it out. Therefore, we kindly request you to transition to the new setup process moving forward.  Adding Breakout Rooms to the Library
-
To use the Video Breakout feature you will need to log in to your CrowdComms Content Management System (CMS) Dashboard and input your details.
-
Upon successful login, select the Event App where Video Breakout will be used.
-
Then Navigate to ‘Libraries’ from the left-hand menu and click on ‘Breakouts’, which will appear as an option in the secondary menu to the right.
-
If you already have Breakout Rooms created, they will appear in the list. (Show how to long)
-
To create a new room, click on the ‘Create new breakout room’ at the top of the page.
-
A pop-up modal will appear prompting you to add the name of your breakout room. Add the relevant room name and click Submit.
-
Once generated, the newly created room will appear on the list. By default, the room capacity is preset to 50, representing the maximum number of participants eligible to join.
-
To amend the capacity or add branding to the room, click on the Pencil icon.
-
On this page, you have the flexibility to modify the room name and capacity, and additionally, you can enhance the aesthetic appeal by incorporating a background image.
-
Don’t forget to click Save changes when you’re done editing.
NOTE: If a user tries and joins a room which is at capacity they will see this message

Also note, the capacity can only be changed for the room when the room is empty and NOT in progress.
Embedding the Video Breakout Feature into the Agenda Sessions
-
After creating all the Breakout Rooms in your Library, you can seamlessly integrate these rooms into your Agenda Session.
-
From here you can either navigate to an existing session which you have created or create a new Agenda Module and add sessions to your agenda.
-
Navigate to the Agenda sessions list page and click on the Pencil icon corresponding to the session where you intend to add the Breakout Room.
-
Proceed to the Features tab, and within the Content Features section, locate the Breakout Room field. Click on it, and from the dropdown list, select the appropriate room to embed in this specific session.
-
Once you’ve finished click Save changes.
Media Permissions:
You must accept the media permissions before joining the call.
Below is an example of the messaging the user will see to accept the permissions:


Useful Link
https://docs.livekit.io/cloud/firewall/
The below message will appear when a session has not started;

The below message will appear when a session has ended;

Wordclouds
 We now have the ability to display wordclouds on a big screen at events, based on input from attendees.
We are providing wordclouds for surveys to begin with, being available for multiple choice and text questions. Users can access the word cloud from the survey edit screen on the context menu of appropriate questions, and also on the results page for that survey.
The wordcloud will show all submitted words, and display more common words in a larger font.
A comma will determine when the word ends, and another begins.
On the wordcloud screen you have access to certain settings, such as general shape, word multiplier, max word length, minimum count for the word to appear.
To view the wordcloud, you just need to copy the URL from the survey and paste it into your browser. Here you will have the option to edit the wordcloud.

You can edit;
- If you wish for the title of the survey to be shown on the WC
- The minimum occurence a word has been submitted in order to appear on the WC
- The background colour of the WC
- The shape of the WC
- The amount of space between the words
- The size of the words on the WC
