IDLoom Payment Guides
Help in setting up your payment method of choice for paid registrations
- Authorize.Net
- Adyen
- Bambora (USA & Canada Only)
- CashNet
- Crédit Agricole
- CCV
- Elavon
- Elavon US
- Globee
- HiPay
- Ingenico/Worldline
- Mollie
- Payflow
- PayPal
- SagePay
- SIX Payment
- Stripe
- VR Payment
Authorize.Net
We will need the following details from your Authorize.Net account:
- API Login ID
- Transaction Key
- Signature Key
- Mode (Sandbox or Live)
If you have not created your Authorize.Net account yet, create one and follow the steps below to integrate it with your events.
- Once you have registered your account, sign in to the account and get your API keys.
- Click Account > API Credentials & Keys to get your API login ID, Transaction Key and Signature Key.

- Click Account > Webhooks.
- Click the Add Endpoint button.

- Fill the Endpoint URL with https://reg.crowdcomms.com/webhooks/authorizenet/EVENT_UID.
Where EVENT_UID must be replaced by the UID of the event. You can find it on the top right when you edit your event. - Set the status to Active.
- Check the Payment Events option in the "Select Events" section.
- Click the Save button.

Adyen
We will need the following details from your Adyen account:
- API Key
- Merchant Account
- HMAC Key
Log into your Adyen account and follow the steps below:
API Key
-
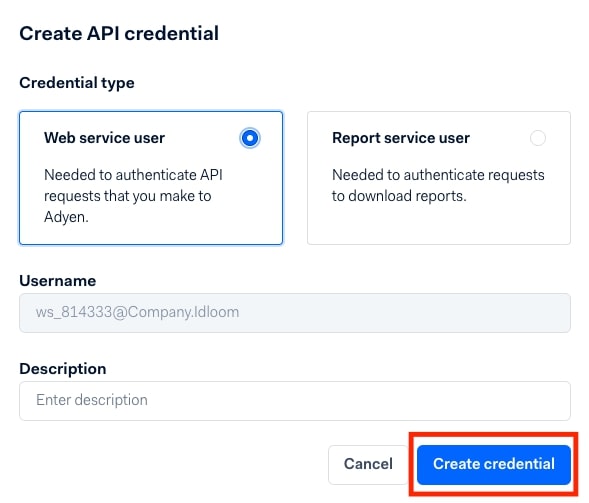
Click on Developers > API credentials > Create new credential

-
Select Web service user and click on Create credential
-
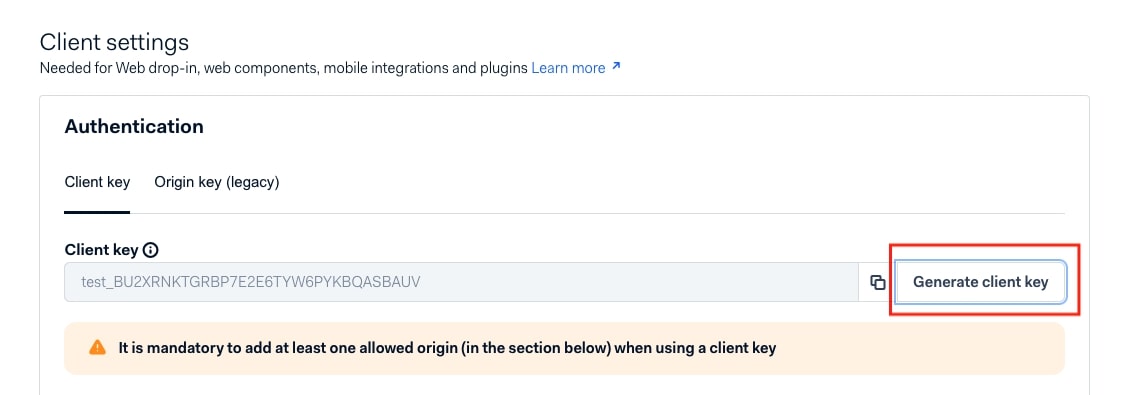
In Client settings, click on Generate client key
-
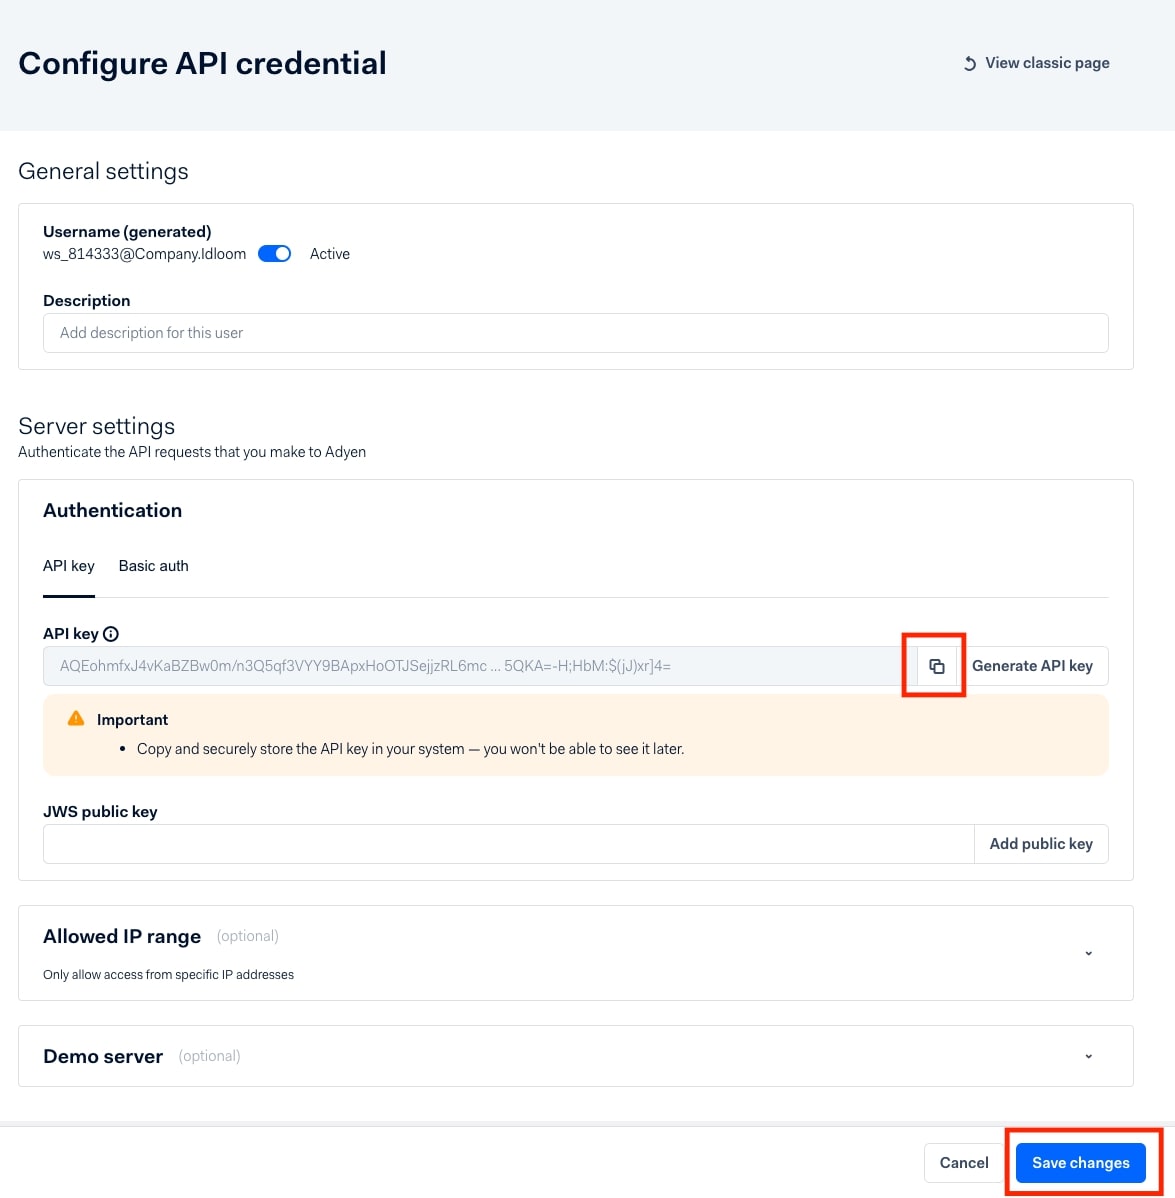
In Server settings, click on the Copy icon next to Generate API key > Save Changes and copy/paste your API key in the API key field in idloom.events. Make sure you copy and securely store the API key in your system - you won't be able to see it later.
Merchant account
-
Click on Settings > Merchant accounts and copy/paste your Merchant account name under Account code in the Merchant account field in idloom.events.

HMAC key
-
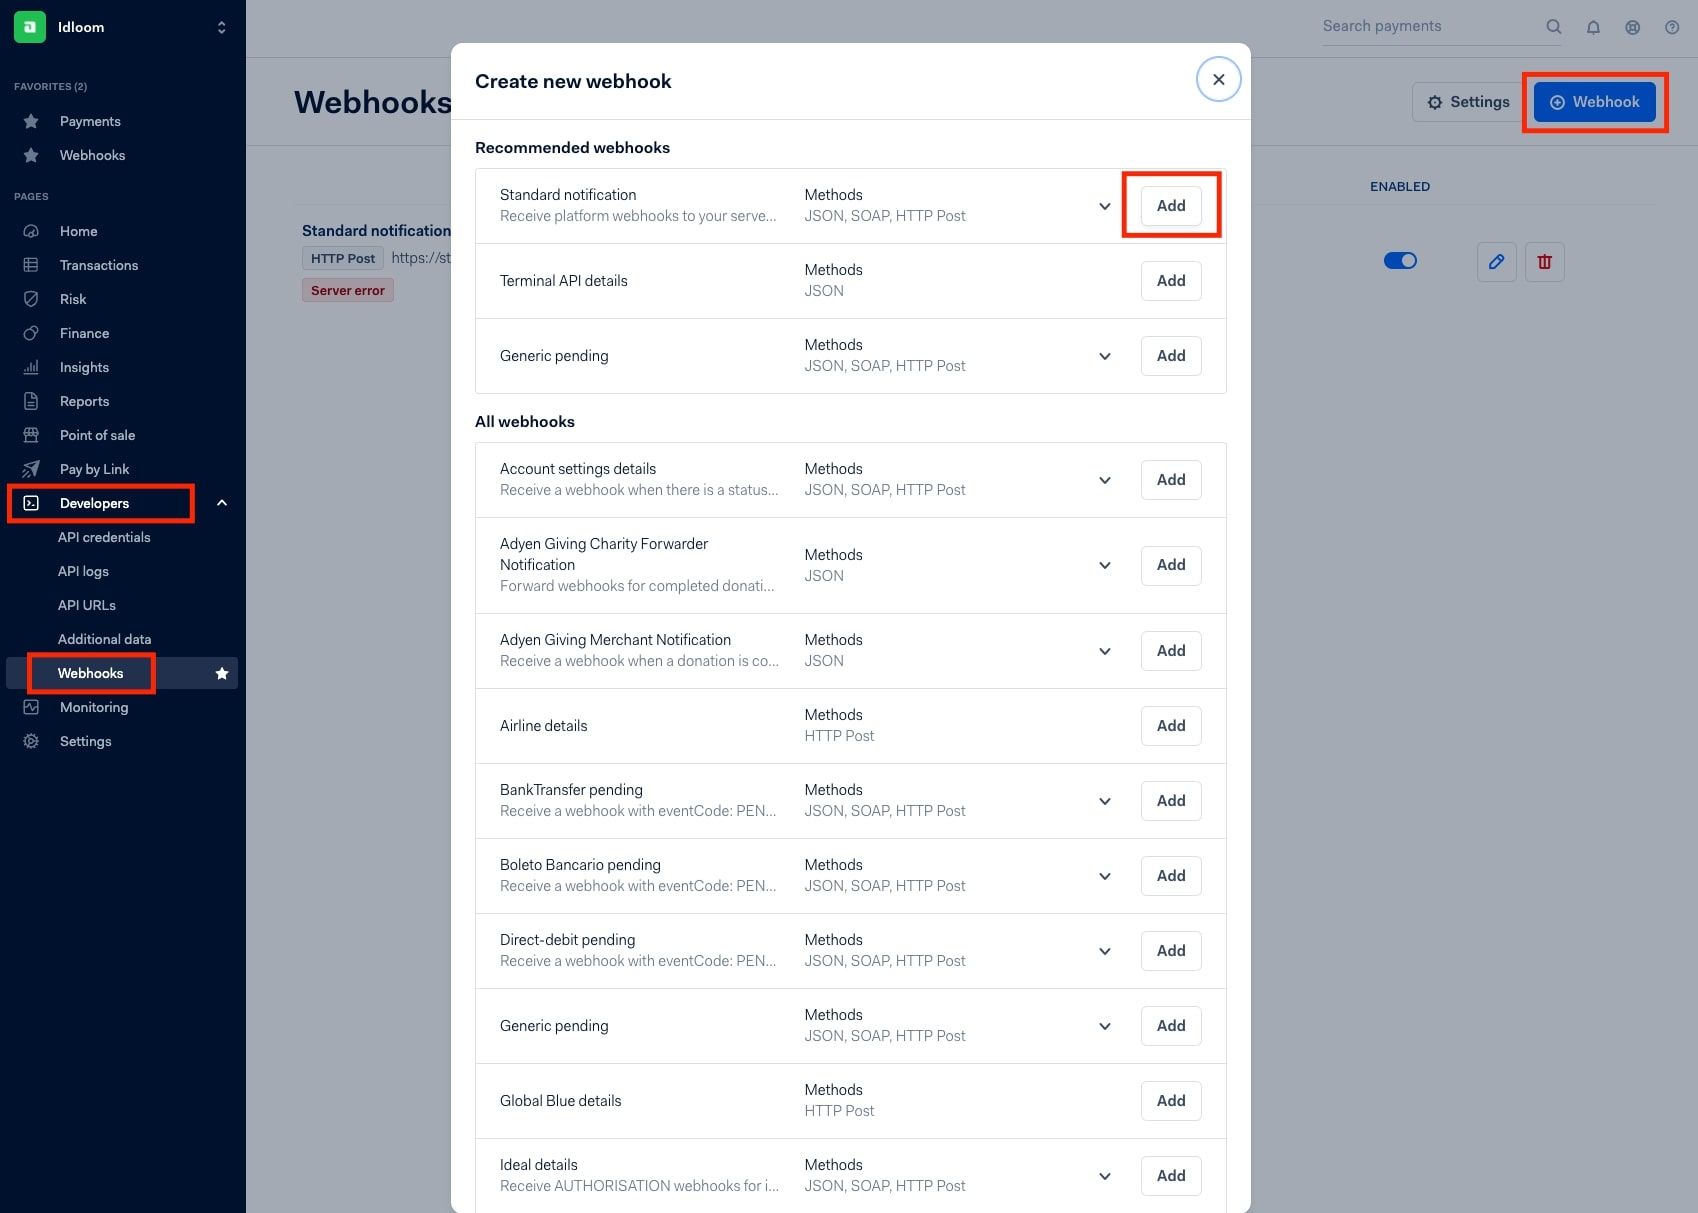
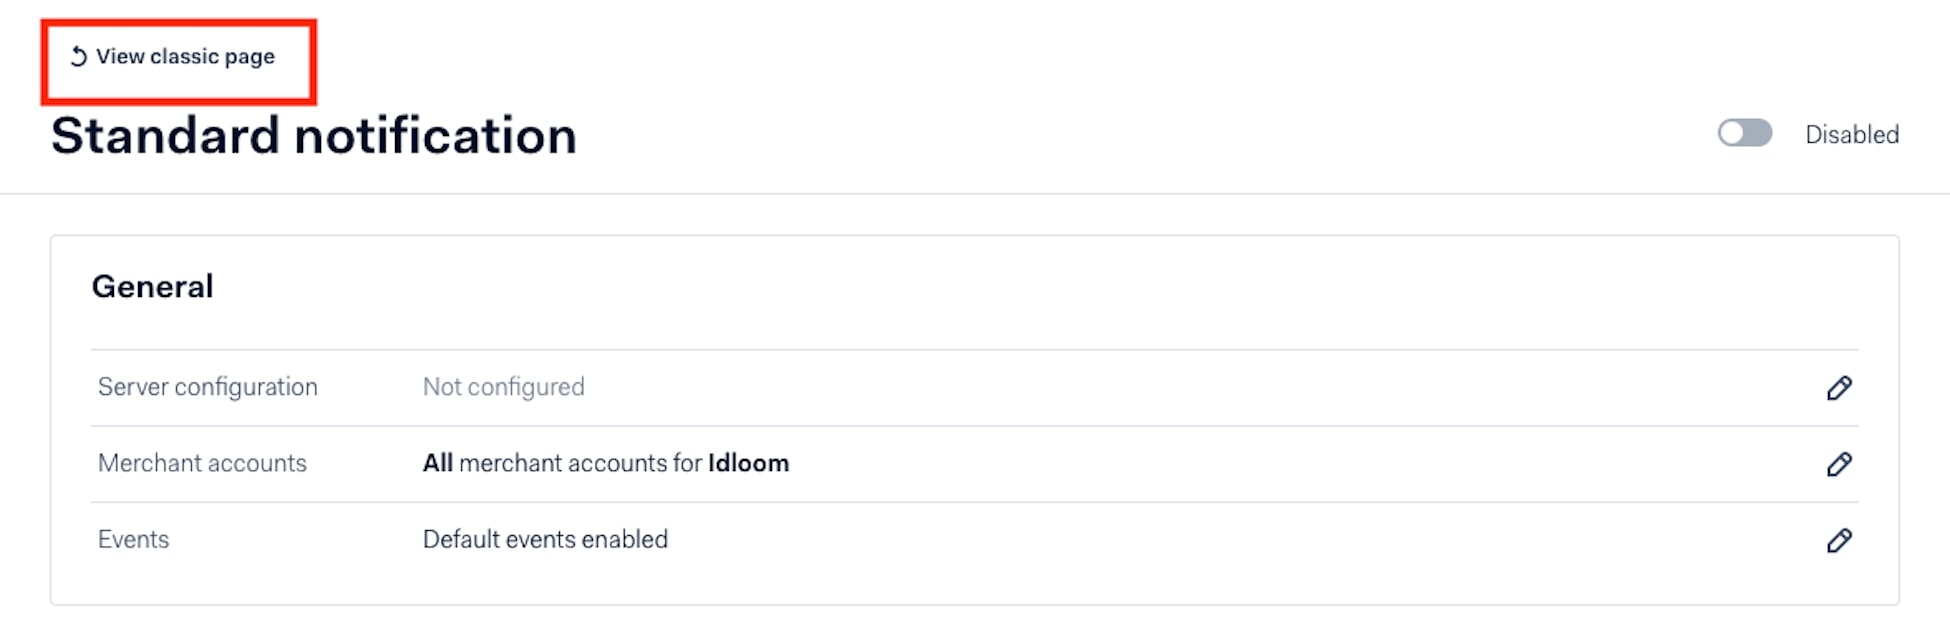
Click on Developers > Webhooks in the left side bar menu > Webhook in the top right corner > Add
-
Click on View classic page
Configure webhook settings for Idloom
-
Enter https://idloom.events/webhooks/adyen as URL
-
Select TLSv1.2 as SSL Version
-
Tick the Active box
-
Select HTTP POST as Method
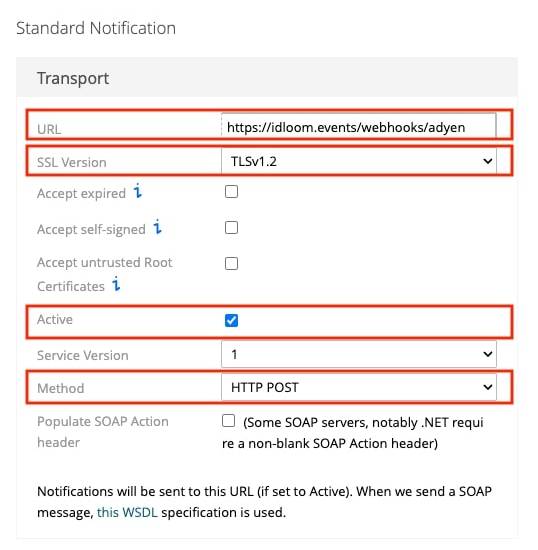
-
Click on Additional Settings > Generate new HMAC key > Save Configuration and copy/paste your HMAC key in HMAC key field in idloom.events


-
Lastly, enter a reference in the Reference field, such as “idloom”. It will serve as reference to know where the transactions come from.
Bambora (USA & Canada Only)
We will need the following details from your Bambora account:
- Merchant ID
- Hash Key
Follow this link for guidance and to set up an account if you don't already have one:
https://partners.na.bambora.com/idloom/
Any further queries on this option, please speak to your support manager and we can follow this up with the IDLoom team for you.
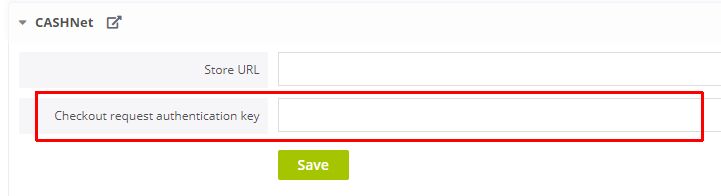
CashNet
We will need the following details from your CASHNet account:
- Store URL
- Checkout request authentication key
Follow the steps below to integrate CASHNet with your events.
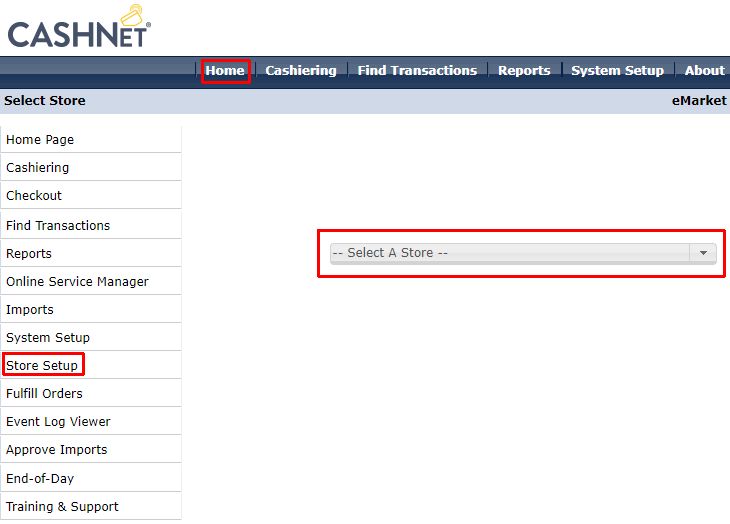
- In the CASHNet backend, click Home/Store Setup
- Select your store
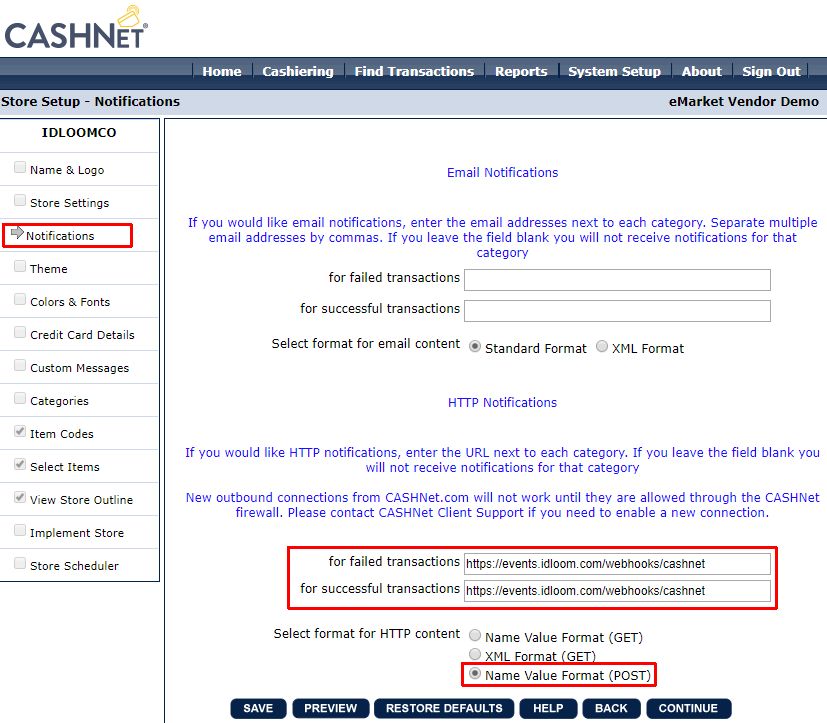
- Click Notifications and set the settings as shown in the screenshot below then click SAVE
- Click System Setup/Reference Types
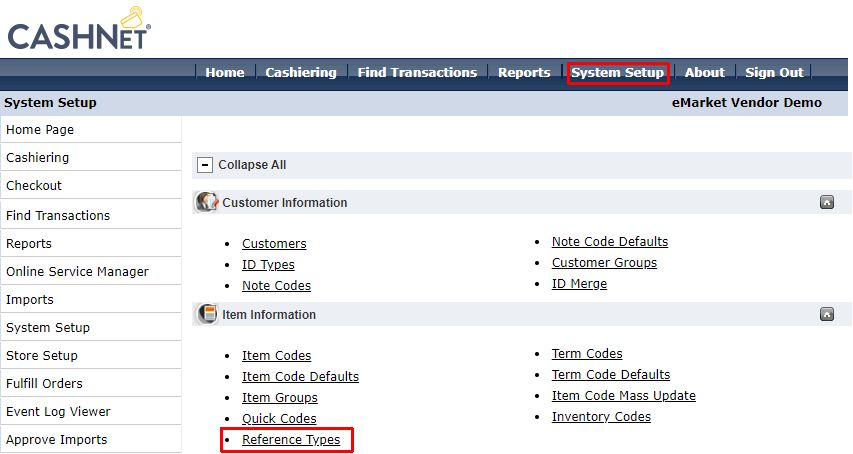
- Find and select the USERID
- Uncheck Disabled then click SAVE
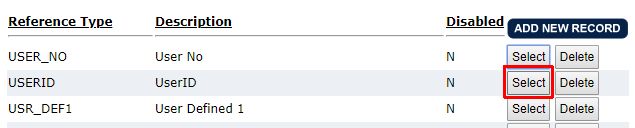
- Or if there is no USERID, click on ADD NEW RECORD and configure the new reference type like the screenshot below
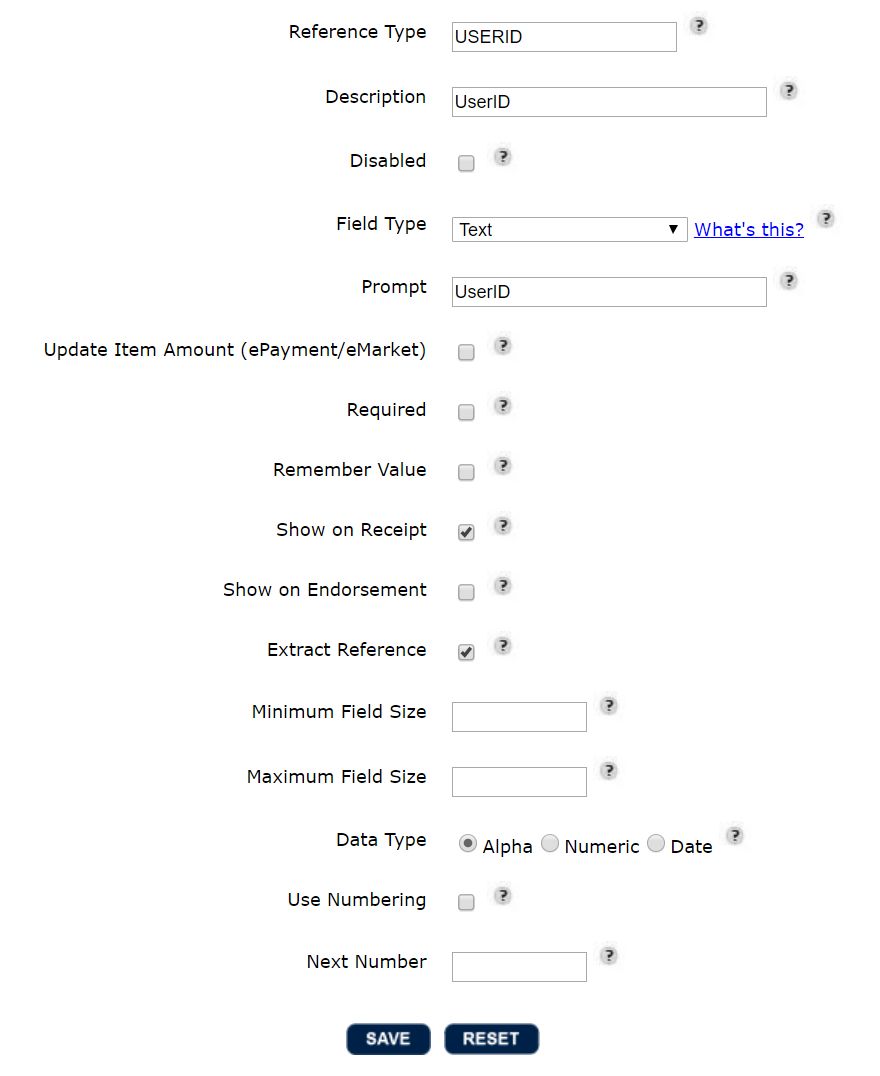
- Click System Setup/Merchants
- Select your merchant
- Select SHA1 - Base64 Encoded as Checkout Request Authentication Method
- Set a random code as Checkout Request Authentication Key then click SAVE
- And finally, copy the same random code in your idloom settings
Crédit Agricole
We will need the following details from your Crédit Agricole account:
- Site
- Rank
- Username
- HMAC
- Mode (Sandbox or Live)
Please head to the back-office Vision E-transaction.
Connect to the platform by using the credentials provided by the Crédit Agricole.
You should land on the following back-end page. From this point on:
- Click on “Settings” (in the green strip naviguation menu)
- You can then click on the name of your “Site” (left sidebar – shopping cart icon)
On this page, you’ll be able to obtain, in the “General configuration” section, your:
- Site Number (7 digit code)
- Rank Number (take the last two digits)
- Paybox ID (1 to 9 digit codes)
You can also generate your HMAC Key, top right of the page, by adding a “Passphrase” (you can invent any code you want so long as your respect the below mentioned conditions – when these are met, your passphrase strength will be defined as “Strong” and you’ll be able to click on “Generate Key”). Your key should have now appeared in the previously empty cell.
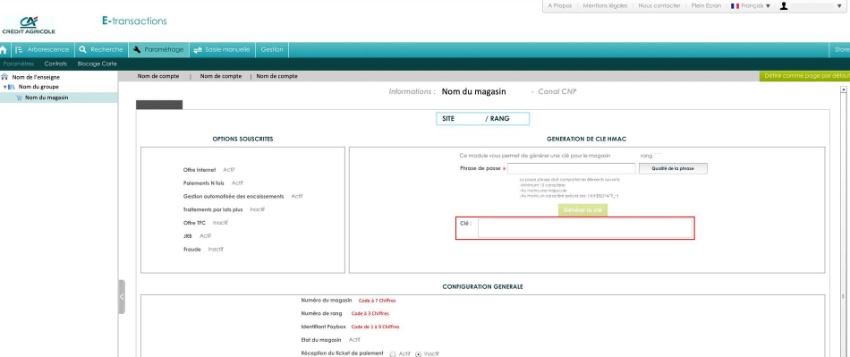
You now have all the information at your disposal to link your idloom-events account with the one of Crédit Agricole!
CCV
We will need the following details from your CCV account:
- API Key
- Payment method (options below)
- Cards (Debit or Credit)
- iDEAL
- Sofort
- Paypal
- Giropay
- BankTransfer
- Terminal
- Payconiq
- EPs
- Alipay
- Klarna
- Gift
- Landing Page
If you have not created your CCV account yet, create one and follow the steps below to integrate it with your events.
- Once you have registered your account, sign in to the account and get your API keys.
- Click Configuration > API keys in the left menu to get your TEST key and LIVE key.
- Click Configuration > Webhooks in the left menu.
- Fill the URL with https://reg.crowdcomms.com/webhooks/ccv

Elavon
We will need the following details from your Elavon account:
Full guides have not been provided IDLoom side for this option. Please let us know if you need further assistance and we will follow up with the team for you.
Elavon US
We will need the following details from your Elavon US account:
- Merchant Account ID
- Merchant User ID
- Pin
- Mode (Sandbox or Live)
Beyond adding your “Merchant Account ID”, “Merchant User ID”, “Pin” and selecting your mode (Sandbox = Demo, Live = Production), you will also need to configure your account.
To do so, connect to your Converge UI/Portal via the following URLs:
- Converge Next Gen Demo: https://demo.convergepay.com/converge-webapp/#!/login
- Converge Next Gen Production: https://www.convergepay.com/converge-webapp/#!/login (DEMO CREDENTIALS WILL NOT WORK IN THIS ENVIRONMENT)
Once connected, via the left-hand side menu, go to "Settings" and select "System Setup".
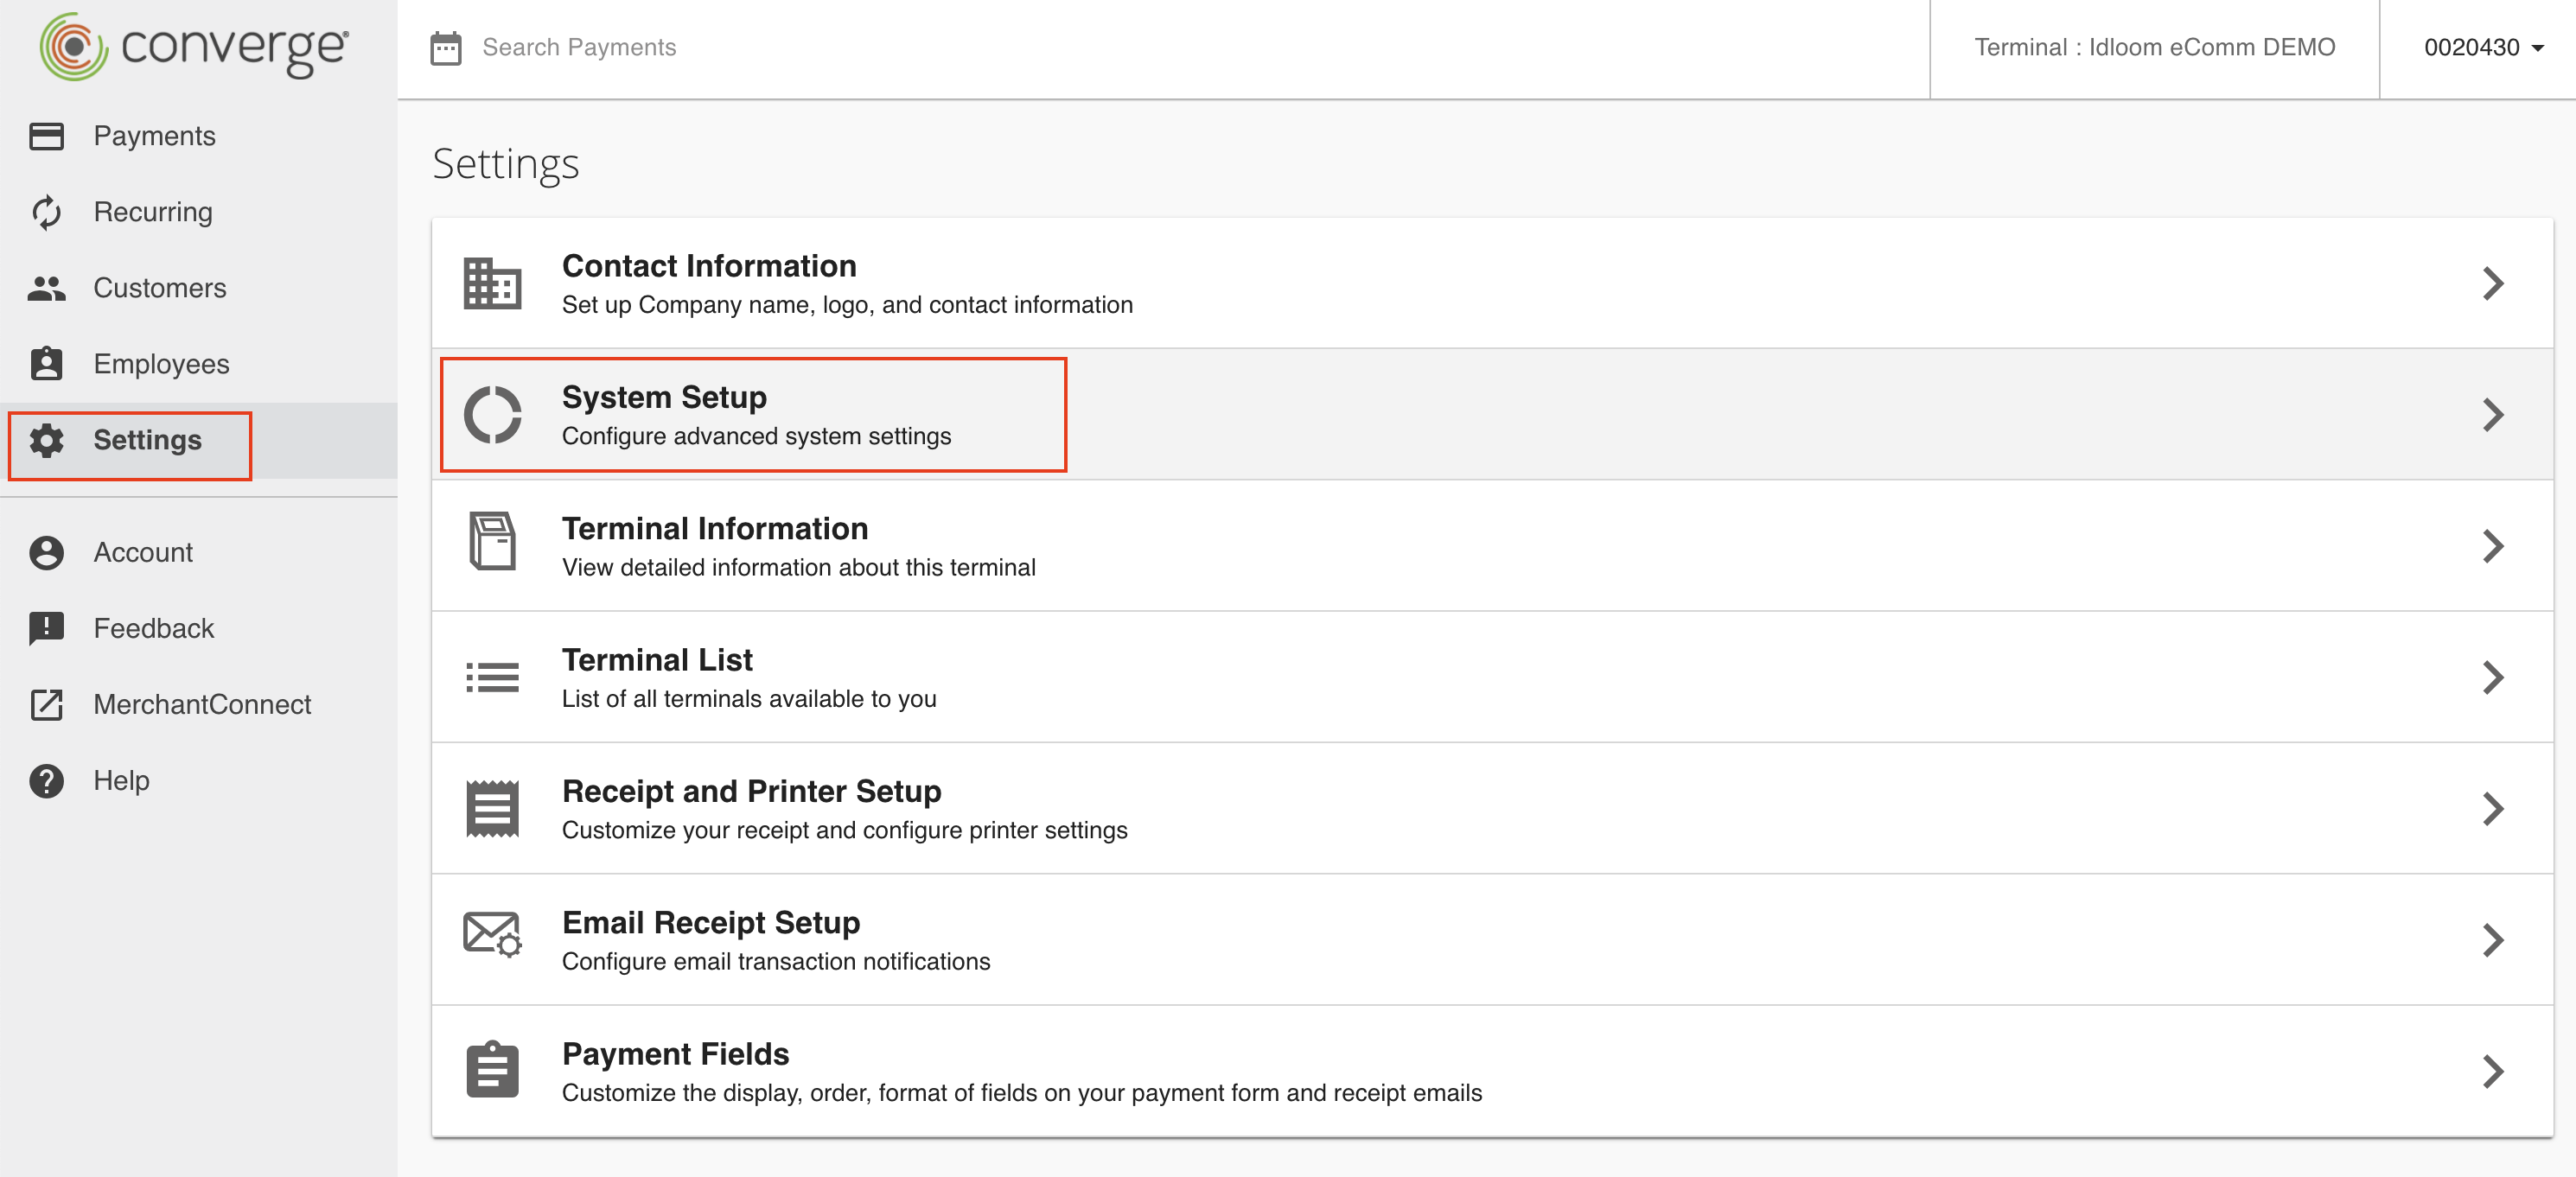
Scroll down to the bottom of the "System Setup" page, until you reach "Export options".
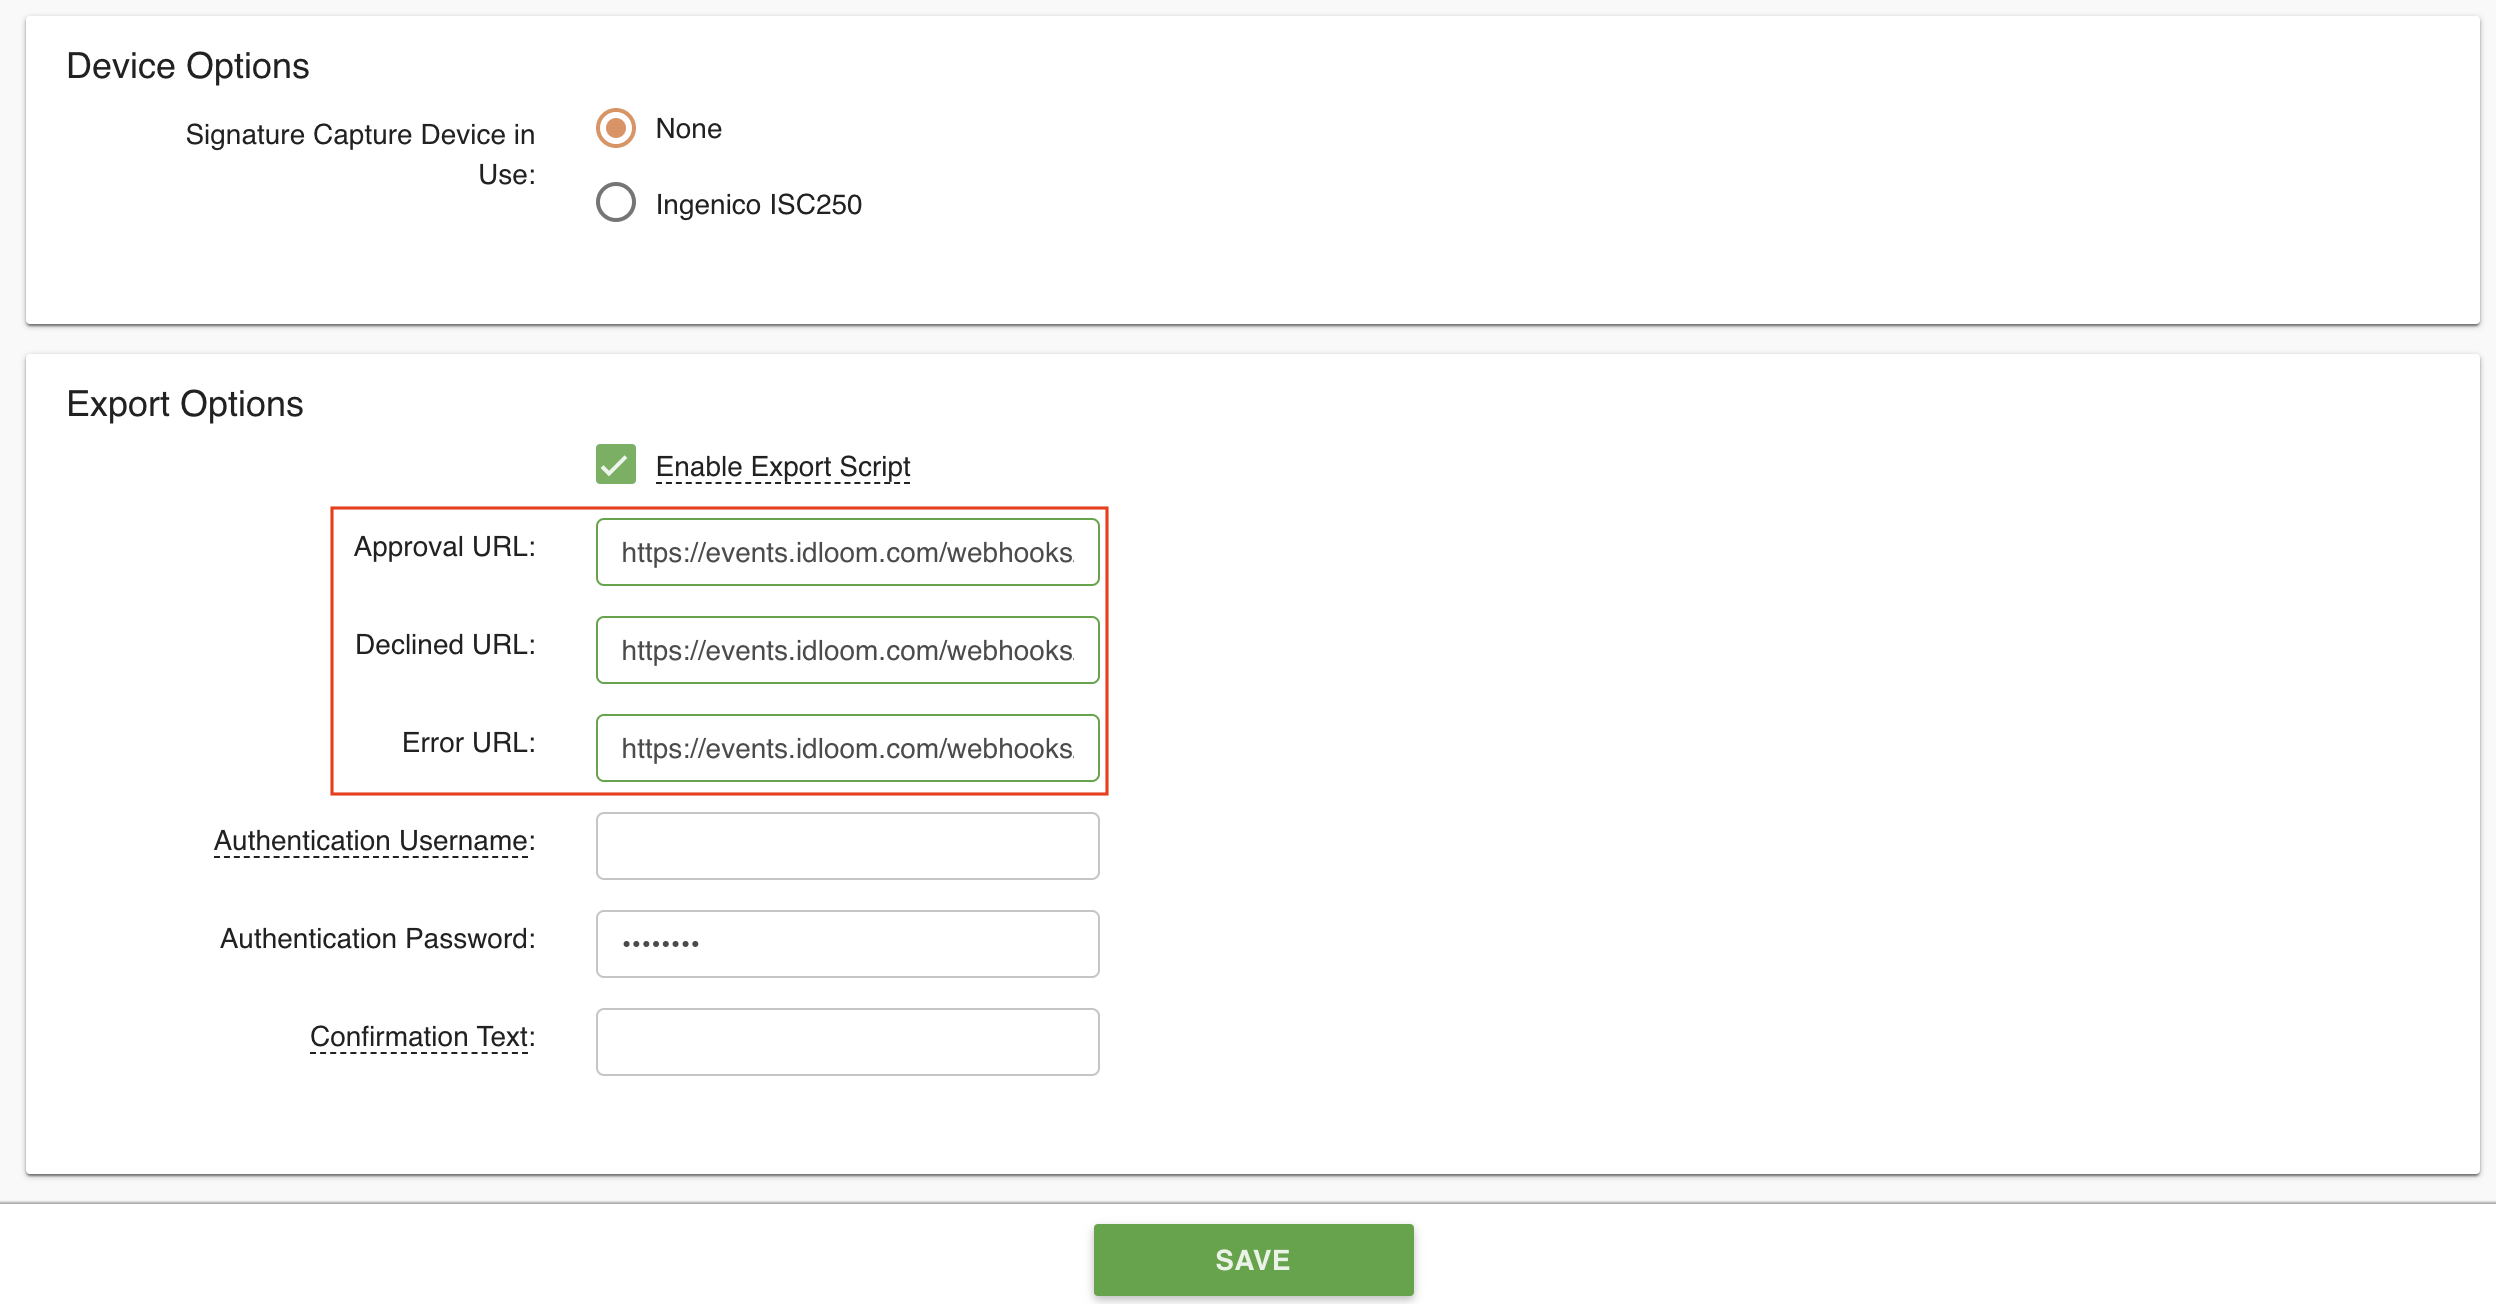
Lastly, be sure to follow these 3 steps:
- Check the “enable export script” box
- Copy/paste the following URL, https://reg.crowdcomms.com/webhooks/elavonus, three times for displayed field ("Approval URL" / "Declined URL" and "Error URL").
- Save your changes.
Globee
We will need the following details from your Globee account:
- API Key
Full guides have not been provided IDLoom side for this option. Please let us know if you need further assistance and we will follow up with the team for you.
HiPay
We will need the following details from your HiPay account:
Full guides have not been provided IDLoom side for this option. Please let us know if you need further assistance and we will follow up with the team for you.
Ingenico/Worldline
We will need the following details from your Worldline account:
- SHA-IN pass phrase
- SHA-OUT pass phrase
- Worldline PSPID
- Worldline title page (optional)
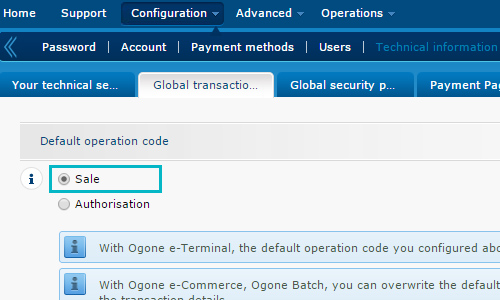
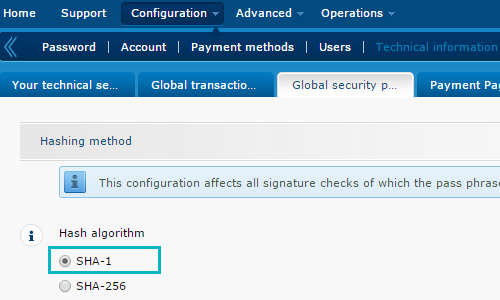
To apply the recommended configurations, connect you to the Worldline back office, go to the tab "Configurations" -> "Technical information" and follow the following instructions.
Global transaction parameters
Global security parameters

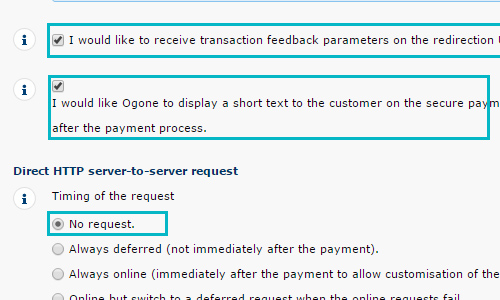
Payment Page
Data and origin verification
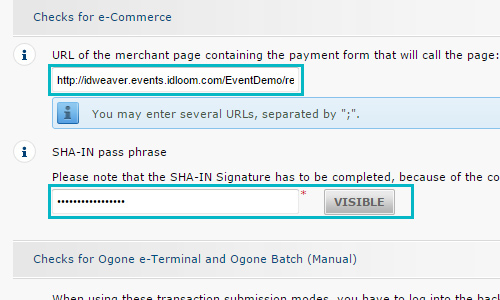
Fill in the field "URL of the merchant page" with the registration link to the event (eg: https://company.reg.crowdcomms.com/EventDemo/register)
(Caution: One URL for each event separated by ";").
Transaction feedback
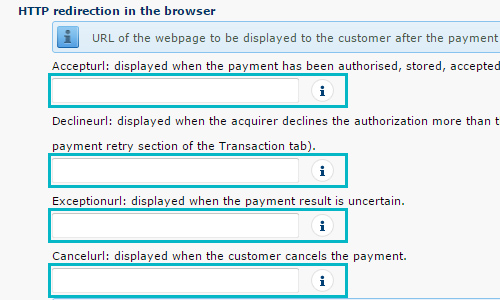
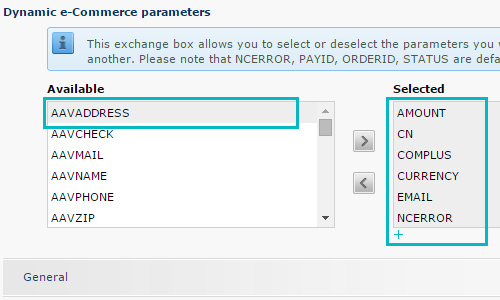
Select all the following settings on the right: AMOUNT, CN, COMPLUS, CURRENCY, EMAIL, NCERROR, ORDERID, PAYID, PM, STATUS

Mollie
We will need the following details from your Mollie account:
Full guides have not been provided IDLoom side for this option. Please let us know if you need further assistance and we will follow up with the team for you.
Payflow
We will need the following details from your Payflow account:
Full guides have not been provided IDLoom side for this option. Please let us know if you need further assistance and we will follow up with the team for you.
PayPal
We will need the following details from your PayPal account:
- Client Id
- Client Secret
- Mode (Sandbox or Live)
- PayPal title page (optional)
Click here to see how to configure your payment settings
SagePay
We will need the following details from your Elavon account:
Full guides have not been provided IDLoom side for this option. Please let us know if you need further assistance and we will follow up with the team for you.
SIX Payment
We will need the following details from your SIX Payment account:
Full guides have not been provided IDLoom side for this option. Please let us know if you need further assistance and we will follow up with the team for you.
Stripe
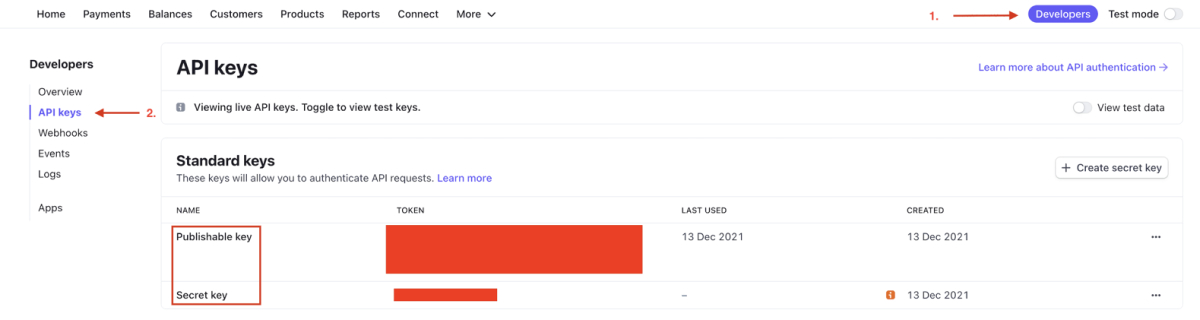
We will need the following details from your Stripe account:
- Publishable key
- Secret key
- Signing secret
If you have not created your Stripe account yet, create one and follow the steps below to integrate it with your events.
- Once you have registered your account, sign in to the account and get your API keys.
- Click Developers > API keys in the left menu to get your Publishable key and Secret key.
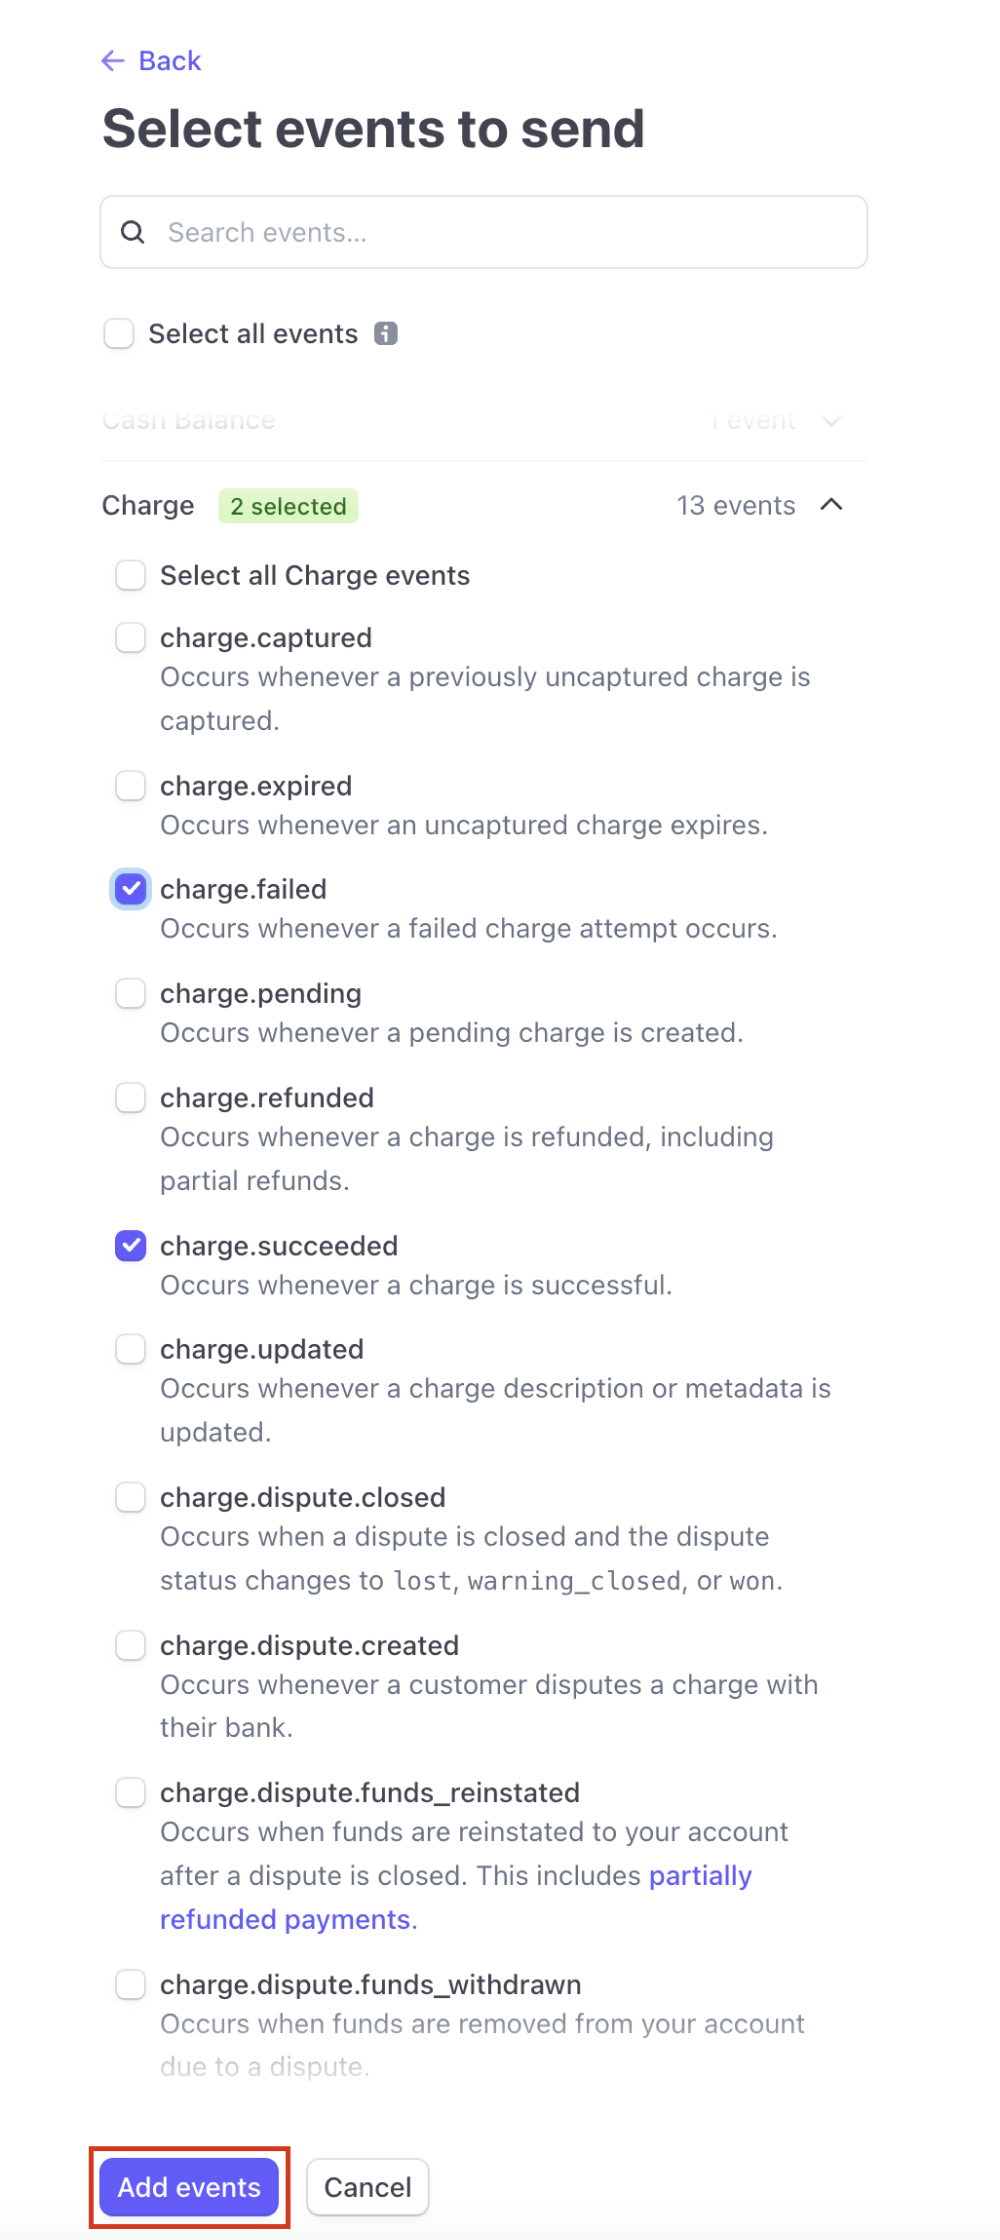
- Click Developers > Webhooks in the left menu.
- Click the Add endpoint button.

- Fill the Endpoint URL with https://reg.crowdcomms.com/webhooks/stripe
- Select the Latest API version.
- Add the following four events:
- charge.succeeded
- charge.failed
- source.canceled
- source.failed
- Click the Add endpoint button.

- Click the Click to reveal button to get your Signing secret.
VR Payment
We will need the following details from your VR Payment account:
Full guides have not been provided IDLoom side for this option. Please let us know if you need further assistance and we will follow up with the team for you.