Two Factor Authentication
What is Two-Factor Authentication? Two-Factor Authentication (2FA) works by adding an extra layer of security to your online accounts. It requires an additional log in credential – beyond just the username and password – to gain account access, and getting that second credential requires access to something that belongs to you. Why are we making 2FA mandatory on our platform? With Two-Factor Authentication (also known as two-factor Verification), you add an extra layer of security to your account in case your password is stolen. After you set up 2-Step Verification, you'll sign in to your account in two steps using: Something you know, like your password. Something you have, like your phone.
Two Factor Authentication for CMS Use
Setting Up 2FA
2FA can be enabled either by an authentication app or by getting a verification code sent to your email address.
N.B. If it is your first time accessing the CMS since the roll out of multi-factor authentication, then you may need to close your browser, re-launch and then clear your cache and cookies before accessing the CMS.
When first setting up 2FA you will be presented with this screen:

If you choose to use an authentication app then please select ‘enable’. This gives better protection as it requires the use of 2 devices. If you however would rather verify by email, you can as this is still an additional layer of security.
To set up using an authentication app:
Scan the QR code or manually enter the 16 digit code (sometimes referred to as a KEY) using your Authenticator App on your personal device

Once you have either scanned the QR code or entered the 16 digit code manually, you will then be provided with a 6 digit ONE TIME ONLY code to enter
N.B The 6 digit code is only valid for 60 seconds (Your Authenticator App will provide you with a new code after this time expires).
If you are unfamiliar with authentication apps, then here are some common ones you can use:
- Authy
- Microsoft Authenticator
- Google Authenticator
- LastPass
- OTP
Input the 6 digit code and then click "Verify"

You will now be logged into the CMS
Email Verification
If you opt for email verification, a 6 digit code will be sent to the email address associated with your CMS account.

N.B. For both routes, you have the option to ‘trust this computer for 30 days’ to save you verifying every time if you don’t want to.
How to Manage your CMS Device
In the top-right hand profile menu you will see the option to ‘manage devices’. Here you will see a device if you chose to use an authentication app. You can click the pencil to re-name it so you know exactly what device you used if helpful.

N.B. You can only have one authentication device at a time for CMS access, so if you want to change devices, you will need to click the trash can to remove the first one. Once you have no devices, you will see the option to ‘add device’. This will then take you through the previous process to set up 2FA.
If you lose your device, you will need to contact your designated member of our team as only CrowdComms staff can reset this for you. You will be prompted to do this by the system anyway if you select this option when trying to login. We will then reset it for you.

Two Factor Authentication for Front End Use
Setting up 2FA for Your App
You can now choose between further security options for your events. These extra options are only available for private and secure platforms that require login.
Security options are as follows:
Disabled
This is the login process as you currently know it, with no changes. Users will not be given the option to set up 2FA during the login process.
Optional
After going through the standard process of inputting their email and password, users will be given the option to set up a 2FA device at login, but it is not compulsory. They can opt for 'ask me later' if they don't want to do it at that moment, or they can select 'don't ask me again' in which cse this screen will never appear again when logging into the app.
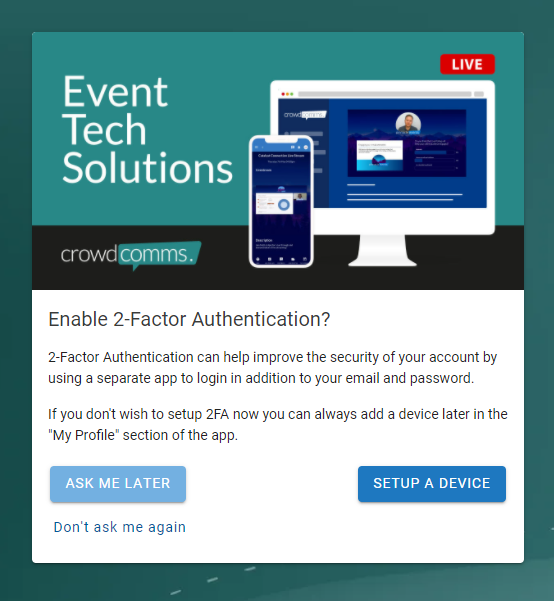
For setting up a device, please see the option for usng an authentication app below.
Email verification
This option means that 2FA is required, however front-end users can choose between an authentication app, or verification via a code being sent to their email.
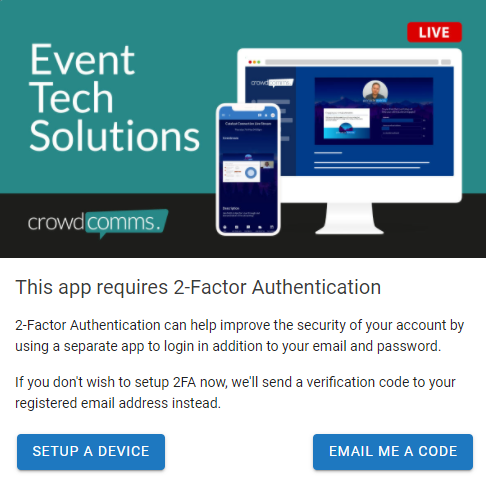
If they choose to receive a code, then a 6-digit code will be sent to their email which they will need to input before proceeding:

N.B. They have the option to turst the device for 30 days, to save doing this on each login should they wish.
If they chose an authentication app, then please see the steps below for using an authenticator app
Authenticator app
It will be mandatory for users to set up an 2FA via an authenticator app in order to log in. As soon as their email and password have been input, they will be presented with this screen:

Once you have either scanned the QR code or entered the 16 digit number manually, you will then be provided with a 6 digit one time code to enter into the next screen on the App.
N.B. The 6 digit code is valid for 60 seconds (Your authenticator App will issue a new code after this time has expired)

As with email verification
Most people will be familiar with Authentication apps, but for anyoe who hasn't used oe before, you can point them in the direction of these common ones:
- Authy
- Microsoft Authenticator
- Google Authentictor
- LastPass
- OTP
Managing Your Devices
On the front end, you can have more than one device for authentication. To manage your devices you need to go to the top-right profile menu and click 'my account'.
There you can:
- Edit your device name
- Add or Remove a device
- View when a device was added to the account
Lost Devices
If a delegate loses their authentication device, they will need to contact you as the event organiser to reset it for them.
To do this, you just need to find their profile in the people library, and then scroll down all the way to the bottom and click ‘reset authenticator devices’. This will remove the attached device from their account and allow them to set one up again from scratch.

Please note:
- If a passcode has been added to your app, this comes after everything as the very last step.
- SSO overrides everything as it already requires verification via a third party