4. Building Your Platform
- CrowdComms CMS Introduction: Video Tutorial
- Step one: Settings & Custom URL: Video Tutorial
- Step three: Modules, plan your content: Video Tutorial
- Step four: Building your agenda: Video Tutorial
- Step five: Libraries: Video Tutorial
- Step six: Platform comms: Video Tutorial
CrowdComms CMS Introduction: Video Tutorial
The CrowdComms platform has a wide feature set allowing admins to create on brand platforms that meet a variety of project requirements. This includes single page webinars, follow the sun (events covering different time zones) virtual conferences, multi day in person or hybrid congress's with complex personalisation for different groups, through to 12 month community platforms.
This guide provides a step by step process for a typical setup. Platform training, managed services and live chat are available to help you understand how to best utilise the platform to meet your own goals. We're here to help!
Note: The steps outlined show the latest version of the CrowdComms CMS (Admin dashboard) which you can access here. We recommend switching the toggle to the top right to access the latest version and the associated benefits.
Don't have access yet? Speak to your allocated account manager, support manger or contact us here.

Native app
If you have opted for a native app, a member of our native submission team will contact you to request the required information to allow us to submit your app. You can request an update on this from the live chat team contactable from the CMS.
If you have opted for a web based platform and want to upgrade to a native app, please discuss options with your Account Manager.
Important: You will need to setup your own app store account and the submission review can take three (3) weeks to be approved after we have submitted your app.
Full overview of native apps and the process can be found here.
Managing your timeline
Attached is a template project planner that you can use to track the progress of your project and agree responsibilities and timelines with all involved with the platform build.

Step one: Settings & Custom URL: Video Tutorial
The intuitive dashboard makes it easy for you to update all the necessary settings so that its set to your requirements.
App Details
- Update platform name
- Date and Time
- Timezone for sessions and alerts (users will have option to view in their local timezone as well as the default timezone)
- Default language
- Setup a custom url that will be used to promote your platform. Native app available: Discuss with your account manager and support manager to assist with the native submission.
Important: Custom URL
- If you provide your chosen custom URL whilst completing the Project Setup Form, this will be picked up by a dedicated resource who will email you to confirm that the URL is in place.
- If you wait until the project is in process to confirm your custom URL, please contact the live chat team from the CMS and they will get this setup for you.
- Please note: We can only purchase custom URL's that are available. The cost to purchase a domain is capped at £25, included with all packages. If your preferred URL that is more expensive than this, we will provide guidance on how to purchase and assign this to the event platform or give the option to choose an alternative that is less than £25 to purchase.

Security
CrowdComms are ISO-27001 accredited, trusted by global brands and some of the most security conscious organisations. We have a number of options to choose from to make sure only approved users can access, and that platform security is appropriate for the type of content and users accessing.
Note: Single Sign On (SSO) available. Discuss options with your account manager and support manager.

Branding
Here you will have the chance to apply your brand colours, custom font(s), and upload default images to be present on your platform including favicon, and the background image. For more advanced users there is also the option to apply platform wide custom css in this section.
View the changes in branding preview.

Content Management and Advanced Features
These allow for further customisation of your platform, however for the standard build you can skip this for now.
Step three: Modules, plan your content: Video Tutorial
There are 20 modules to choose from and each module has a different purpose. Some are focused on showcasing content and videos, others are used to deliver events, increase engagement, facilitate networking and capture feedback.
Each module is intuitive to setup however we recommend joining a training session or watching one of our training videos before proceeding further to ensure you utilise the platform in the most efficient way for your requirements.
Important: Keep it simple! Whilst there are 20 modules to choose from and you can create unlimited modules, the highest levels of uptake and positive user feedback are often linked to platforms that have limited modules and are focused on what is the most important actions you need users to complete.
In the 'Modules' section, select 'Create new module'.

You will see the full list of modules to choose from. Each module serves a different purpose and can be renamed to be relevant to your use case, as well as targeted to be visible to specific groups only.
Following the same process as the home screen. Choose from the available modules to build the framework for your event. Rename and change the icon to personalise to your requirements.

Abstracts module: Showcase medical abstracts, catalogue content, job specifications for internal comms.
Activity feed module: Private social media feed locked down to your platform, white boards, photo wall.
Agenda module: Show the event schedule. Features include filters, personalised schedules and session capacities to manage simple to highly complex agendas.
Company Display module: Showcase sponsors and exhibitors. Often repurposed as help desk or to profile new services or products being promoted within the platform.
Direct Link module: Powerful module to improve user experience. Direct link to any area of the platform including other modules, sessions, companies, people, live polls, surveys, Q&A feature or external pages. Simple one click for users to get where they need to be.
Documents module: Share powerpoints and other useful documents with approved groups. Supports pdf, ppt, word, excl and image files for your users to view and download. Link these documents to other areas of the platform such as sessions, people and company profiles.
Game Display module: Create challenges with points associated to drive platform, event and sponsor engagement. Live leaderboard shows how users are tracking. Include prizes and build a comms plan to get the best uptake.
iFrame module: Allows you to have your website and other supported sites to load within the platform. Stops users leaving the platform when you link external content.
Info pages module: Legacy module to showcase content. Replaced by the Info pages templates in page builder with improved user experience for admins and platform users.
Live Polls module: Create live polls and link these to sessions to generate real time engagement with your speakers. Users vote on questions and see the results appear in platform or on a branded live display at the venue display(s).
Live streams module: Legacy module to showcase live streamed content. We recommend creating live streams in the library section and linking to your agenda sessions for the best output and user experience.
Maps module: Upload Google maps and multiple floor plans with pin drop locations to link from sessions and companies.
Page Builder module: Powerful feature to build home pages, information pages and image galleries. Can be repurposed for multiple use cases.
People Display module: Showcase people lists such as speakers, attendees and VIPs. Upload your people to the Libraries section first, and link relevant groups to this module. Create multiple where needed. Networking features including 1-2-1 chat, business card exchange, video calls and request a meeting linked to profiles.
Portal module: Perfect for clients who organise multiple events. A portal acts a hub for all your events. All approved users download the same app 'Client A Events' and have a list of events they've been given access to. Controls to set permissions around what events are visible based on who has registered for each event.
Q&A Display module: Build as many Q&A areas as needed in the libraries section and link them here for quick access when you have Q&A taking place in different sessions. These can also be linked to the session.
Surveys module: Build as many surveys as you need. Session specific surveys linked to sessions, abstract surveys linked to abstracts, multi choice quiz's and event surveys.
Video Library module: Showcase on on demand content. Create categories to differentiate topics, pre event videos, on demand sessions and more.
Step four: Building your agenda: Video Tutorial
Overview
The platform agenda is the backbone of your event. Optimised towards user experience, it not only provides an overview of your event timetable in chronological order but allows users to build their own schedule when they favourite sessions directly within the app.
Need to tailor the experience for certain users? No problem! Session Visibility allows you to customise which sessions are visible to specific users, with the flexibility to have multiple agendas within a single platform.
Setting up agenda sessions
Importing and Exporting
You can import your agenda via our Agenda Spreadsheet template. This can be exported and imported via the CMS

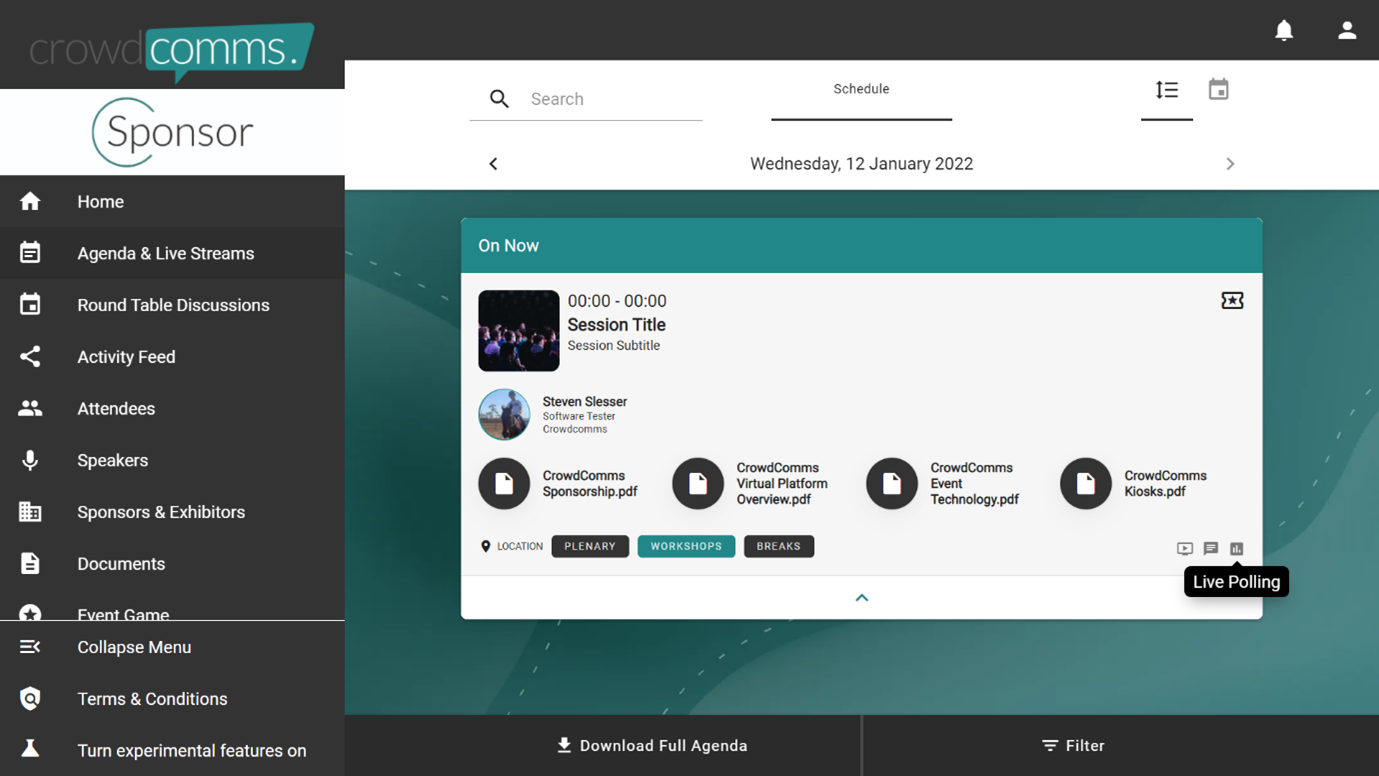
Each session is clearly displayed in an individual card, in chronological order, and includes the following information:
- An image relating to the session (200px by 200px)
- Start and end time of the session
- Session title
- Session subtitle
- Location
- Session capacity
- Any interactive features

Sessions can be expanded to display a brief description, access the list of speakers and any documents relating to that session.
Clicking onto a session opens a full session description page, where any live streams or breakouts can be accessed


For further customisation, certain information can be toggled on and off for all users. This is found within the agenda module on the CMS, under the tab called ‘Features’. Here you can switch on or off the following:
- Speakers –when the session card is expanded, the profiles of any speakers linked to the session are displayed, including their profile picture, full name, company and job title. When clicked, this leads to the full session details.
- Documents– when the session card is expanded, the icon and name of any document linked to the session is displayed, with speaker details shown underneath. When clicked, this leads to the full session details
- Features– this displays small icons, which when hovered over, detail which interactive features are used as part of this session. For example, live streaming, polling or Q&A. The session card doesn’t need to be expanded for this to display.
- Location– this displays the location which the session is linked to. Again, the session card doesn’t need to be expanded for this to display.
- Subtitle– this displays the session subtitle which has been entered into the CMS against this The subtitle displays just below the session title and has a character limit of 256 characters.

If you have multiple agendas then it is possible to set different features to be visible across the different agendas.
Session Visibility
Individual sessions within an agenda have two optional fields "People" and "Groups" that you can use to create specific agendas tailored to each of your attendees. If you choose to assign People or Groups to those fields on an agenda session, then that session becomes visible to those people only. Other attendees using your platform will no longer see that session appear in the agenda view.
Leaving the "People" and "Groups" fields blank will make the session visible to all attendees who have access to the platform and to the agenda module containing that session. You can control access to individual modules by setting the visibility options on the module settings page.

You're free to mix and match visible and hidden sessions within the same agenda module, giving you the freedom to design a rich agenda that can incorporate public and private sessions.
Interactive Sessions
If your app has any Live Polls, Surveys or Q&As within it, you can link them to sessions so the interactive elements appear right on the Session Page. To do this, in the Dashboard, edit the session you'd like to add interactivity to and go to the "Features" tab. From there, select the Survey, Q&A or Live Poll which you'd like to link to the session and press Save.
Here you can also enable or disable the chat and notes features for the session.

Session Filters
If your event has multiple streams or categories of sessions, it's possible to create a number of filters such as "Plenary", "Breakouts", and, "Refreshments" which can then be applied to a list of sessions. When browsing the agenda in the platform, users can then filter down an extensive agenda by these terms to browse more easily.

Personal Agendas / Favouriting Sessions
In contrast to "Allowed People" and "Allowed Groups", Attendees can 'favourite' a session by clicking the star icon next to a session in the app agenda view. This will add the session to the attendee's 'My Schedule' view in the app, allowing them to plan which sessions they wish to attend during the course of the event.
You can export the current list of 'favourited' sessions from the 'Import/Export' tab of the agenda edit screen in the CMS, allowing you to get an idea of how popular sessions are and allow for planning capacity.

Ordering of Sessions
Sessions within an agenda are primarily ordered chronologically and then alphabetically by the session title. If you have two sessions that start at exactly the same time and you want them to appear in a specific order, it's worth considering either making one session start a minute later or tweaking the title of the session so that it appears after the other alphabetically. Don't forget you can have as many agenda modules as you want in your platform, so if an agenda is becoming un-manageable it may make sense to split it up into two or more modules. This could also make the platform easier to navigate for your attendees.
We hope that this overview provided you with all of the information that you need to get the most out of your event agenda. However, if at any time you require further support, please get in touch with your CrowdComms’ Support Specialist or Account Manager.
Simulive
We all know that pre-recording your sessions creates great-quality, error-free video content and gives you the option of dropping in post-production, video-enhancing effects. Our new Simulive feature enables you to pre-record your live stream ahead of time and schedule it to play so that all of your delegates can watch it at the same time, regardless of when they have joined the session and without the need of a tech support team.
Another big bonus of using the Simulive feature is that video content automatically becomes on-demand and available for your attendees to watch (or re-watch!) as soon as the session finishes.
Enabling Simulive
You can enable this feature individually in the session where you want to embed a video from your Video Library.
On your Event App, the video will start playing as soon as your agenda session starts. If there are late joiners to the session, they will be watching it at the exact time as everybody else.

Step five: Libraries: Video Tutorial
Introduction
This video gives a short intro to the role libraries play, after which you can access our guides for specific libraries using the hyperlinks below.
People: The people library will play a role in every event as the repository for user profile information and controlling access.
Companies: Create visually engaging booths which can display a host of content about your sponsors or exhibitors.
Locations: Manage and view any location labels you have created
Live Streams: View and edit your Live Streams and get info such as stream key, or live viewing figures.
Zoom Meetings & Webinars: Import and manage events from your Zoom account using our integration.
Breakouts: Manage your breakout rooms which can then be linked to agenda sessions.
Videos: Upload and manage your on demand videos for display within an agenda session or our dedicated "Video Library" module.
Documents: Upload and manage your documents ready for linking to a relevant module.
Images: View and download images uploaded elsewhere in the platform, or upload new images in bulk, ready to be linked through to your modules.
Live Polls: Here you can create and setup your poll questions and then run them during the session, with the ability to cue questions and preview the results live.
Surveys: Create and edit surveys using a variety of question types, and export your results.
Q&A: Create and set up container for user submitted questions during your live event.
Smart Sessions: Setup and manage room access, timings branding and more for your smart sessions.
Step six: Platform comms: Video Tutorial
The comms section allows you to send out notifications to your audience before, during and after an event. It is a great way to keep your attendees up to date with your event and drive engagement for live sessions, capturing feedback or promoting sponsors and networking opportunities.

Example alerts:
- Update your profile to gain 50 points!
- Session starts in 5 minutes
- Networking hour begins now
- Thank you to our sponsor
- Please provide feedback here
This feature has now been re-designed to be even more flexible. There are now three different types of in-app alerts, all with native push notification support, so delegates will never miss another message. You can opt for large pop-ups with or without embedded surveys, flash notifications or a persistent notification with a call-to-action.
This re-design includes the ability to embed surveys from the survey library into the large pop-up alert notification, enabling event surveys to be collected more swiftly and effectively.
To avoid bombarding your delegates with 'in-your-face' alerts, the more subtle flash notifications can be used, which will appear on the top right-hand corner of the Event App screen for five seconds. Alternatively, the persistent notification can be used, which is a similar design but continues to be displayed until the user dismisses it or performs the call-to-action.
Preparing alerts
- Firstly, you will need to log into your CrowdComms Content Management System (CMS) Dashboard and input your details.
- Upon successful login, select the Event App in which you would like to use the alerts.
- Then click on the ‘Alerts’ tab from the left-hand menu, and you will then see the Alerts page.
- To add an alert, click on the ‘+’ icon at the top of the page.
- On this page, you will see three different types of alerts to choose from. To pick the type of alert notification you wish to use, click on one of the top options. The options are:
a. Full-Screen Modal Notification – Rich media format alerts that must be acknowledged by the user
b. Fading Notification – Small, text-only notifications that disappear after five seconds without user interaction
c. Persistent Notification – Small, text-only notifications that remain until the user takes an action

Full-Screen Modal Notifications
- For this type of alert notification, you can also embed a survey within the notification for your delegates to complete. You can also make the completion mandatory if you wish.
- To set up your alert notification, there are several fields that you will need to populate.
- You first need to add the title for your alert in the Content section. You are allowed 128 characters in this field.
- Next, you can add the message or content for your alert in the rich-text editor’s field. This field will enable you to style your alert notification message including adding bold, italic, bullet points etc.
- In this field, you can also embed a video which you have uploaded to the CMS Dashboard Video Library.
- Next, is the Embed section where you can embed a survey which you have already created in your Survey Library. Click here to find out how to create a survey.
- You can also make this survey compulsory, just check on the ‘Mandatory completion’ checkbox to enable this function. Please note that if you check this box, this means your delegates will not be able to navigate away from the alert notification pop-up until they have completed the survey. Therefore, it may be a good idea to inform your delegates about this in the alert’s text.
- In the next section, Time, you can decide when you would like the alert notification to appear on your Event App for your delegate to see.
- If you would like the alert notification to be sent immediately, check on the ‘Send now’ check box.
- If you want to send it in the future, select the date and time when you would like the alert notification to be sent out.
- This next section is the Recipients to whom you want the alert notification to go to. If it’s a targeted alert that you are sending, use the relevant group(s) you wish to target. Select the 'Everyone' group if you want everyone on your Event App to see the alert notification.
- The final section is other Delivery methods which you can include on top of the in-app notification that you’re sending.
- Check on the ‘Send email notification’ check box if you want the email version of the alert to be sent to your delegate’s inbox.
- Check on the ‘Send native notification’ check box if you want your delegate to receive a Push Notification on their mobile device.
- If you opt for the native notification option, you will see the Push Notification section where you can add a notification message and embed a deep link to direct your delegates to a specific part of your Event App.
- Once you’re happy with your alert notification set up, either click ‘Send’ if you have checked ‘Send now’ or click ‘Save’ to schedule it to go out on the date and time set.

Fading & Persistent Alert Notifications
- The Fading and Persistent alert notifications are very similar in design. Both are small, text-only notifications which will appear on the top right-hand corner of your screen.
- The two differences are that for Persistent alert notifications, you can add a Call-to-Action button to direct the user to a specific page within your Event App. The message will also remain until the user takes an action. When Fading alert notifications are used, the message will disappear after 5 seconds.
- To set up both types of notifications, you will need to add the Alert title and message. You have up to 128 characters in both fields.
- For the Persistent alert notification Call-to-Action button, you can personalise your text with up to 30 characters in this field.
- You can then add a deep link to your Call-to-Action button by selecting an action from the dropdown option. For example, if you select ‘Session’ you will then be prompted by another dropdown where you can select the specific Session you want to guide your delegates to. Please note that if you choose not to add a deep link, the Call-to-Action button will take your delegate to the Alerts page of the App.
- In the next section, you can decide when you would like the alert notification to appear on your Event App for your delegate to see.
- If you would like the alert notification to be sent immediately, click on the ‘Send now’ check box.
- If you want to send it in the future, select the date and time when you would like the alert notification to be sent out.
- This next section is the Recipients to whom you want the alert notification to go to.
- If it’s a targeted alert that you are sending, use the relevant group(s) you wish to target. Select the' Everyone' group if you want everyone on your Event App to see the alert notification.
- The final section is other Delivery methods which you can include on top of the in-app notification that you’re sending.
- Check on the ‘Send email notification’ check box if you want the email version of the alert to be sent to your delegate’s inbox.
- Check on the ‘Send native notification’ check box if you want your delegates to receive Push Notifications on their mobile device.
- If you opt for the native notification option, you will see the Push Notification section where you can add a notification message and embed a deep link to direct your delegates to a specific part of your Event App.
- Please note, that when creating a persistent alert notification, the Push Notification deep link will be bound to the same action as the alert Call-to-Action button.
- Once you’re happy with your alert notification set up, either click ‘Send’ if you have checked ‘Send now’ or click ‘Save’ to schedule it to go out on the date and time set.
