6.2. Networking: Business Cards
Improve delegate engagement with custom contact card designs that can be left virtually anywhere around the event app. Scan or swap them with other delegates, leave them behind at exhibitor stands and build up a list of contacts to download and take away from the event. The user guide below will show you how to set up standardised business card designs in your CMS Dashboard for your delegates to use in your Event App. We’ve also included guides for your delegates to follow so that they can easily personalise their card, add their own bespoke design and quickly get to grips with how to exchange their card with other delegates. Content: 1. Setting up Business Cards in CMS 2. Logging in to the Event App and Setting up Privacy Preferences – Guide for your delegates 3. The Business Cards Page on the Event App – Guide for your delegates 4. Customising Business Cards on the Event App – Guide for your delegates 5. Exchanging Business Cards with Other Delegates and Companies – Guide for your delegates
- Setting up Business Cards in CMS: Video Tutorial
- Logging in to the Event App and Setting up Privacy Preferences
- Business Cards Page on the Event App
- Customising Business Cards on the Event App
- Exchanging Business Cards with Other Delegates and Companies
Setting up Business Cards in CMS: Video Tutorial
1. Firstly, you will need to log into your CrowdComms Content Management System (CMS) Dashboard and input your details.
2. Upon successful login, select the Event App where you would like Business Cards applied.
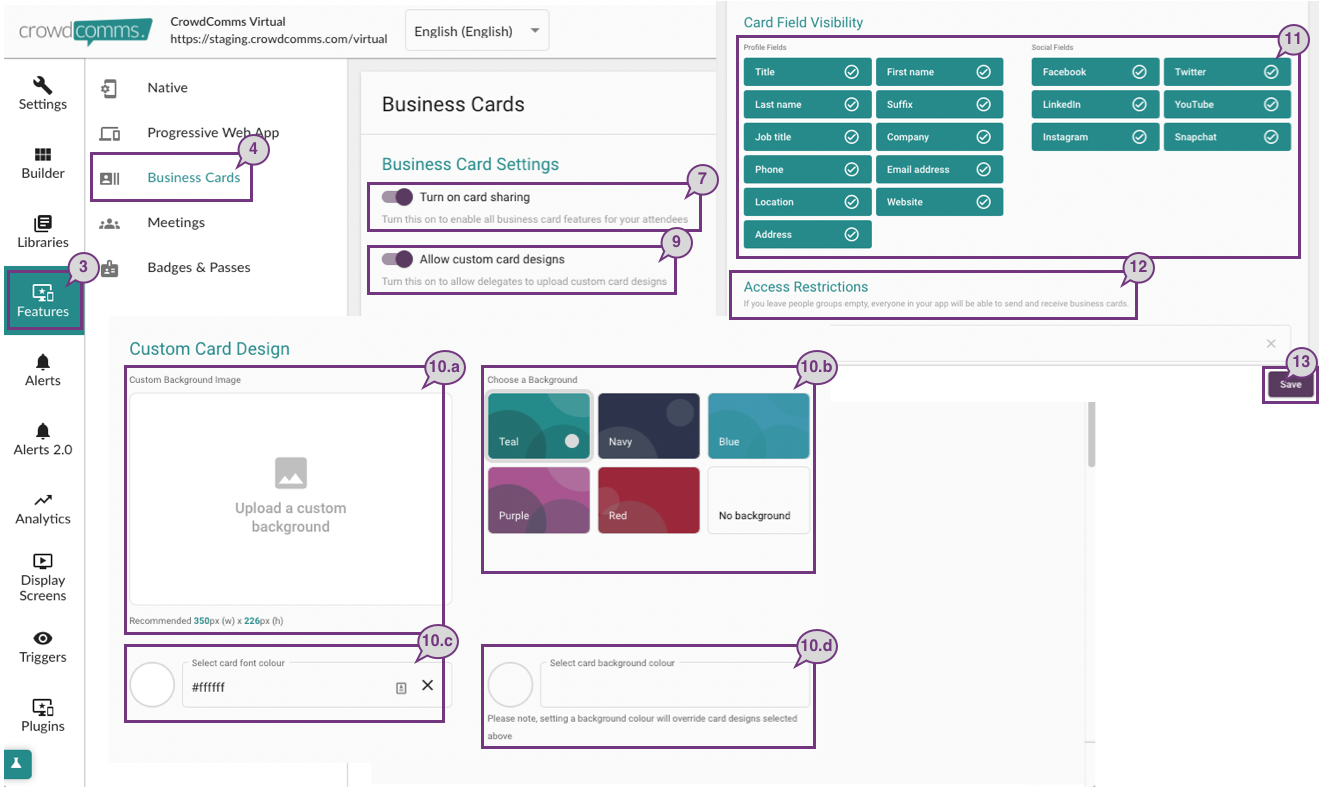
3. Then click on ‘Features’ from the left-hand menu.
4. Click on ‘Business Cards’ that appear as an option in the secondary menu to the right.
5. On this page, there are several sections for you to populate and they are the settings, card design, personal details fields visibility and access restrictions.
6. Under Business Card Settings there are two toggles which you can set.
7. If you switch on the ‘Turn on card sharing’ toggle, your delegates will be able to exchange cards with one another and drop their cards at the Company pages.
8. If they are at a physical event, they will be able to scan other delegates’ cards and be able to have their card scanned by other delegates to initiate an exchange.
9. If you switch on the ‘Allow custom card designs’ toggle, your delegates will be able to upload custom card designs to be used as their business card’s background.
10. In the Custom Card Design section, you will be able to:
a. Upload a custom background image – If you upload an image, this image will appear on your Event App for your delegates to see and use as their business cards’ background.
b. Template background – If you select one of the template backgrounds, it will become the default background for your delegates on your Event App.
c. Card font colour – Once you’ve uploaded a custom background image, you can choose the font colour by clicking on the circle. To choose a colour, you can either enter the Hex code or use the colour and shade sliders.
d. Card background colour – If you wish to have a simple block colour background you can do so by clicking on the circle. To choose a colour, you can either enter the Hex code or use the colour and shade sliders.
Please note that setting a background colour will override card designs selected either from the custom design or the template background image.
11. In the Card Field visibility section, you can select which profile or social fields delegates can choose to appear on their business cards. For example, if you don’t want your delegates to be including their Company’s name in their business card, you can de-select ‘Company’ from the field’s visibility.
12. The last section is the Access Restrictions field. If you want to restrict this feature to only certain group(s), you will need to add the group names in this field. Otherwise, leave this field blank to allow everyone in your Event App to be able to use the Business Cards feature.
13. Don’t forget to click ‘Save’!
Logging in to the Event App and Setting up Privacy Preferences
1. Firstly, log in to your Event App and input your login details.
2. If this is the first time you have logged in to this app, you will see the Privacy Settings preference pop-up giving you the following options:
a. Make yourself available for Video Meetings – Check this box if you want other delegates within the platform to be able to invite you to a private video call without having to first send a meeting invite.
b. Make yourself available for Chat Messaging – Check this box if you want to send and receive private messages with other delegates within the platform.
c. Make your profile visible on the App – The default is set to ‘visible’. If you don’t want others to see your profile, you will need to uncheck this box.
d. Make yourself available for meeting booking – Check this box if you would like other delegates within the platform to be able to book meetings with you. If you uncheck this option, you won’t be able to send or receive meeting invites.
e. Make yourself available for Business Card Exchanges – Check this box to allow you to create a virtual business card and swap contact information with other delegates and companies.
3. If this isn’t the first time you have logged in to this app, you can still amend the settings mentioned in step (2). You can do this by clicking on the right-hand menu, where you can see your initials, and clicking ‘My Profile’.
4. Scroll down the page until you see the ‘Privacy Settings’ section. You can amend your preferences here.

Business Cards Page on the Event App
1. Once you’ve logged in to your Event App, you will be able to find the business card feature on the Business Cards page.
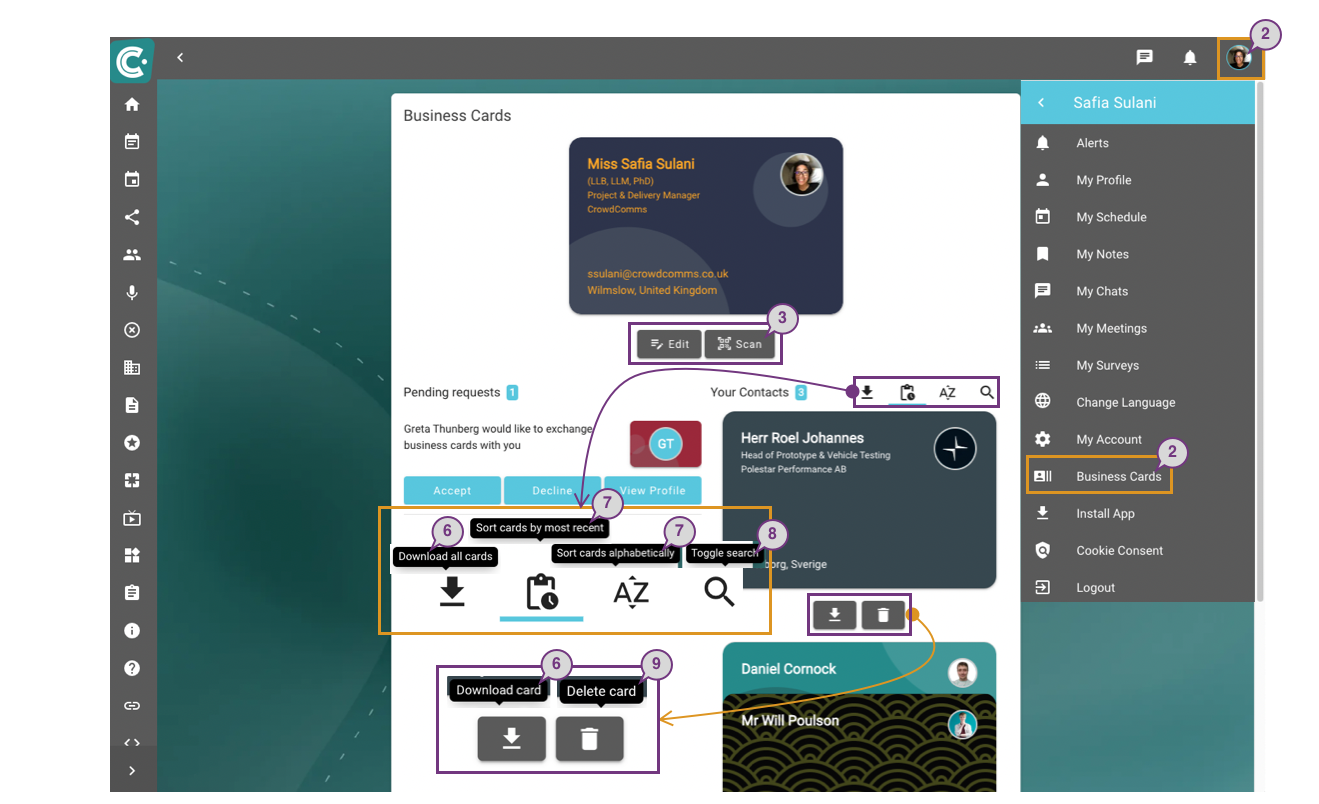
2. To go to the page, click on the right-hand menu, where you can see your initials, and click ‘Business Cards’.
3. On this page, you’ll be able to edit your card, open the card scanner, view the QR code for your card, accepts request to exchange and many more.
4. In your Contacts list, you can find the list of cards you initiated the exchange with.
5. You can download individual cards or download all of the cards on your deck.
6. If you click on the download button, you will receive a spreadsheet with the information which appears on your contacts’ cards and these can vary depending on the information they included.
7. You can sort the cards according to the time they were added to your list, or alphabetically.
8. You can also search for specific cards, which will then only show the cards from the keyword search that you use.
9. Finally, if you wish to remove a business card from your contact list, simply click on the delete icon.
Customising Business Cards on the Event App
1. Click on the right-hand menu, where you can see your initials, and click ‘Business Cards’.
2. You will then be taken to the Business Cards page where you can see your own virtual business card.
3. At the bottom of the card, click on ‘Edit’ to customise your card.
4. On the ‘Edit Your Card’ page, there are several things you can edit to customise your card according to your creativity. This freedom, however, is subject to your event organiser’s set-up. You can:
a. Edit personal details – You can decide which of your personal details are visible on your virtual business card.
For example, if you don’t want your email to appear on your business card, you can de-select ‘Email’ from the personal details field.
Please note that to ensure the information field you selected is visible on your business card, you must ensure that your profile in your Event App is populated with the relevant information. To do this click on the right-hand menu, where you can see your initials, and click on ‘My Profile’ to edit your personal details.
(The sections below are available if your event organiser allows individuals to further customise their business cards).
d. Card style – You can choose different template designs to customise your virtual business card.
e. Custom background image – You can also upload your own background image.
f. Custom card colour – Alternatively, if you would prefer a simple block colour background, you can click on the ‘Edit’ icon to pick a colour for your virtual business card background. You can either select a pre-defined colour, choose a colour using the colour shade slider or enter the Hex code.
g. Custom text colour – Regardless of the background that you choose, you can change the text colour that will appear on your virtual business card. To pick a colour, you can either select a pre-defined colour, choose a colour using the colour shade slider or enter the Hex code.
5. Once you are happy with your modification, click ‘Save Changes’.

Exchanging Business Cards with Other Delegates and Companies
Virtually exchange business cards with another delegate
1. To exchange cards virtually on the Event App, go to the ‘People Displays’ page. This page can be found on the left-hand menu of your Event App. This tab can occasionally be labelled differently, but most commonly ‘Delegates’ or ‘Attendees’.
2. You can locate the person you want to exchange details with by searching for them using the Search field. Then, click on the relevant attendee to view their profile.
3. On their profile, you will see their virtual business card if they are available for exchange.
4. Click on the ‘Exchange business cards’ button to initiate an exchange.
5. You will then see a pop-up where you can write your message to the person with whom you wish to exchange the business card. Please note, that this field isn’t compulsory.
6. Click ‘Send’ to start exchanging.
7. Other delegates within the app can also initiate a business card exchange with you, when they do this, you will be able to see all of these requests in the ‘Pending Requests’ list on the Business Cards page.
8. You can either Accept, Decline or view their profile to find out more about them.

Exchanging business cards in-person at an event
1. If you happen to be at an in-person event, you can exchange business cards with other delegates by scanning their QR code using our in-App scanning feature. To do this, you will need a device with a camera to be able to perform the scanning action.
2. If you wish to scan a delegate’s business card, go to the ‘Business Cards’ page, and click on the ‘Scan’ button. Then click on the ‘Open Scanner’ icon.
3. You will then see a pop-up, which you can use to scan the QR code of other delegates.
4. Please note that if you have not populated any of your personal details on your profile, the QR code field will be blank.
5. To initiate an exchange, the person with whom you wish to exchange the business card must show their QR code to you to enable you to scan their business card.
6. If successful, you will receive their business card in your contact list, and they will automatically receive your business card.
7. If another delegate would like to exchange their business card with you, you can show them your QR code by going to the ‘Business Cards’ page and clicking on the ‘Scan’ button. Allow the other delegate to scan your card and once successful, you should also receive their business card added to your list of Contacts.

Leaving your card on a company page
1. On your Event App, you will also be able to leave your virtual business card with a company.
2. To do this, go to the company list from the left-hand menu, select the company you wish to share your business card with and click on the ‘Leave your business card’ button at the top of the Company’s page.
3. You will then see a pop-up where you can write your message to the company with whom you wish to leave your business card, although this field isn’t compulsory.
4. Click ‘Send’ to leave your card.
5. When you leave your card with a company, you are initiating an exchange of your business card with the company’s representative.
6. As a result, if the company representative accepts your request, you will in turn receive the company representative’s business card.
