Video-On-Demand Streaming Service
Are you looking for an elegant, responsive, and ultra-organised way to display on-demand video content for your attendees to access throughout your event? The innovative CrowdComms Video-On-Demand Streaming Service brings the functionality and familiarity of video streaming technology alongside real-time session viewing to provide users with an engaging and accessible content hub.
- Overview
- Enabling Video Library
- Adding videos to the library
- Building the Video-On-Demand Streaming Service
- Single Scrolling Module
- Multi-Section Library Module
- Downloading your on-demand videos and live-streams
Overview
Enabling Video Library
Please contact your CrowdComms’ Account Manager if you would like Video Library activated on your Event App.

Adding videos to the library
Logging in to the Dashboard (CMS)
- Firstly, log into your CrowdComms Dashboard (CMS) and input your details.
- Select the Event App that you would like the Video-On-Demand Streaming Service to be set-up on.
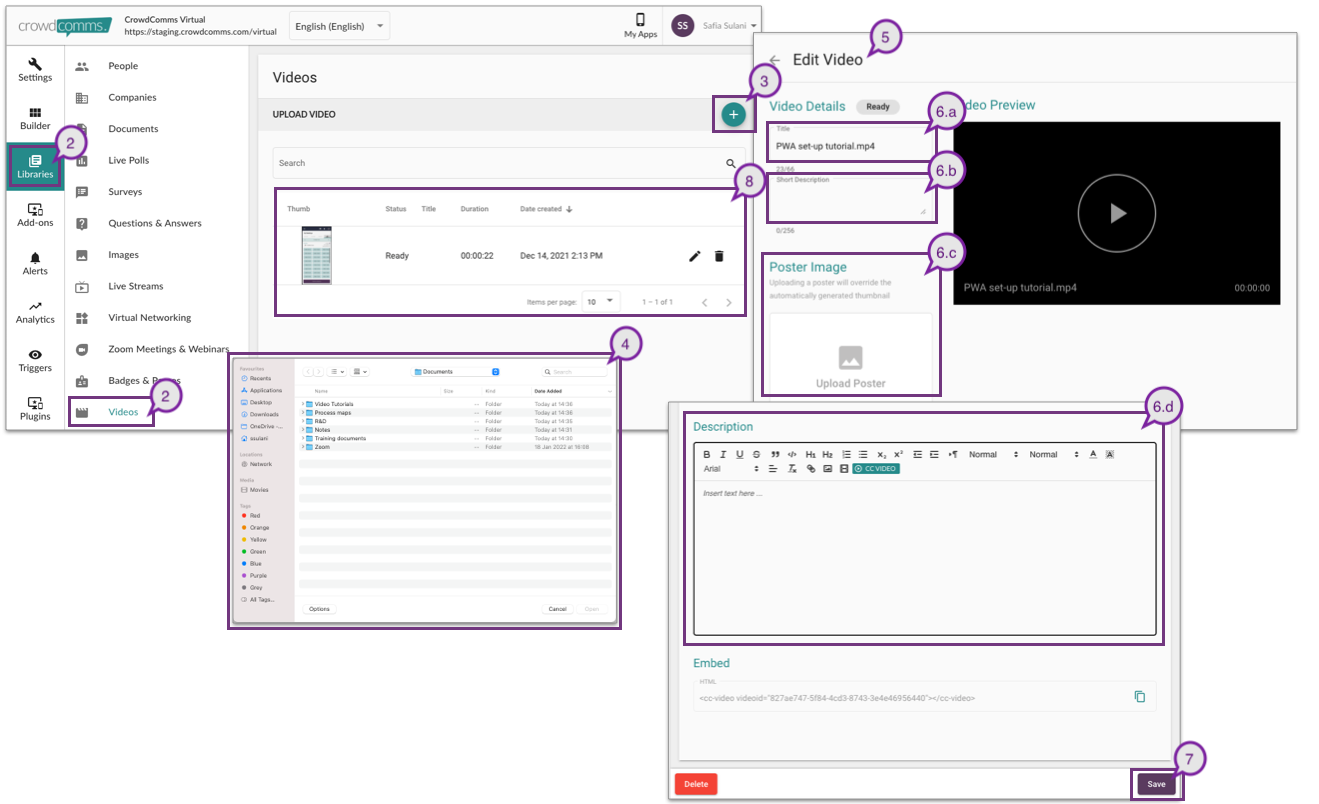
Adding videos to the library
- Before getting started with building the Video-On-Demand Streaming Service, you will need to upload a series of videos to the Video Library bank in the Dashboard.
- To do this, firstly click ‘Libraries’ on the left-hand menu and click on ‘Videos,’ which will appear as an option in the secondary menu to the right.
- Click on the ‘+’ icon to upload your chosen video(s).
- A pop-up will appear, which will prompt you to locate and select the videos you want to upload to the Dashboard.
- Once the download completes, another pop-up will appear to enable you to edit details about your video. You can also do this by clicking on the pencil icon to edit.
- In this page, you can:
a. Add a title to your video (maximum of 66 characters)
b. Add a short description (maximum of 256 characters)
c. Upload a poster image, which will appear as a thumbnail
d. Add a description about the video in the rich-text editor field
Attendees are more likely to watch videos that have eye-catching thumbnails and engaging
descriptions! - Don’t forget to click ‘Save’ after you have finished editing.
- Your uploaded videos will appear as shown in the image below
Building the Video-On-Demand Streaming Service
- Now that you have all your videos uploaded into your library, you are ready to start!
- Firstly, click on ‘Builder’ from the left-hand menu.
- You will then see the Module tile selection screen appear. Click on ‘Video Library’ that appears as an option.
- A pop-up will appear, which enables you to rename the module.
- Select the type of display you want to appear on the Event App, you have the option of a ‘Single Scrolling Library’ or ‘Multi-Section Library’
a. Single Scrolling – This will display one feature video with one scrolling list of video thumbnails that fit to the screen.
b. Multi-Section Library – This will display categorised video libraries, allowing you to separate your content into curated sections. - To change the icon and set the module privacy, go to the Settings tab
- Don’t forget to click ‘Save’ after you have finished editing.

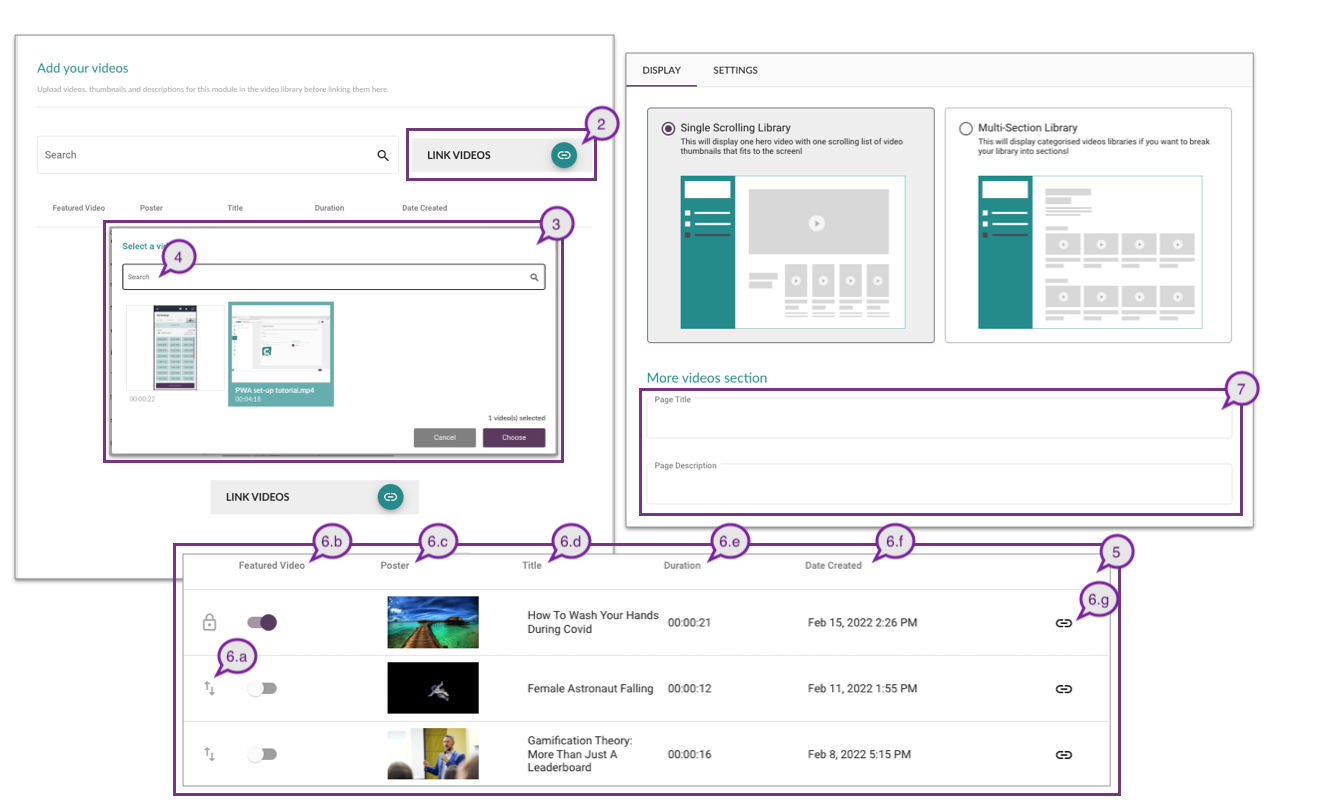
Single Scrolling Module
- For this option you only need to link your videos once, as they will all be contained in a single, continuous list.
- You will need to link the videos that you want to display in this Module from your Video Library bank, by clicking on the ‘Link Videos’ button. If you have skipped this stage and your library bank is empty, please refer to ‘Adding videos to the library’ to learn how to add videos to the Dashboard library.
- A pop-up will appear with the list of videos from your Video Library bank.
- In this pop-up, you can use the ‘Search’ bar to look for a specific video, select a listed video or multiple videos at once and click ‘Choose.’
- Your chosen video(s) will appear on the list as shown in the image below.
- In this list, you can see several columns and they are:
a. Re-order list – This will enable you to reorder your videos by dragging and dropping them to the desired order
Note: The featured video will always remain at the top of the list, to reorder it, you first need to change your featured video to another video from the list.
b. Featured video toggle – This toggle will push this video into the playable hero spot in the Event App. Only one video should have this selected by default, and it will be the first video that you link to this Module. You can change this to another video at any time.
c. Poster image – This will be the thumbnail image that you have set in the library.
d. Title – The title is taken from the ‘Title’ of your video in the library.
e. Duration – The video length.
f. Date Created – The date you added the video to the library bank.
g. An Unlink Icon – This will unlink the video from this Module and will not be visible to your delegates. - Once you have linked your videos, you can also add text to the ‘Section Title’ and the ‘Section Description.’ These titles and descriptions will appear on the Event App to provide further information and instructions to attendees.
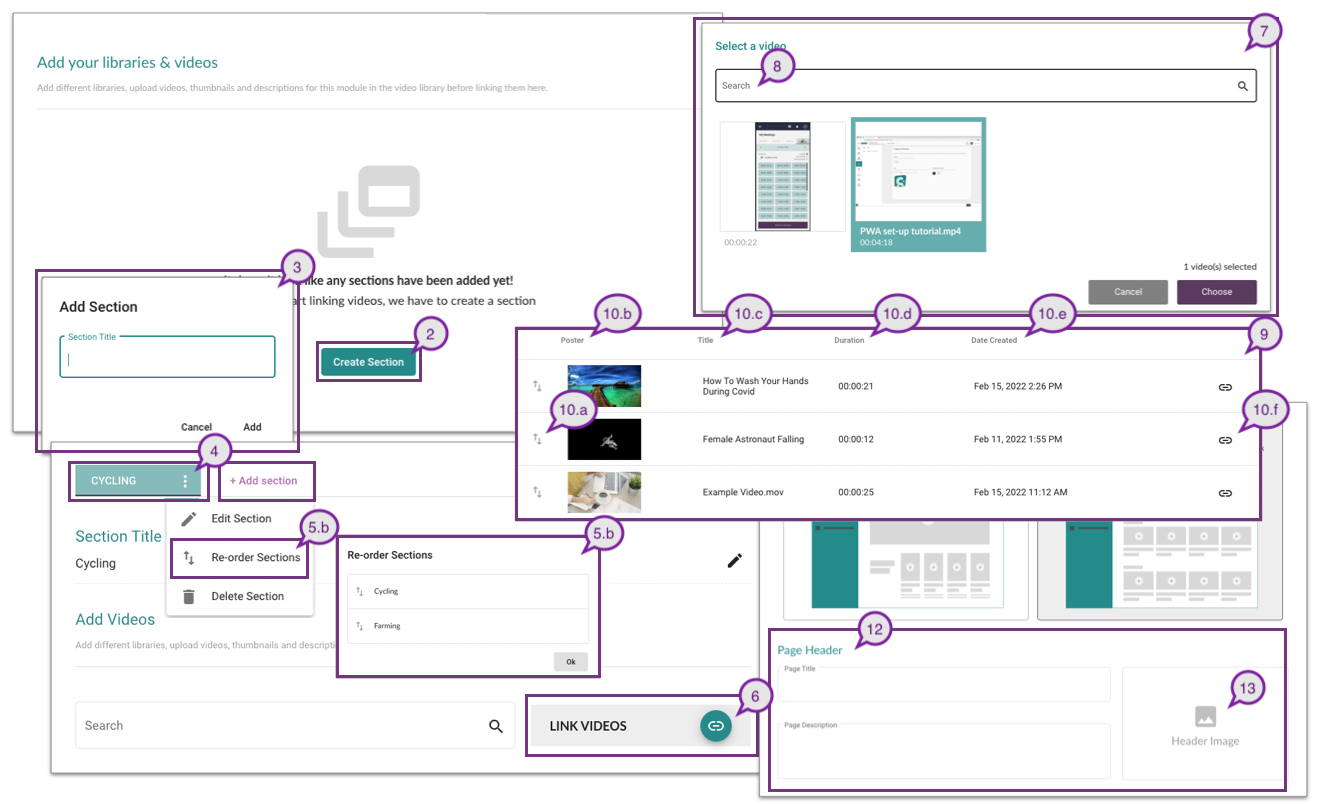
Multi-Section Library Module
- For this option you may need to link your videos multiple times, depending on the number of sections you wish to create and how many categories you want your video to feature in.
- To start, click the ‘Create Section’ button as shown in the image below.
- A pop- up will appear, which enables you to name the Section Title, then click ‘Add’.
- If you wish to change the name of the section title or delete the section, click on the context menu [3 dots].
- You can also re-order the sections based on how you want them to appear on the Event App. There are 2 ways to do this:
a. Horizontally – Click on the section tab and drag and drop them horizontally
b. Vertically – Click on the context menu [3 dots] then click on ‘Re-order sections’. You will then see a pop-up, drag and drop the section according to your desired order - You will then need to link your videos that you want to display in this Module from your Video Library bank, by clicking on the ‘Link Videos.’ Please refer to ‘Adding videos to the library’ to learn how to add videos to the Dashboard library.
- A pop-up will appear with the list of videos from your Video Library bank.
- In this pop-up, you can use the ‘Search’ bar to look for a specific video, select a listed video or multiple videos at once and click ‘Choose.’
- Your chosen video(s) will appear on the list as shown in the image below.
- In this list, you can see several columns and they are:
a. Re-order list – This will enable you to reorder your videos by dragging and dropping them to the desired order.
b. Poster image – This will be the thumbnail image that you have set in the library.
c. Title – The title is taken from the ‘Title’ of your video in the library.
d. Duration – The video length.
e. Date Created – The date you added the video to the library bank.
f. An Unlink Icon – This will unlink the video from this Module and will not be visible to your delegates. - To add more sections, please repeat step 2 – 7 above.
- Once you have linked your videos, you can also add text to the ‘Page Title’ and the ‘Page Description.’ These titles and descriptions will appear as the Page Header on the Event App to provide further information and instructions to attendees.
- Finally, upload a header image that you want to appear at the top of your Video Module on your Event App.
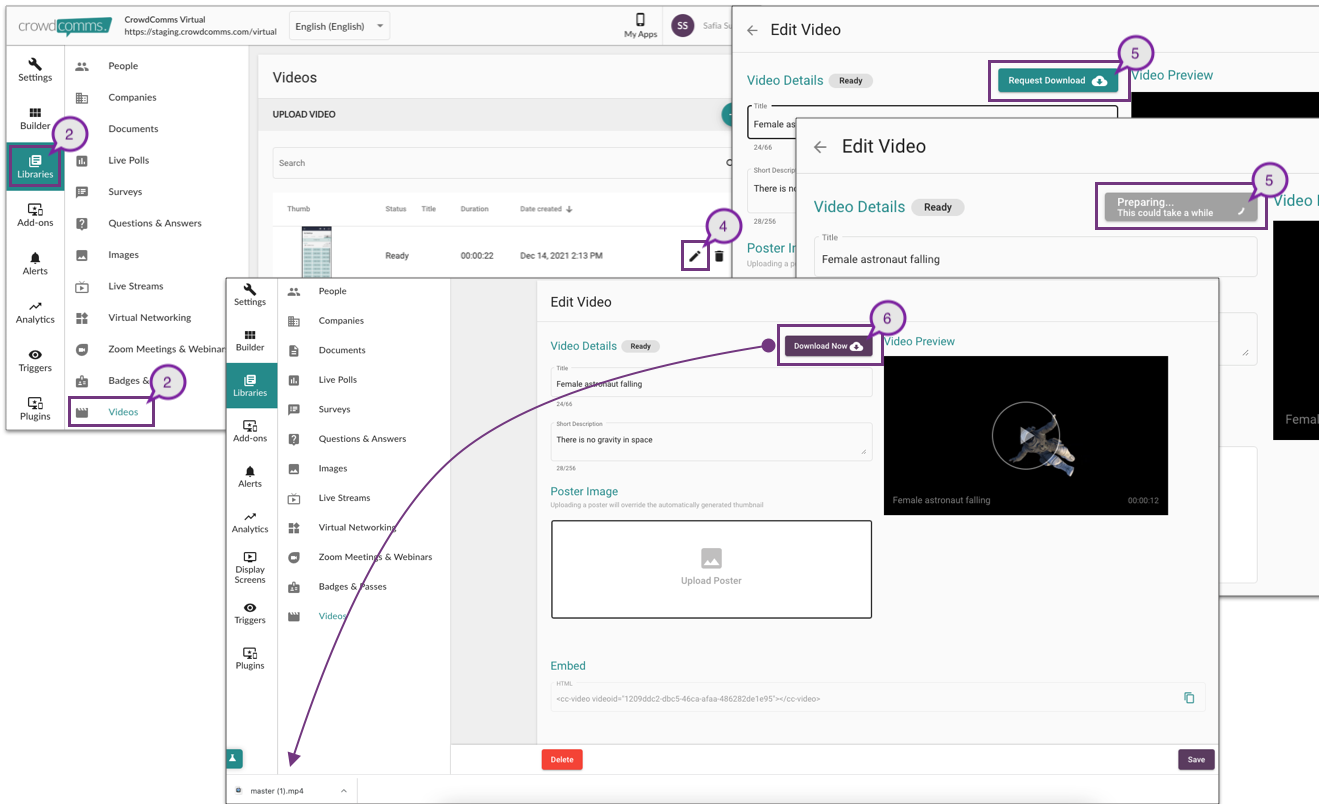
Downloading your on-demand videos and live-streams
- You are now able to download all live-streams which have been converted into on-demand videos as well as all other videos stored within the Video Library Bank.
- To do this, firstly click ‘Libraries’ in the left-hand menu and click on ‘Videos,’ which will appear as an option in the secondary menu to the right.
- You will see a list of videos containing either:
a. On-demand videos – Video which was downloaded directly to the CMS
b. Live-stream videos – Live-streams which have been converted into on-demand videos - Click on the ‘Pencil’ icon on the video that you wish to download.
- Click on the ‘Request to Download’ button and you will see that the status will change to ‘Preparing’. This could take a while, while the system prepares the video for you to download.
Note: If the video preparation takes longer then 5 minutes, click on the ‘Preparing’ button again, then click refresh. - Once ready, the status will then change to ‘Download Now’. Click on the ‘Download Now’ button and your video will be downloaded to your machine.
- The ‘Download Now’ status will remain in place for 24 hours. This means, anyone who has access to the same Event App CMS will be able to click on the button and the same video will be downloaded straight onto their machine.
- After 24 hours, if you want to download the same video again, you will need to repeat the request as mentioned in Step 5.