CrowdComms - Kiosk Badge Designer
Designing ToYour designBadge
1. badgeAccessing whichthe canBadge laterDesigner
- Log in to the CMS Dashboard.
- From the left-hand menu,
navigatego toKiosks,'Kiosks'. - In the secondary menu,
clickselecton the ‘'BadgeDesigner’Designer'.
On
On
2. thisChoosing page,a youBadge willDesign
- Three
presentedbadge design templates are available:- Standard Badge (Eco Print): Ideal for eco-conscious events, with
twoquickbadgeprintingdesigns:durationSimpledueEco PrintThis design is ideal for events that are conscious of the environment, as it requiresto low inkconsumption, resulting in quick printing duration.
consumption.- Edge-to-Edge Background:
A fresh and modernModern design offeringa largeample space forafull image display ontheboth front andback of the badge.back. COMING SOON!Credit Card BadgesAn:85x55mm flexibleFlexible plastic cardthat's perfectsuitable forseries ofrecurring eventswith a returning audienceoras apremiumoffering souvenir card to keep as a momento of the eventsouvenirs.
- Standard Badge (Eco Print): Ideal for eco-conscious events, with
3. betweenStart theseDesigning
- Click
designs,onclick'Select Template' button on thearrowdesiredastemplateshowntobelow,edit. - Select a preset template by hovering over the design and
toclickingdesign"Selectthe badge, click on the ‘Configure this badge’Preset" button.Please note that this badge will not be visible on the delegate's profile or the Event App.
SoSo, if you are running a virtual event, and would like to use the virtual badge, click here to learn how to configure this.
4. Designing the badgeBadge
- Customise
editorvariouspage,aspectsyousuchwillas:be- Paper
ablestocktoselectionsee configurable sections on the left-hand side of the page.Depending on the section, you’ll be able to:Select paper stock:(Eco, Sticky, AUS Eco & USEcoEco).BeFront-to-backabledesigntomirroring.- Background
whethercolour ornot you wish for the front design to be mirrored on to the back.image. Select the background colour of the badge headerUpload aLogo or header imageintoupload.- Adding badge items like profile fields, QR codes, or images.
- Adjusting size, padding, margin, and alignment.
- Adding a customisable footer.
select
- Paper
5. Back Design Configuration
- If not mirroring the
badgedesign,headerconfigure:- Rear content space.
AdjustAttributesthe(icon shape, size,padding (area around the image), Margin (Area beneath the image) and alignment of the image you've uploadedConfiguring or hiding the back headerIn the settings for this section you'll find the dropdown to show/hide the header. Input whatever text you'd like in this section along with its colour,font,sizeetc.).andEachcase.attributesYou'll also be able to set the background header's colour.Configuring the rear content spaceThis sections is a basic image upload so can contain anything you'd like. From sponsor graphics to promotional messages or guidance for your event. Please refer to the badge designer sizing guide for different image upload sizes depending on your configurationConfiguring the rear footerSimilarly to the header the rear footervisibility can behidden entirely or configuredcustomised tocontainspecificmessaging.groups.- Rear
controlfooteroversettings (text,textsize, font family,casingetc.).
If you've chosen to not to mirror your badge design on the rear you'll get 3 extra controls. These will allow you to configure and design the back of your badge independently. These controls include:Withand
6. InTemplate thisPreview
- View
you'llthealsotemplatebeperablegroup tochooseseefrom 4 different sizes of this element and whether you'd prefer a vertical or horizontal orientation of the messagevariations.
Badge Fields
The Badge fields section of the designer is where you'll be deciding what information from the users profile you would like to present on the badge, and whether or not you'd like to display the users unique QR code. Your preset badge design will, by default, will have The full name, company name and job title and QR code displaying. You have total control over all of these fields and can add to or remove any item you wish. To remove a badge field simply click on the trash can icon next to the field. Alternatively you can edit each field by clicking on the pencil icon.
Each Badge field's content can be edited to pull in any default profile field you'd like to display (not including custom fields). YouTo alsoremove havea controlbadge overfield simply click on the trash can icon next to the field. Alternatively, you can edit each field by clicking on the pencil icon.
- Customise information displayed on the badge, including name, company, job title, and QR code.
- Edit or remove fields as needed.
- Control font, size, weight, casing,
linecolour,heighttext wrapping, margins, andcolouralignment.
Using
Group Customisation
- Personalise the
same design type, you can add further customisation to the Badge Footer to personalise eachbadgeaccording to the group.So,footer forexample, if you have threedifferent groupsat your event, the(e.g., Delegates,theVolunteers,and the Press, you can configure your batch according to these groups. You can have different footer colours and/or fonts for each group.Press).Click on the pencil icon as shown below. Type the label name, for example, Press. Then on the ‘Applicable Groups’ field, select the relevant group(s) you want to associate this badge design with.
- Configure footer colours and fonts for each group.
Please note, that you must first create these groups before they can be added to the above field.
If
Saving youand havePrinting oneBadges
- After
who is a member of two groups,finalising theorderdesign,ofclickpriority"SaveofBadge". - Saved badge
they will get when they print them is from top to bottom of the list below.Once you are happy with your design, don’t forget to click ‘Save badge’Once you have saved a badge, you won’tcan beableprintedtoforseeusers. - To
optionswitchof the other badge. So, to change from one design to another, you must firstdesigns, delete the saved badgebyfirst. - Option to print
allbackgroundtheonly,badgesexcludingforuserallinformationtheandusers.QR code. (This could be useful if you want to save time during the event day by printing the badges in advance of the event.)
If you click on the ‘Print design’ you will be able
You can also opt to print the badge background only. With this option, the users’ information and the QR code will not appear on the printed badges.
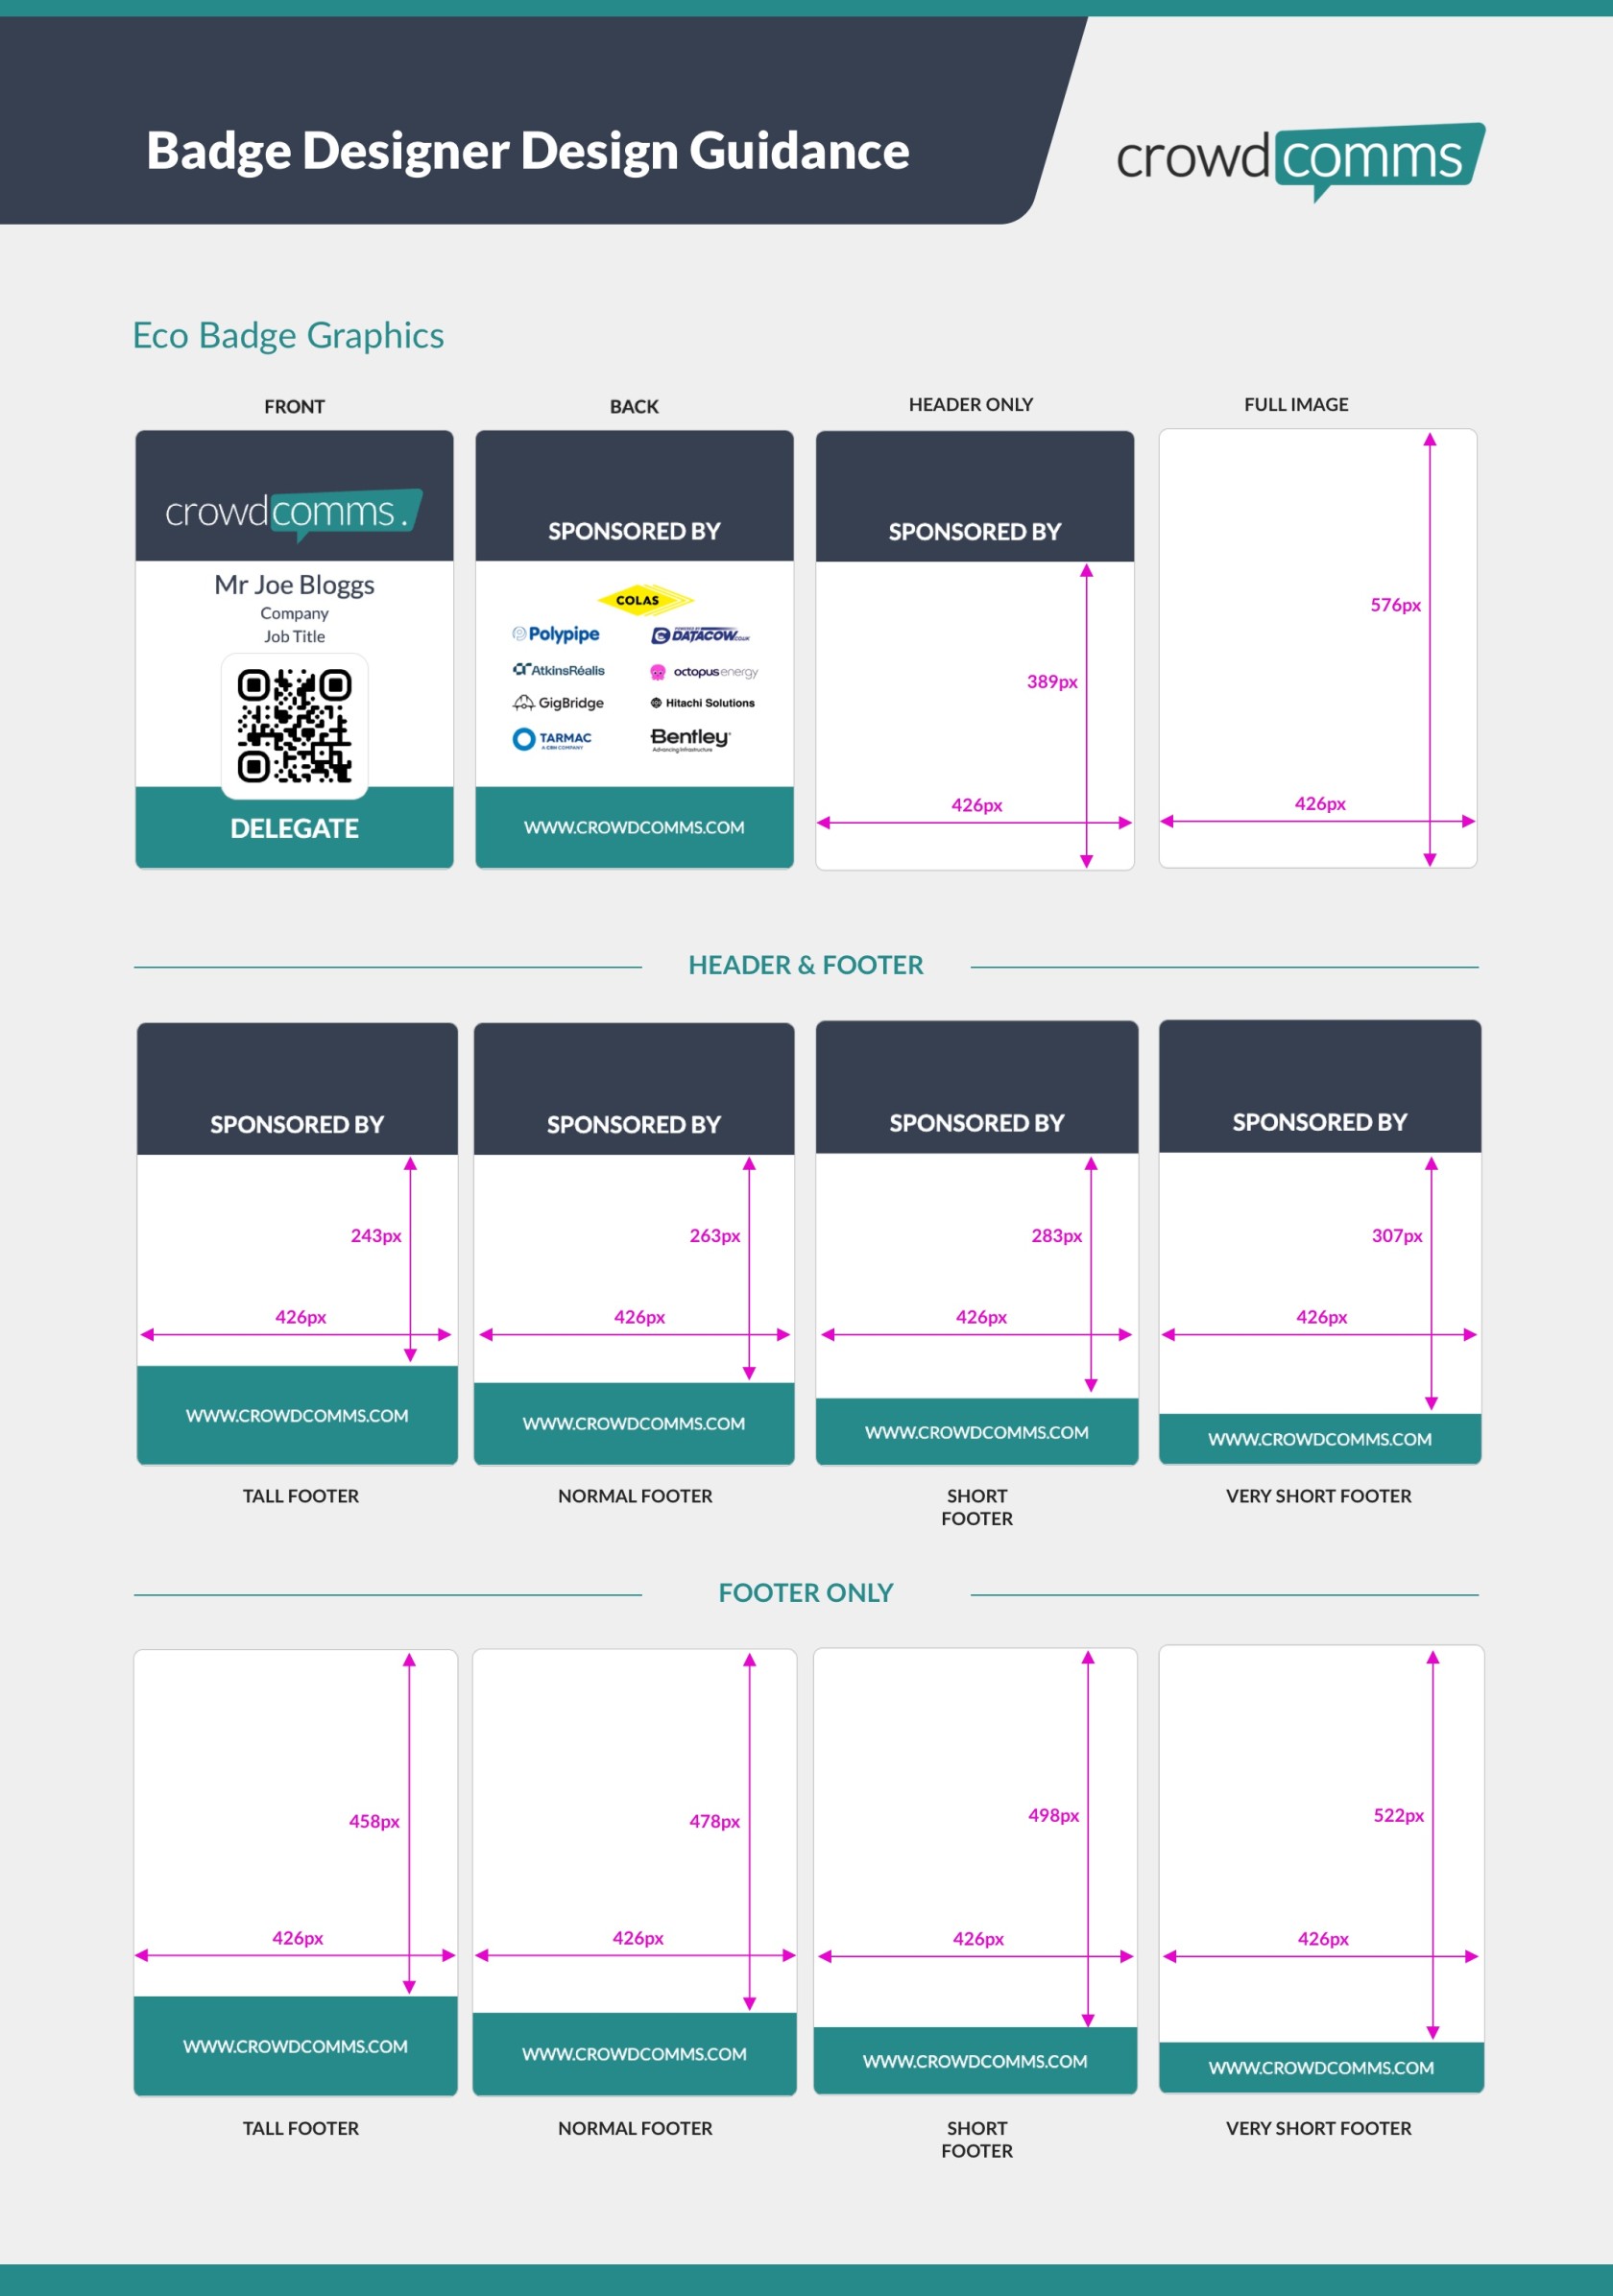
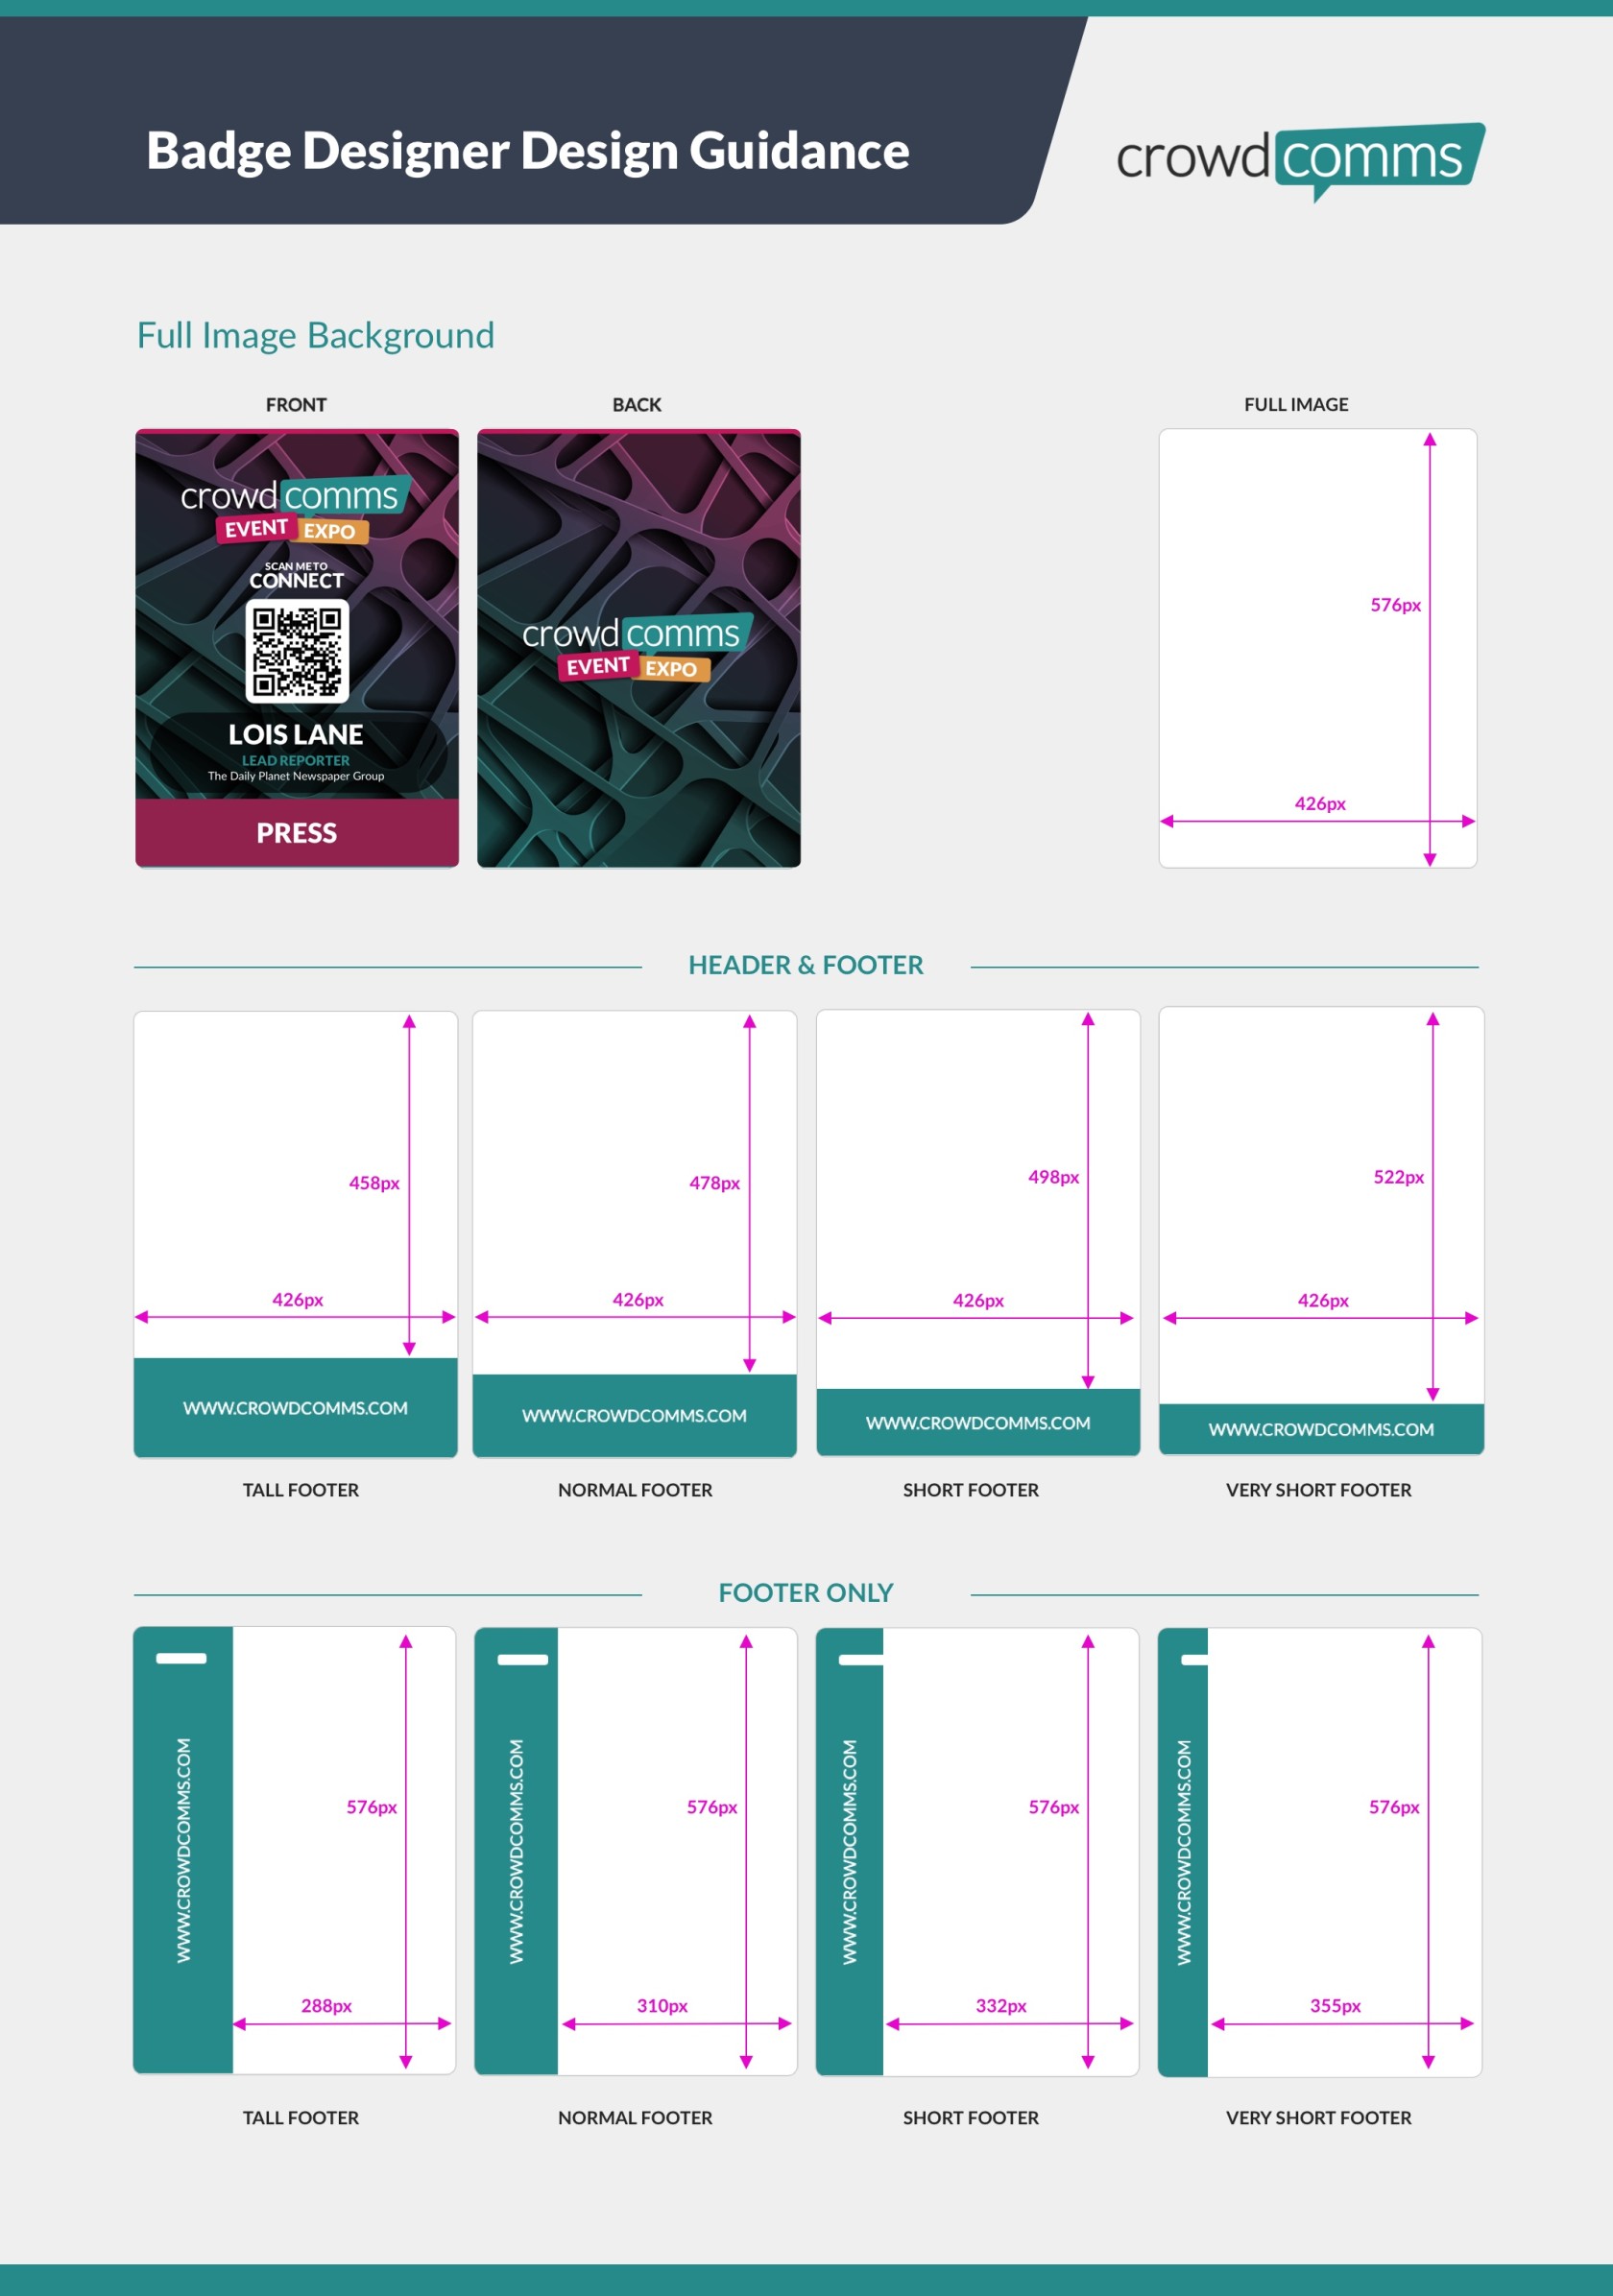
Designing images to upload onto your badges
Here's a handy cheat sheet to set up your canvases in external design application to get you images right first time


