CrowdComms - Kiosk Badge Designer

Designing YourYour BadgeBadge
1. Accessing the Badge Designer
- Log in to the CMS Dashboard.
- From the left-hand menu, go to 'Kiosks'.
- In the secondary menu, select 'Badge Designer'.
![]()
2. Choosing a Badge Design
ThreeTwobadgeBadge design templates are available:- Standard Badge (Eco Print): Ideal for eco-conscious events, with quick printing duration due to low ink consumption.
Edge-to-Edge Background:Modern design offering ample space for full image display on both front and back.CreditStandard Card Badges:FlexibleSuitable for printing on flexible plastic cardsuitablefor recurring events or premium souvenirs.
3.
Click on 'Select Template' button on the desiredchosen template you will have a range of pre-set designs toedit.choose from. All pre-sets are completely customisable to suit your needs, ensuring you can always add any extra design features you desire.
Standard Badge Pre-Sets
- Standard
SelectReara preset template by hovering over the design and clicking "Select Preset" button.Please note that this badge will not be visible on the delegate's profile or the Event App. So, if you are running a virtual event, and would like to use the virtual badge, click here to learn how to configure this.- Front Attributes
- Vertical Group
- No Group
- Background Card
- Profile Picture
- Full Background
Standard Card Pre-sets
- Standard
- Double Sided
4. Designing the Badge
CustomiseChoosevariousyouraspects such as:- Stock Size (Eco, Sticky, AUS
Eco& US Eco). Front-Then select from the drop down whether to enable front-to-back designmirroring.Mirroring.BackgroundIn the badge designer side bar customise the front of your badge with :- Header
- Can include block colour or
image.a background image and/or logo.
- Can include block colour or
LogoBackgrounds- With colour or
headeranimageimage.
upload.- With colour or
Adding badgeBadge itemslike- Profile fields, profile
fields,image, text field, QR codes, image orimages.attributes.
- Profile fields, profile
- Footers
- Can include text, block colour background or a background image/logo.
- Header
- All content can be customised under the following parameters:
-
- Adjusting
size,itempadding,spacing,margin,margins and alignment. AddingTextawrappingcustomisableorfooter.truncating.- Font style, size, casing, weight, line height and colour.
- Visibility of backgrounds, badge items, headers and footers can be assigned to specific groups
- Adjusting
-

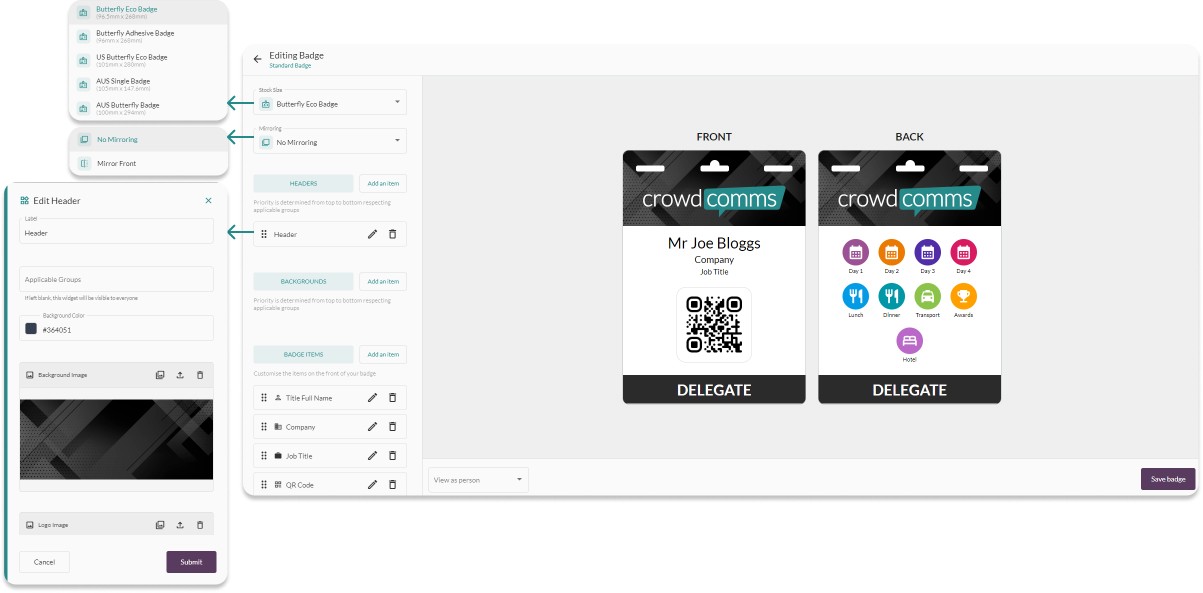
5. Back Design Configuration
- If not mirroring the
design,front design you will need to configure:RearBack Header- Back Background
- Back Badge Items
- Back Footers
- All back content
space.will Attributeshave(icontheshape,samesize,functionalityfont,asetc.).theEachfrontattributescontent,visibilitydetailedcan be customised to specific groups.Rear footer settings (text, size, font family, etc.).
- Stock Size (Eco, Sticky, AUS

6. Template Preview
ViewYou can view your design changes in real time in thetemplatepreviewperpanelgroupandtoviewseedesignsvariations.tailored for specific groups via the 'View as Person' dropdown menu in the bottom left of the preview panel.

Badge FieldsItems
Your presetpre-set badge design by default, will have The full name, company name and job title and QR code displaying. You have total control over all of these fields and can add to or remove any item you wish. Each Badge field's content can be edited to pull in any default profile field you'd like to display (not including custom fields). To remove a badge field simply click on the trash can icon next to the field. Alternatively, you can edit each field by clicking on the pencil icon.
- Customise information displayed on the
badge,badgeincludingsuchname,ascompany,ProfilejobFields,title,ProfileandPicture, Attributes, QRcode.code, Image or Text Field. - Edit or remove fields as needed.
- Control font, size, weight, casing, colour, text wrapping, margins, and alignment.

![]()
Group Customisation
- Personalise the badge
footerbackgrounds, headers, footers and attributes for different groups (e.g.,Delegates, Volunteers, Press).Click - Select
the'AddpencilItem'iconnextastoshownHeader,below.Footer or Badge Items/Attributes. - Type the label name, for example, Press. Then on the ‘Applicable
Groups’Groups’ field, select the relevant group(s) you want to associate this badge design with. - Configure
footerHeaders/Footercolourscolours, backgrounds and fonts for each group. - Attributes can be greyed out if not applicable to a group or visibility removed entirely for that group

Please note, that you must first create these groups before they can be added to the above field. For more information on creating people groups see here.
Saving and Printing Badges
- After finalising the design, click "Save
Badge"Badge". - Saved
badgebadges can be printed for users. - To switch designs, delete the saved badge first.
OptionThere is now and option to print background only, excluding user information and QR code. (This could be useful if you want to save time during the event day by printing the badges in advance of the event.)

Designing images to upload onto your badges
Here's a handy cheat sheet to set up your canvases in external design application to get you images right first time
![]()
![]()